Indulging in desserts is one of life’s greatest pleasures, and few things can compare to the rich, creamy goodness of fudge. Today, we invite you to explore a delightful twist on this classic treat with our Decadent Salted Pistachio Fudge Bars. This recipe perfectly marries the velvety texture of fudge with the nutty crunch of salted pistachios, creating an irresistible combination that promises to tantalize your taste buds.
These fudge bars are not just a dessert; they are a celebration of flavors. The creamy sweetness of the fudge is beautifully contrasted by the savory crunch of salted pistachios, resulting in a flavor profile that is both sophisticated and comforting. Whether you’re planning a gathering, celebrating a special occasion, or simply treating yourself to a sweet indulgence, these fudge bars are sure to impress anyone who takes a bite. The balance of sweetness with a hint of salt elevates this dessert to a whole new level, making it perfect for chocolate lovers and nut enthusiasts alike.
Understanding the Key Ingredients
To create the perfect Decadent Salted Pistachio Fudge Bars, it’s essential to understand the key ingredients that contribute to their luscious flavor and texture. Each element plays a crucial role in crafting this delightful dessert.
Exploring the Fudge Base
1. Semi-sweet chocolate chips: The cornerstone of any fudge recipe, semi-sweet chocolate chips provide a rich, chocolatey flavor that complements the other ingredients beautifully. They melt down into a smooth, creamy base, forming the heart of the fudge bars.
2. Sweetened condensed milk: This magical ingredient adds creaminess and sweetness to the fudge, making it wonderfully smooth and rich. The sweetened condensed milk not only enhances the flavor but also helps to bind the ingredients together, giving the fudge its signature consistency.
3. Unsalted butter: Adding unsalted butter to the mix contributes to the smoothness of the fudge base. It helps to create a creamy texture while allowing the chocolate and sweetened condensed milk to shine through without being overly greasy.
4. Vanilla extract: A splash of vanilla extract is crucial for enhancing the overall flavor profile of the fudge. Its aromatic qualities bring warmth and depth to the dessert, making every bite taste even more divine.
Discovering the Crunchy Element
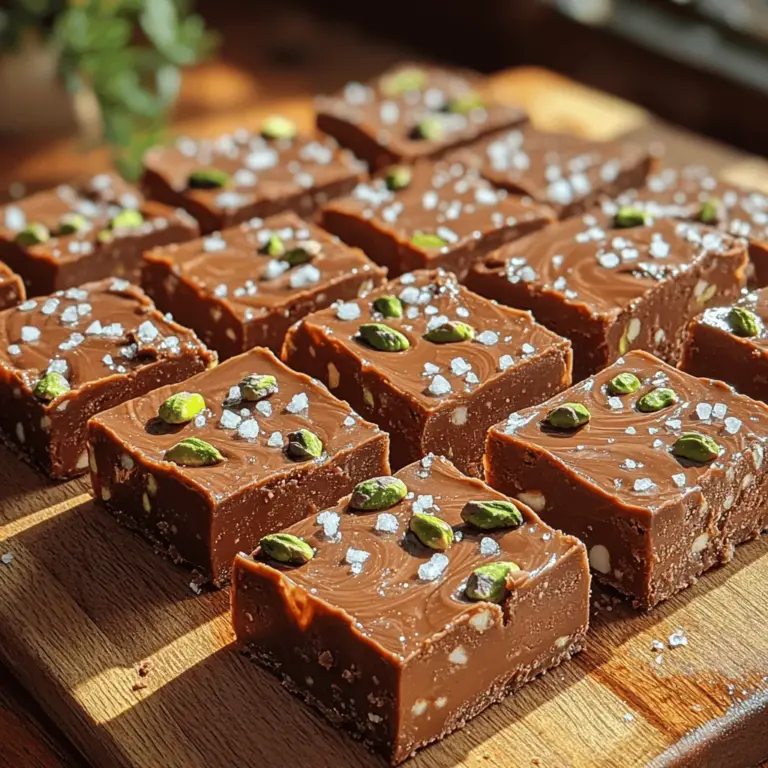
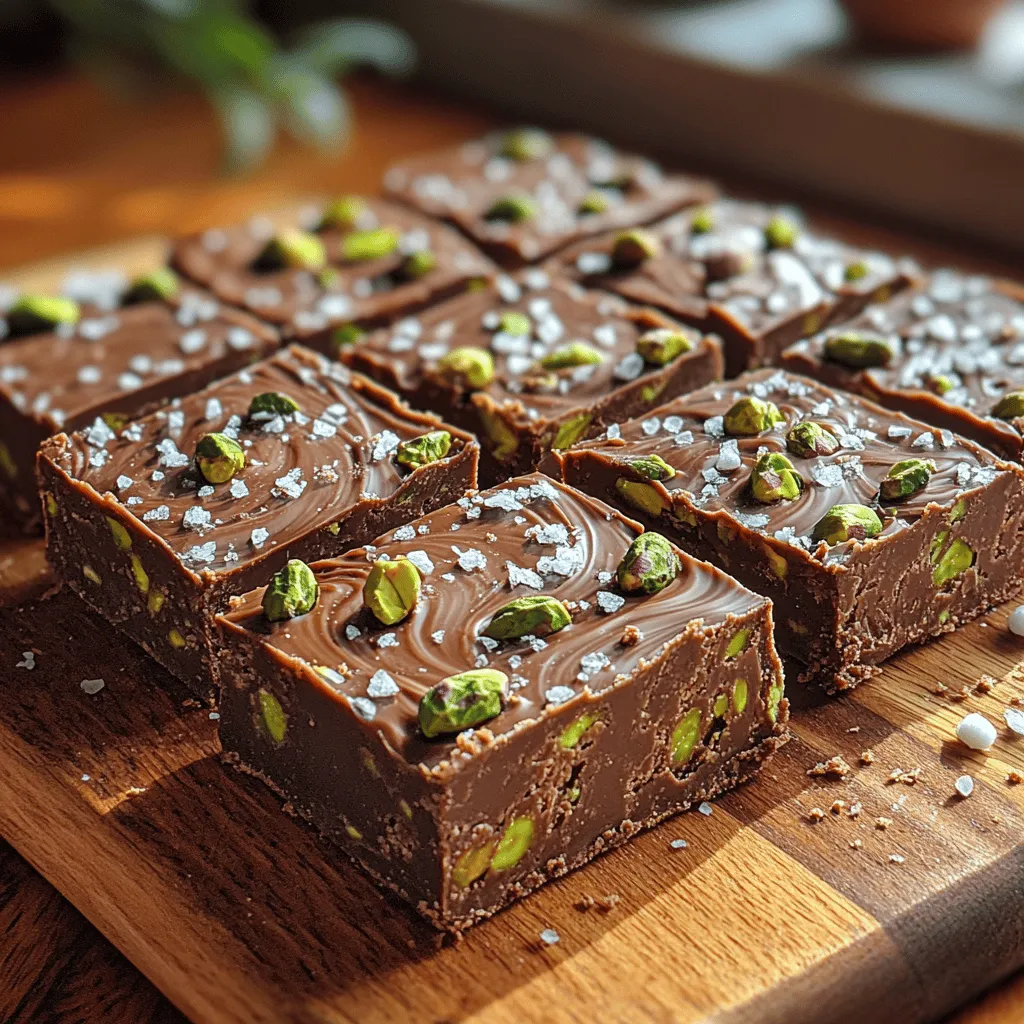
1. Shelled salted pistachios: The star ingredient of this recipe, shelled salted pistachios add a delightful crunch and a touch of saltiness that beautifully contrasts with the sweetness of the fudge. Their vibrant green color also adds visual appeal, making these fudge bars as beautiful as they are delicious.
2. Mini marshmallows (optional): While not essential, mini marshmallows can be incorporated into the fudge for an added layer of texture. They introduce a fluffy element that lightens the density of the fudge, providing a unique mouthfeel that complements the richness of the chocolate.
Preparation Steps for Success
Now that we’ve covered the key ingredients, let’s dive into the preparation steps that will help you achieve fudge bar perfection. Preparation is key to ensuring that your fudge bars turn out flawlessly, so let’s go through the process step by step.
Prepping Your Workspace
Before you start cooking, it’s essential to prep your workspace. A clean and organized kitchen will make the process smoother and more enjoyable.
– Importance of using parchment paper: One of the best tips for making fudge bars is to line your baking dish with parchment paper. This ensures that the fudge will come out easily once it has set, allowing for clean-cut edges and a beautiful presentation.
– Gathering necessary tools: For this recipe, you’ll need a few essential tools:
– A medium saucepan: This is where you’ll melt the chocolate and combine the ingredients.
– A spatula: A rubber spatula is ideal for stirring and scraping down the sides of the pan.
– A baking dish: A square or rectangular baking dish works best for setting the fudge.
Melting the Fudge Base
Melting the fudge base is a critical step that requires some attention to detail to avoid mishaps.
– Techniques for melting chocolate: When melting chocolate, there are a few techniques you can use to ensure that it melts smoothly without burning. One of the most effective methods is using a double boiler, where you place a heatproof bowl over a pot of simmering water, allowing the steam to gently melt the chocolate. If you don’t have a double boiler, you can melt the chocolate chips directly in the saucepan over low heat, but be sure to stir continuously to prevent scorching.
– Importance of continuous stirring: Stirring the chocolate consistently as it melts is vital. This helps to incorporate the heat evenly and prevents the chocolate from seizing or burning. Once the chocolate is mostly melted, remove it from the heat and continue stirring until fully melted and smooth.
Infusing Flavor and Texture
Once your fudge base is melted and smooth, it’s time to infuse flavor and texture.
– Adding vanilla extract: After the chocolate has melted, it’s the perfect time to add the vanilla extract. This enhances the flavor of the fudge and ensures that its aromatic qualities are evenly distributed. Stir the vanilla into the melted chocolate until well combined.
– Incorporating mini marshmallows: If you choose to use mini marshmallows, this is the moment to fold them into the melted base. The marshmallows will begin to soften and blend into the mixture, contributing to the overall texture of the fudge. Stir gently to incorporate them without overmixing, as you want to keep their fluffy texture intact.
Folding in the Pistachios
The final step before pouring the fudge into your prepared baking dish is to fold in the pistachios.
– Best practices for gentle folding: Gently fold the shelled salted pistachios into the fudge mixture using a spatula. The goal is to evenly distribute the nuts throughout the fudge without breaking them down too much. Overmixing can lead to a gritty texture, so use a careful folding motion until the pistachios are just incorporated.
With these initial steps, you are well on your way to creating your Decadent Salted Pistachio Fudge Bars. Keep in mind that patience and attention to detail in the preparation process will ensure a delightful dessert that everyone will rave about. As you continue with the recipe, you’ll find that the combination of flavors and textures is both satisfying and undeniably delicious. Enjoy the journey of crafting this delectable treat!
Distribution Tips: Ensuring an Even Mix for Balanced Flavor in Every Bite
The key to achieving the perfect bite of your Decadent Salted Pistachio Fudge Bars lies in the even distribution of ingredients. After preparing your fudge mixture, gently fold in the chopped pistachios until they are evenly dispersed throughout the chocolate base. This ensures that every piece you cut will have a balanced flavor profile, with the rich chocolate and the nutty crunch of pistachios harmoniously blending in every bite.
To achieve this, use a rubber spatula or wooden spoon to mix the ingredients. Be careful not to overmix, as you want to maintain the integrity of the pistachios and avoid breaking them down too much. The goal is to create a visually appealing mix that balances the deep chocolate with the bright green of the pistachios, making each piece not only delicious but also eye-catching.
Finishing Touches for an Irresistible Dessert
Creating the Perfect Texture
Packing the fudge mixture is a crucial step that will determine how well your bars hold together once they are set. To ensure that your fudge has the right consistency and can be easily cut into bars, follow these techniques:
1. Use an Offset Spatula: Once you’ve poured the fudge mixture into your prepared pan lined with parchment paper, use an offset spatula to spread it evenly across the surface. This tool allows you to press down gently, ensuring that the mixture is compacted without being overly compressed.
2. Press Firmly but Gently: Use your hands or the flat side of a measuring cup to press the mixture down firmly. The goal is to create a solid base that will hold its shape once chilled. If the mixture is too loose, it may crumble when you try to cut it.
3. Add Sea Salt: A sprinkle of flaky sea salt on top of your fudge mixture before chilling elevates the overall flavor profile. The salt enhances the sweetness of the chocolate and the earthiness of the pistachios, creating a beautiful contrast that makes each bite more satisfying.
Chilling for Perfection
Chilling your fudge bars is essential for achieving the right texture. Proper refrigeration allows the fudge to set, making it easier to cut into neat squares without falling apart.
– Importance of Refrigeration: When the fudge is chilled, the fats in the chocolate and the moisture in the mixture solidify, resulting in a creamy yet firm texture. This step ensures that the bars have a melt-in-your-mouth quality while also maintaining their shape.
– Recommended Chilling Time: Ideally, you should refrigerate the fudge for at least 2-3 hours, or until it is firm to the touch. For best results, consider letting it chill overnight. This allows the flavors to meld and deepen, resulting in a more flavorful fudge.
Cutting and Serving Your Fudge Bars
Lifting and Slicing with Ease
Once your fudge has set, it’s time to cut and serve. The use of parchment paper is vital in this step:
– Utilizing Parchment Paper for Removal: Lining your pan with parchment paper not only prevents sticking but also allows for easy removal of the entire slab of fudge. Once it’s set, simply lift the fudge out by the edges of the parchment paper. This technique minimizes the risk of breakage and makes for a clean, professional-looking presentation.
– Ideal Cutting Techniques: To achieve clean edges, use a sharp knife that has been warmed under hot water (then dried). This allows the blade to glide through the fudge rather than tearing it apart. Make sure to wipe the knife with a paper towel after each cut to maintain clean edges, ensuring your bars look as good as they taste.
Serving Suggestions
The way you serve your Decadent Salted Pistachio Fudge Bars can enhance the overall experience. Here are some considerations to keep in mind:
– Temperature Considerations: These fudge bars can be enjoyed both chilled and at room temperature. If serving them chilled, they will have a firmer texture, while room temperature will result in a softer, more decadent mouthfeel. Consider your guests’ preferences when deciding on the serving temperature.
– Pairing Ideas: To enhance the indulgence of your fudge bars, consider pairing them with a selection of beverages. A rich cup of coffee or a creamy hot chocolate complements the chocolatey richness beautifully. Alternatively, serve them with a scoop of vanilla ice cream for a delightful contrast in temperature and texture. For a refreshing twist, a glass of almond milk or a fruity herbal tea can also be great options.
Nutritional Insights and Considerations
Caloric Breakdown of Fudge Bars
While these fudge bars are undeniably indulgent, understanding their caloric content can help you enjoy them in moderation. A rough estimate for a standard serving (1 bar) calculates to around 200-250 calories, depending on the specific ingredients used and portion size.
The ingredients contribute to this caloric total as follows:
– Dark Chocolate: Rich in calories due to its fat content, but also provides antioxidants.
– Pistachios: Adding healthy fats and protein, they contribute a moderate amount of calories as well.
– Sweeteners: Depending on your choice of sweetener, this can vary significantly; natural sweeteners may have lower caloric values compared to refined sugars.
Understanding this balance can help you enjoy these bars as a treat rather than an everyday snack.
Pistachios: A Nutritional Powerhouse
Pistachios are not just a tasty addition; they also bring numerous health benefits to the table:
– Healthy Fats: Pistachios are a source of monounsaturated fats, which are beneficial for heart health. Including nuts like pistachios in your diet can help lower bad cholesterol levels and reduce the risk of heart disease.
– Protein and Fiber: These nuts are relatively high in protein compared to other nuts and provide dietary fiber, which aids digestion and promotes satiety.
– Antioxidants: Pistachios are rich in antioxidants, which help combat oxidative stress in the body. Their vibrant green color is a testament to their rich antioxidant content.
Considerations for dietary restrictions include that these bars are naturally gluten-free, making them suitable for those with gluten sensitivities. However, due to the presence of nuts, individuals with nut allergies should avoid this recipe.
Conclusion
In conclusion, these Decadent Salted Pistachio Fudge Bars offer a harmonious blend of rich chocolate and crunchy nuts, creating an unforgettable dessert experience. The straightforward preparation process makes it accessible for bakers of all levels, while the combination of flavors and textures ensures they will be a hit at any gathering. By incorporating high-quality ingredients and following the outlined steps, you’ll be able to create a dessert that not only satisfies your sweet tooth but also impresses family and friends alike. Enjoy every delightful bite of this luxurious treat!
