Introduction
In recent years, the no-bake dessert trend has taken the culinary world by storm, captivating dessert enthusiasts with its simplicity and convenience. No-bake recipes eliminate the need for an oven, making them accessible to bakers of all skill levels. Among these delightful creations, the No-Bake Kit Kat Cheesecake stands out for its unique combination of flavors and textures, offering a sweet treat that is both indulgent and satisfying.
Imagine a dessert that marries the rich creaminess of cheesecake with the crunchy, chocolatey goodness of Kit Kat bars. This no-bake cheesecake is a perfect blend of textures, featuring a smooth filling and a crust that delivers a delightful crunch. The appeal of this dessert goes beyond its taste; it also lies in its stunning presentation and the ease with which it can be prepared. Whether you are hosting a gathering, celebrating a special occasion, or simply indulging in a sweet craving, these cheesecakes are sure to impress.
One of the greatest advantages of no-bake recipes is their flexibility. Unlike traditional baked goods, which often require precise timing and temperature control, no-bake desserts offer a forgiving approach that allows for creativity and experimentation. This is particularly true for the Kit Kat Cheesecake, where you can easily adjust the ingredients to suit your personal preferences or dietary needs.
With delicious layers of cream cheese and crushed Kit Kat bars, this dessert not only pleases the palate but also provides a visual feast. The combination of chocolate and creamy textures makes each bite an experience to savor. Whether you’re a seasoned baker or a novice, this no-bake cheesecake is designed for everyone to enjoy.
Understanding the Ingredients
To create the perfect No-Bake Kit Kat Cheesecakes, it’s essential to understand the role of each ingredient in the recipe. Below is a detailed breakdown of the ingredients that contribute to the flavor, texture, and overall appeal of this delightful dessert.
Crushed Kit Kat Bars
At the heart of this recipe are the crushed Kit Kat bars, which provide a rich chocolate flavor and a satisfying crunch. These iconic candy bars are made of layers of crunchy wafers coated in smooth milk chocolate, making them an excellent addition to the cheesecake filling and crust. The chocolatey goodness of Kit Kat bars enhances the overall flavor profile of the dessert, while their texture provides a delightful contrast to the creamy cheesecake.
Graham Cracker Crumbs
Graham cracker crumbs serve as the foundation for the cheesecake crust. Their slightly sweet and nutty flavor complements the richness of the filling, creating a well-rounded taste. The crumbs provide the necessary structure and crunch, ensuring the crust holds together well. When mixed with butter, graham cracker crumbs create a firm base that contrasts beautifully with the creamy cheesecake layer.
Unsalted Butter
Unsalted butter plays a crucial role in binding the crust together. It adds richness and helps to create a moist and cohesive texture. By using unsalted butter, you can control the overall saltiness of the dessert, allowing the sweet flavors to shine through. The combination of melted butter with the graham cracker crumbs creates a mixture that can be easily pressed into jars or a springform pan, forming a sturdy base for the cheesecake.
Cream Cheese
Cream cheese is the star ingredient of the cheesecake filling, providing its signature creamy texture. The richness of cream cheese creates a luxurious mouthfeel, making each bite of the cheesecake incredibly satisfying. It also serves as a neutral canvas, allowing the flavors of other ingredients, such as the Kit Kat bars and vanilla extract, to shine. For the best results, choose full-fat cream cheese to achieve a thick and creamy consistency.
Powdered Sugar
Powdered sugar, also known as confectioners’ sugar, is used to sweeten the cheesecake filling without adding graininess. Its fine texture blends seamlessly with the cream cheese, ensuring a smooth and creamy filling. Adjusting the amount of powdered sugar allows you to control the sweetness of the cheesecake, catering to your taste preferences.
Vanilla Extract
Vanilla extract enhances the overall flavor of the cheesecake filling, adding aromatic notes that complement the chocolate and creaminess. A high-quality pure vanilla extract will contribute a depth of flavor that elevates the dessert. It serves as a subtle yet essential ingredient, providing balance and richness to the cheesecake.
Heavy Whipping Cream
Heavy whipping cream is key to achieving a light and airy texture in the cheesecake filling. When whipped, it incorporates air into the mixture, creating a fluffy and rich consistency. The addition of whipped cream adds volume and a luscious mouthfeel, making each bite of the cheesecake decadent. It’s important to whip the cream to the right consistency, ensuring it holds its shape when folded into the cream cheese mixture.
Chocolate Sauce
A drizzle of chocolate sauce not only enhances the flavor of the No-Bake Kit Kat Cheesecake but also adds an appealing visual element. The rich chocolate sauce can be drizzled on top of the cheesecakes just before serving, providing a beautiful contrast to the creamy filling and crunch of the Kit Kat bars. It can also be used as a garnish for an extra touch of indulgence.
Mini Kit Kat Bars
Finally, mini Kit Kat bars serve as both a decorative touch and a delightful textural garnish. These bite-sized pieces can be scattered on top of the cheesecakes, adding extra crunch and a pop of color. They also reinforce the Kit Kat theme of the dessert, making it visually appealing and inviting.
Step-by-Step Breakdown of the Recipe
Now that we’ve explored the ingredients, let’s dive into the step-by-step process of making these delicious No-Bake Kit Kat Cheesecakes.
Preparing the Base
The first step in creating your No-Bake Kit Kat Cheesecakes is preparing the base. This involves combining the crushed Kit Kat bars with graham cracker crumbs and melted butter to form a sturdy crust.
1. Crush the Kit Kat Bars: Start by placing the Kit Kat bars in a resealable plastic bag and using a rolling pin or mallet to crush them into small pieces. Aim for a mix of fine crumbs and larger chunks for added texture.
2. Combine Ingredients: In a mixing bowl, combine the crushed Kit Kat bars with graham cracker crumbs. You will need about two cups of graham cracker crumbs for every cup of crushed Kit Kat bars to create the perfect balance of flavor and texture.
3. Add Melted Butter: Melt the unsalted butter in a small saucepan or microwave, then pour it into the mixture. The melted butter helps to bind the crust together, giving it a rich flavor.
4. Mix Thoroughly: Using a spatula or wooden spoon, mix the crumbs and melted butter until all the crumbs are evenly coated. The mixture should resemble wet sand and hold together when pressed.
Forming the Crust
Once the base is prepared, it’s time to form the crust. The goal is to create a firm and even layer that will support the cheesecake filling.
1. Choose Your Containers: You can use individual jars, small cups, or a springform pan for this recipe. If you’re using jars, consider 4 to 6-ounce glass jars for a single-serving size that is perfect for parties or gatherings.
2. Press the Mixture: Scoop the crust mixture into the bottom of your chosen container. Use the back of a spoon or your fingers to firmly press the mixture down, ensuring an even layer. The crust should be about half an inch thick.
3. Chill for Structural Integrity: After pressing the crust into the containers, place them in the refrigerator for about 15-20 minutes. Chilling allows the butter to set, helping the crust hold its shape when you add the cheesecake filling.
Making the Cheesecake Filling
Now that your crust is ready, it’s time to create the luscious cheesecake filling that will be the highlight of your No-Bake Kit Kat Cheesecakes.
1. Prepare Your Mixing Bowl: In a large mixing bowl, beat the cream cheese until smooth and creamy using an electric mixer. Make sure the cream cheese is at room temperature to prevent lumps in the filling.
2. Add Powdered Sugar and Vanilla: Gradually add the powdered sugar and vanilla extract to the cream cheese, mixing on low speed until fully incorporated. Taste the mixture and adjust the sweetness if desired.
3. Whip the Heavy Cream: In a separate bowl, whip the heavy whipping cream until stiff peaks form. This process is crucial for adding lightness to the filling. Be careful not to over-whip, as this can lead to a grainy texture.
4. Fold in the Whipped Cream: Gently fold the whipped cream into the cream cheese mixture. Start with a small amount of whipped cream to lighten the mixture, then gradually fold in the remaining whipped cream. Use a spatula and a gentle folding motion to maintain the airy texture.
5. Incorporate Crushed Kit Kat: Finally, fold in any remaining crushed Kit Kat bars to add texture and flavor to the filling. Be careful not to over-mix, as you want to keep the filling light and fluffy.
With your cheesecake filling prepared, you’re ready to assemble your No-Bake Kit Kat Cheesecakes. The combination of the crunchy crust and creamy filling will create a dessert that is sure to delight your taste buds and impress your guests.
Stay tuned for the next part of the article, where we will explore the assembly process, tips for decoration, and additional serving suggestions for this delectable dessert.
{{image_1}}
Achieving the Perfect Creamy Consistency with Cream Cheese
To create a luscious no-bake cheesecake, the foundation lies in the quality of your cream cheese. Always use full-fat cream cheese for the best texture and flavor. Start by allowing the cream cheese to come to room temperature, as this will make it softer and easier to blend. A smooth and creamy consistency is essential; if the cream cheese is too cold, it can lead to lumps in your cheesecake filling.
Steps for Incorporating Powdered Sugar and Vanilla for Flavor Enhancement
Once your cream cheese is soft enough, it’s time to enhance the flavor. Gradually add powdered sugar, about half a cup at a time. This method allows you to control the sweetness and ensures that it blends evenly without clumping. After incorporating the powdered sugar, add a teaspoon of pure vanilla extract. The vanilla not only adds a delightful flavor but also enhances the overall taste profile of your cheesecake. Mix well until the mixture is smooth and free of lumps.
Whipping the Cream
Next, we move on to whipping the heavy cream. This step is critical for achieving a light and airy texture in your cheesecake. Pour one cup of heavy whipping cream into a mixing bowl and start whipping on medium speed. As the cream begins to thicken, increase the speed to high and whip until you reach stiff peaks. Stiff peaks are essential; they should stand straight up when you lift the whisk or beaters from the cream. This airy texture will lift your cheesecake filling, making it fluffy and delightful.
Importance of Stiff Peaks in Achieving a Light and Airy Cheesecake
Stiff peaks are not just a decorative feature; they play a crucial role in the overall structure of your no-bake cheesecake. When the whipped cream is incorporated into the cream cheese mixture, it adds volume and lightness to the dessert. If you under-whip the cream, the cheesecake can become dense and heavy, while over-whipping can cause the cream to turn grainy. Thus, achieving the perfect stiff peak is fundamental for that creamy, airy cheesecake experience.
Techniques for Folding Whipped Cream into the Cream Cheese Mixture
Once your whipped cream is ready, it’s time to combine it with the cream cheese mixture. This step requires a gentle hand to maintain the airy texture. Use a spatula to fold the whipped cream into the cream cheese mixture. Start by adding a small amount of whipped cream to lighten the mixture, then gradually fold in the rest. Use a gentle, sweeping motion; this method incorporates air without deflating the whipped cream. The goal is to maintain as much volume as possible while ensuring the mixture is homogeneous.
Adding Crunch
The star of the show in our Crunchy Delight is, of course, the Kit Kat bars. To incorporate the crunch, chop the Kit Kat bars into small pieces; this ensures they distribute evenly throughout the cheesecake filling. The crunchiness of the bars complements the creaminess of the cheesecake, creating a delightful textural contrast. Aim for about 1 to 1.5 cups of chopped Kit Kat, depending on how much chocolate goodness you want in every bite.
Ensuring Even Distribution of Kit Kat Bars in the Filling
When adding the chopped Kit Kat bars to the cheesecake mixture, fold them in gently, ensuring an even distribution throughout the batter. This step is crucial as it allows every slice of cheesecake to have that satisfying crunch. Avoid over-mixing, as this could break the chocolate into smaller pieces and diminish the delightful texture.
Assembling the Layers
With the filling ready, it’s time to assemble the cheesecake. Start with your pre-prepared crust, which should be firm and set. Carefully pour the cheesecake filling over the crust, using a spatula to spread it evenly. To achieve a clean layer, pour the filling in the center and gently push it towards the edges. This technique prevents the crust from mixing with the filling and ensures a beautiful layered appearance.
Best Practices for Layering to Avoid Mixing Crust and Filling
When layering, it’s vital to work slowly and methodically. If you pour the filling in too quickly, it might disrupt the crust. To further prevent mixing, you can place a piece of parchment paper around the edges of the crust before adding the filling. This will help create a barrier, keeping the layers distinct as the cheesecake sets.
Chilling the Cheesecake
Once assembled, the cheesecake needs to chill. Proper chilling time is essential for flavor enhancement and texture setting. Cover the cheesecake with plastic wrap and place it in the refrigerator for at least 4 hours, though overnight is preferable. This allows the flavors to meld beautifully and the cheesecake to firm up, making it easier to slice and serve.
Importance of Chilling Time for Flavor Enhancement and Texture Setting
Chilling not only helps with texture but also allows the flavors to develop. The sweet creaminess of the cheesecake, combined with the chocolatey crunch of the Kit Kats, deepens as they sit together. This waiting period is crucial; don’t be tempted to skip it, as it could lead to a runny cheesecake that doesn’t hold its shape.
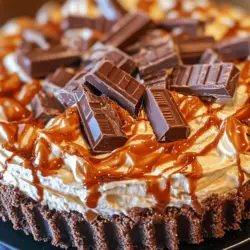
Garnishing and Serving
After the cheesecake has set, it’s time to add the finishing touches. Drizzle melted chocolate sauce over the top to create an enticing look. For an added touch of decadence, place mini Kit Kat bars around the edges or on top of the cheesecake. This not only enhances the presentation but also invites your guests to dig in.
Techniques for Drizzling Chocolate Sauce and Placing Mini Kit Kat Bars for Presentation
To drizzle the chocolate sauce, use a squeeze bottle or a spoon to create artistic patterns. For a polished look, try to alternate the drizzles with white chocolate sauce if you want a contrasting color. When placing the mini Kit Kat bars, consider varying the heights or angles for an eye-catching presentation. A well-garnished cheesecake is not just a treat for the taste buds but also a feast for the eyes.
Exploring Variations of the No-Bake Cheesecake
If you’re feeling adventurous, there are endless possibilities for variations of this no-bake cheesecake. Consider replacing Kit Kat bars with other chocolate bars, like Reese’s Peanut Butter Cups for a nutty twist or Snickers for added caramel flavor. You can also experiment with flavored cheesecake fillings by adding different extracts such as almond or orange for a unique taste.
Suggestions for Alternative Ingredients and Flavors
You can substitute the heavy cream with coconut cream for a dairy-free version, or use gluten-free cookies for the crust if you have dietary restrictions. For a fruity twist, try adding pureed strawberries or blueberries to the cream cheese mixture before folding in the whipped cream. This not only infuses flavor but also adds a beautiful color to your cheesecake.
Using Different Chocolate Bars or Candy for Unique Twists
Feel free to mix and match your favorite candy bars. For instance, adding M&M’s or crushed Oreos can create a fun, colorful cheesecake. If you want to keep it classic yet interesting, consider adding a swirl of chocolate or caramel sauce right into the batter before setting it. This creates tasty ribbons throughout the cheesecake that make for a delightful surprise in every bite.
Ideas for Fruit Toppings or Flavored Cheesecake Fillings
Besides candy bars, fresh fruits can elevate your cheesecake. Top your cheesecake with sliced strawberries, raspberries, or a berry compote for a refreshing contrast to the creamy filling. You can also create a flavored cheesecake filling by incorporating lemon juice and zest for a citrusy kick or matcha powder for a unique green tea flavor. The options are as varied as your imagination!
Adapting the Recipe for Dietary Restrictions (Gluten-Free Options, Dairy-Free Alternatives)
For those with gluten sensitivities, simply swap traditional graham crackers for gluten-free varieties. Additionally, dairy-free cream cheese and whipped cream alternatives are widely available, allowing you to create a delicious dessert for everyone to enjoy. This adaptability makes no-bake cheesecakes a versatile option for gatherings.
The Appeal of No-Bake Desserts
No-bake desserts have surged in popularity for good reason. They provide a quick and easy way to satisfy your sweet tooth without the need for complicated baking techniques or long preparation times. This is especially appealing for those with busy lifestyles, as they can be made ahead of time and stored in the refrigerator until needed.
Discussion on the Popularity of No-Bake Desserts in Modern Cooking
The modern kitchen often emphasizes convenience, and no-bake desserts fit perfectly into this trend. They allow home cooks of all skill levels to create impressive desserts with minimal effort. Moreover, no-bake cheesecakes can be customized easily to suit various tastes and dietary needs, making them a staple for many households.
Benefits of No-Bake Recipes for Busy Lifestyles
In a fast-paced world, no-bake recipes provide a solution for quick desserts. They eliminate the need for preheating the oven and monitoring baking times, allowing you to focus on other tasks. You can whip up a no-bake cheesecake in under 30 minutes, and with a little patience in the chilling process, you’ll have a stunning dessert ready to impress your family and friends.
The Versatility of No-Bake Cheesecake Recipes for Various Occasions (Parties, Holidays, Casual Gatherings)
No-bake cheesecakes are perfect for any occasion, from birthday parties to holiday gatherings. Their adaptability allows you to tailor flavors and toppings to suit your event theme. Whether you’re hosting a casual get-together or a festive celebration, a no-bake cheesecake can easily become the centerpiece of your dessert table.
Conclusion
Creating a No-Bake Kit Kat Cheesecake is not just about following a recipe; it’s about indulging in a delightful culinary experience. With its creamy filling, crunchy Kit Kat bits, and the ease of preparation, this dessert is sure to become a favorite in your home. The joy of sharing such a delicious treat with family and friends enhances the experience, making every slice a reason to celebrate.
We encourage you to try this recipe and let your creativity flow. Explore different flavors and toppings to make this cheesecake uniquely yours. Embrace the joy of dessert-making and the happiness it brings when shared with loved ones. After all, there’s nothing quite like the satisfaction of enjoying a homemade treat that delights both the eyes and the palate.