
Introduction
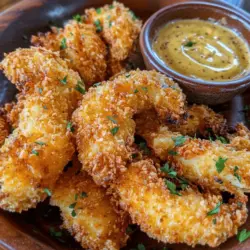
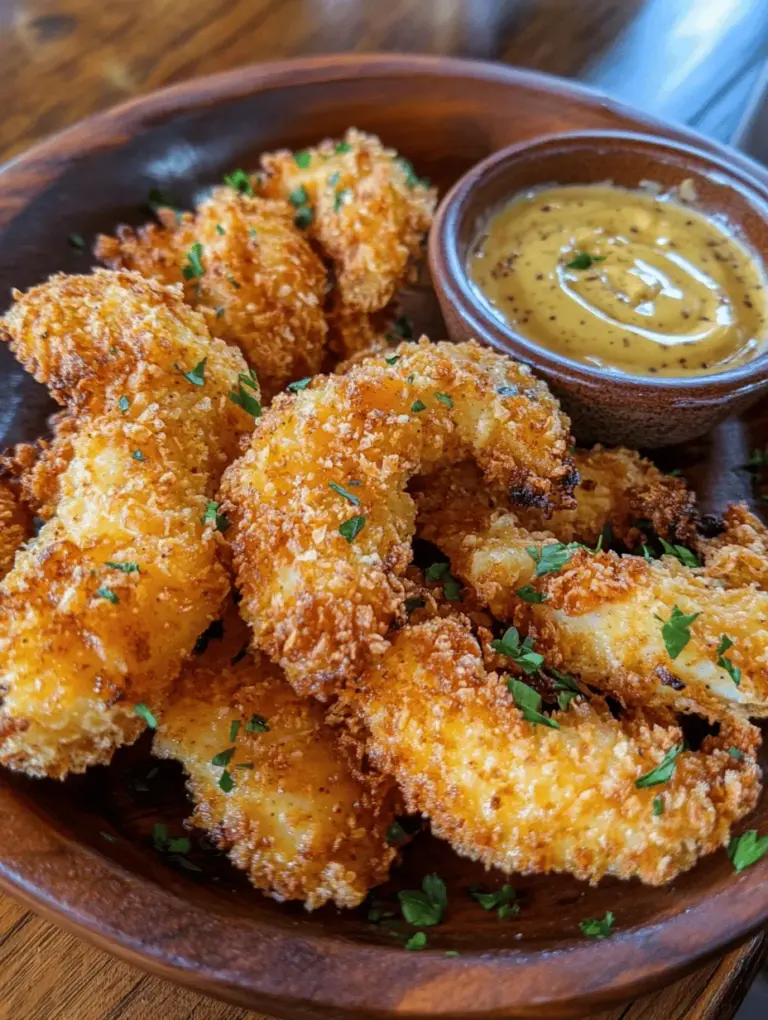
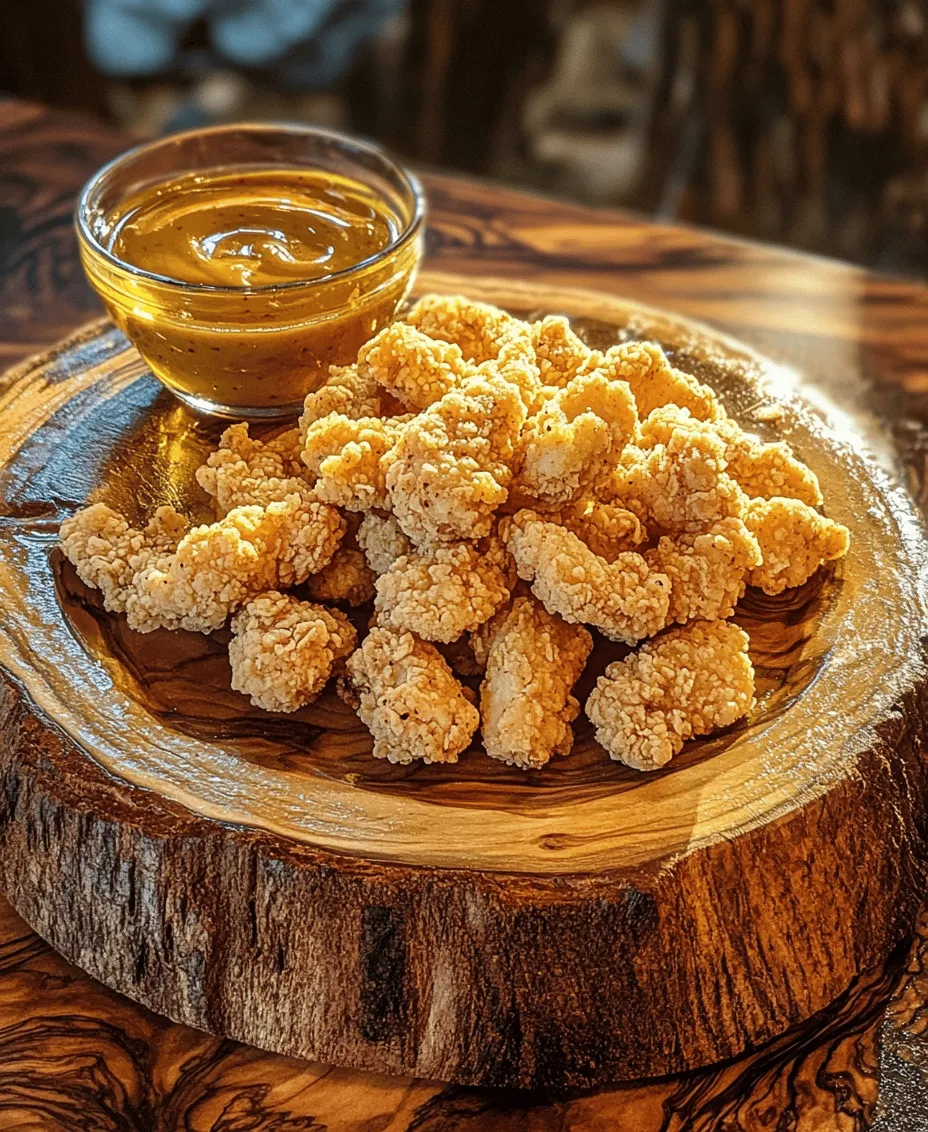
Crispy Chicken Tenders with Honey Mustard Dip is a beloved dish that brings together the comforting crunch of perfectly fried chicken and the sweet, tangy flavor of a homemade dipping sauce. This dish has a special place in the hearts of families everywhere, often gracing dinner tables and party platters alike. The allure of homemade comfort food cannot be overstated; it’s a way to gather loved ones and create lasting memories around a shared meal.
Chicken tenders have an undeniable appeal that transcends age groups. Children love their mild flavor and finger-food nature, while adults appreciate their versatility and the ability to customize them to suit various palates. Whether served as a main course, appetizer, or snack, these tenders can be adapted to fit any occasion, making them a staple in many households.
The honey mustard dip perfectly complements the crispy tenders, adding a delightful layer of flavor that enhances the overall experience. This simple yet versatile sauce is easy to whip up and can be adjusted to taste, balancing sweetness and tanginess to suit your preference. Together, crispy chicken tenders and honey mustard dip create a dish that is not only delicious but also a hit with family and friends.
Understanding the Appeal of Chicken Tenders
Chicken tenders are a culinary delight that has gained immense popularity across various cuisines. From fast-food chains to gourmet restaurants, these tender morsels are enjoyed in countless forms. The appeal of chicken tenders lies in their simplicity and the ability to transform a basic ingredient—chicken breast—into a flavorful dish that can be served in numerous ways.
Nutritionally, chicken breast is an excellent source of protein, making it a healthy choice for a satisfying meal. It is low in fat, especially when skinless, and provides essential nutrients such as B vitamins and minerals. This makes chicken tenders not only a delicious option but also a wholesome one that can fit well into a balanced diet.
Fun facts about chicken tenders reveal their place in popular culture. For instance, did you know that chicken tenders are often referred to as “chicken fingers” or “chicken strips” depending on the region? Their popularity has led to the creation of various dipping sauces, with honey mustard being one of the most cherished. In fact, they have even made appearances in films and television, becoming synonymous with comfort food and childhood nostalgia.
Ingredients Breakdown
To create the best Crispy Chicken Tenders with Honey Mustard Dip, it’s essential to understand the role of each ingredient. Here’s a detailed breakdown:
For the Chicken Tenders:
1. Chicken Breast: The star of the dish, chicken breast is lean, tender, and perfect for frying. When cut into strips, it cooks quickly and retains moisture, resulting in juicy tenders.
2. Flour: All-purpose flour is used for dredging the chicken, creating a base layer that helps the egg wash adhere and forms a crispy crust when fried.
3. Eggs: Beaten eggs act as a binder, ensuring that the breadcrumbs stick to the chicken. They also contribute to the tenderness of the finished product.
4. Panko Breadcrumbs: These Japanese-style breadcrumbs are coarser and lighter than traditional breadcrumbs, offering a superior crunch. They create a delightful texture that elevates the chicken tenders.
5. Seasonings: Salt, pepper, garlic powder, and onion powder are essential for enhancing the flavor of the chicken. Seasoning the flour and breadcrumbs is crucial for achieving a well-rounded taste.
For the Honey Mustard Dip:
1. Honey: The sweet component of the dip, honey adds richness and balances the tanginess of mustard. It can be adjusted based on your preference for sweetness.
2. Mustard: A combination of Dijon mustard and yellow mustard provides a flavor profile that is both tangy and sharp. This blend creates a depth of flavor that pairs wonderfully with the tenders.
3. Mayonnaise: Adding a creamy element, mayonnaise helps to smooth out the dip and adds richness. It also acts as an emulsifier, bringing the ingredients together.
4. Vinegar: A splash of vinegar enhances the dip’s acidity, cutting through the sweetness and adding brightness to the overall flavor.
5. Seasonings: A pinch of salt and pepper rounds out the dip, ensuring every bite is well-seasoned.
Understanding the ingredients not only helps in creating the dish but also in appreciating the flavors that come together to make this recipe a family favorite.
Preparation Steps for Crispy Chicken Tenders
Setting Up Your Breading Station
Before diving into the cooking process, it’s crucial to set up an organized breading station. This will streamline your cooking and ensure that the chicken tenders are coated evenly. Follow these steps to prepare your work area:
1. Gather Your Ingredients: Make sure all ingredients are within reach. You will need chicken strips, a bowl for flour, a bowl for the egg wash, and a plate for the panko breadcrumbs.
2. Create a Workflow: Set your station in the following order: flour bowl → egg wash bowl → panko breadcrumb plate. This arrangement will help you coat the chicken tenders efficiently.
3. Prepare the Chicken: Start with boneless, skinless chicken breasts. Cut them into uniform strips, about 1-2 inches wide. This ensures even cooking and a consistent texture throughout.
Importance of Organization for Efficient Cooking
Having an organized workspace is vital for maintaining a smooth cooking process. Not only does it make the experience more enjoyable, but it also helps prevent messes and cross-contamination. Ensure that your cutting board, bowls, and utensils are clean and ready to use.
Description of Each Step in the Breading Process
1. Dredging in Flour: Begin by placing each chicken strip in the flour bowl, ensuring it is evenly coated. This first layer helps the egg wash stick and creates a solid base for the breadcrumbs.
2. Egg Wash: Next, dip the floured chicken strip into the beaten eggs, allowing any excess to drip off. This step is crucial for achieving that coveted crispy coating.
3. Coating with Panko Breadcrumbs: Finally, roll the chicken strip in the panko breadcrumbs, pressing down gently to ensure an even coating. The panko will provide a light and airy crunch that is simply irresistible.
4. Repeat: Continue this process until all chicken strips are coated. Place the breaded tenders on a wire rack or parchment paper to rest for a few minutes. This resting period allows the coating to adhere better during frying.
Tips for Achieving the Perfect Coating
– Don’t Rush the Dredging: Take your time with each step, ensuring that each chicken strip is thoroughly coated. Rushing can lead to uneven breading and a less crispy texture.
– Use a Shallow Dish for Egg Wash: A shallow dish makes it easier to coat the chicken evenly without making a mess.
– Keep One Hand Dry: Designate one hand for the dry ingredients (flour and breadcrumbs) and one for the wet (egg wash). This technique minimizes the clumping of breadcrumbs and creates a cleaner process.
– Let the Coating Set: Allow the breaded chicken tenders to sit for a few minutes before frying. This resting time helps the coating adhere better and results in a crunchier finish.
By following these steps and tips, you’ll be well on your way to creating deliciously crispy chicken tenders that will impress everyone at the table. The combination of tender meat and crunchy coating, paired with the sweet and tangy honey mustard dip, makes this dish a surefire hit for any meal.
Frying Techniques for Optimal Crispiness
When it comes to achieving that coveted crispy texture for your chicken tenders, the frying technique is just as important as the ingredient selection. Here’s how to perfect your frying process:
Oil Temperature and Frying Time
The temperature of the oil plays a crucial role in ensuring your chicken tenders come out crispy and golden brown. Ideally, you want to heat your oil to around 350°F (175°C). This temperature is hot enough to fry the chicken quickly, sealing in moisture while creating a crust that’s both crunchy and satisfying.
To check if the oil is ready, you can use a thermometer, or a simple method is to drop a small piece of bread into the oil. If it browns in about 60 seconds, the oil is at the right temperature. Frying chicken tenders usually takes about 4 to 5 minutes per batch, depending on the thickness of your chicken pieces. Make sure not to overcrowd the pan; doing so can lower the oil temperature, resulting in soggy tenders.
Importance of Frying in Batches to Maintain Temperature
Frying in batches is essential for maintaining the right oil temperature and achieving consistent results. If you add too many tenders at once, the temperature will drop, leading to longer cooking times and less crispy results. Fry in small batches; this allows the oil to return to the proper temperature quickly after each batch. Aim for 3 to 4 tenders per batch, depending on the size of your frying pan.
Safety Tips for Frying Chicken at Home
Frying can be daunting, especially if you’re new to it. Here are some safety tips to keep in mind to ensure a safe cooking experience:
1. Use a Deep Pot: A deep pot minimizes the risk of hot oil splattering. A Dutch oven or a heavy-bottomed pot is ideal for frying.
2. Keep a Lid Nearby: In case of oil splatter or a fire, having a lid handy to smother flames can be crucial.
3. Avoid Water: Ensure your chicken is dry before frying. Water can cause the oil to splatter, leading to burns or kitchen fires.
4. Monitor Oil Levels: Always ensure there’s enough oil to submerge the chicken but not so much that it overflows during cooking.
5. Use a Slotted Spoon: This helps in safely removing the chicken from the hot oil, letting the excess oil drain away.
Creating the Perfect Honey Mustard Dip
Now that your chicken tenders are frying to perfection, let’s move on to crafting the ideal honey mustard dip that will elevate your dish to new heights.
Step-by-Step Guide to Making the Honey Mustard Dip
Creating a honey mustard dip is simple and requires just a few ingredients. Here’s how to whip it up in no time:
Ingredients:
– ½ cup Dijon mustard
– ½ cup honey
– 1 tablespoon apple cider vinegar (optional for extra tang)
– Salt and pepper to taste
Instructions:
1. Combine Ingredients: In a medium bowl, combine the Dijon mustard and honey. Mix until well blended.
2. Adjust Tanginess: If you prefer a tangy flavor, add the apple cider vinegar. Stir well to incorporate.
3. Season: Taste the dip and add salt and pepper as needed. Adjust the ratio of honey to mustard based on your flavor preference.
4. Chill: For the best flavor, refrigerate the dip for at least 30 minutes before serving. This allows the flavors to meld beautifully.
Importance of Balancing Flavors
The beauty of honey mustard dip lies in its balance of sweetness and tanginess. The honey provides a rich sweetness, while the Dijon mustard adds a sharp, tangy kick. This contrast enhances the flavor of the crispy chicken tenders, making each bite delightful. Feel free to experiment with different types of mustard (like spicy brown or yellow) to find your perfect balance.
Suggestions for Variations in the Dip
To customize your honey mustard dip even further, consider adding spices or herbs. Here are some ideas:
– Spicy Honey Mustard: Add a pinch of cayenne pepper or a dash of hot sauce for a kick.
– Garlic Honey Mustard: Incorporate minced garlic or garlic powder for an aromatic flavor.
– Herbed Honey Mustard: Mix in freshly chopped herbs like dill, parsley, or thyme for a fresh twist.
Serving Suggestions for Chicken Tenders
Once your chicken tenders are perfectly fried and your honey mustard dip is ready, it’s time to think about how to serve your delicious creation.
Ideas for Plating Chicken Tenders Attractively
Presentation can elevate your meal from ordinary to extraordinary. Here are some plating tips:
– Use a Large Platter: Arrange your chicken tenders in a circular pattern, allowing for visual appeal.
– Garnish: Sprinkle fresh herbs like parsley or chives over the tenders for a pop of color.
– Dipping Bowls: Serve the honey mustard dip in a small bowl placed in the center of the platter, encouraging guests to dip as they please.
Recommended Side Dishes to Complement the Meal
To create a well-rounded meal, consider serving your chicken tenders with some delicious sides. Here are a few recommendations:
– Crispy French Fries: A classic pairing, serve thin-cut fries seasoned with salt for a satisfying crunch.
– Fresh Salad: A light, refreshing salad with mixed greens, cherry tomatoes, and a lemon vinaigrette balances the richness of the chicken.
– Coleslaw: A creamy or vinegar-based coleslaw adds a crunchy texture and zest that complements the chicken well.
– Vegetable Sticks: Serve with a side of carrot and celery sticks for a healthy crunch.
Suggestions for Serving the Dish at Gatherings or Parties
Crispy chicken tenders are perfect for entertaining. Here are some ideas for serving at gatherings:
– Buffet Style: Set up a buffet with chicken tenders, various dips, and sides for guests to help themselves.
– Finger Food: Cut the tenders into smaller pieces for easy snacking, perfect for parties or game days.
– Skewers: Thread chicken tenders onto skewers for fun, easy-to-eat portions.
Nutritional Information
Understanding the nutritional content of your meals is essential for maintaining a balanced diet. Here’s a breakdown of the calories and nutrients in a typical serving of crispy chicken tenders with honey mustard dip.
Breakdown of Calories and Nutrients Per Serving
Crispy Chicken Tenders (per serving, about 3 tenders):
– Calories: Approximately 300
– Protein: 25g
– Carbohydrates: 20g
– Fat: 15g
– Fiber: 1g
Honey Mustard Dip (per serving, about 2 tablespoons):
– Calories: Approximately 80
– Carbohydrates: 20g
– Sugar: 16g
– Protein: 1g
Discussion on Healthier Alternatives
If you’re looking to lighten the meal, consider these healthier alternatives:
– Baking Instead of Frying: For a lower-fat option, bake your chicken tenders at 400°F (200°C) for about 20-25 minutes, flipping halfway through. This method allows you to enjoy the same flavors with significantly less oil.
– Whole Grain Coating: Use whole wheat breadcrumbs or crushed oats for a more nutritious coating.
– Serve with Healthy Sides: Opt for steamed vegetables or a quinoa salad to round out the meal.
Tips for Portion Control and Balanced Meals
To maintain a balanced diet, consider the following tips:
– Mindful Eating: Pay attention to portion sizes and savor each bite.
– Balance Your Plate: Aim for half your plate to be filled with vegetables, a quarter with protein (like chicken tenders), and a quarter with carbohydrates (like fries or bread).
– Incorporate More Vegetables: Add a side salad or roasted vegetables to increase fiber and nutrient intake.
Conclusion
Making crispy chicken tenders with honey mustard dip is not just about the cooking process; it’s about the joy of sharing delicious food with family and friends. The satisfaction of biting into perfectly cooked tenders, paired with a sweet and tangy dip, creates a comfort food experience that resonates with many.
Don’t hesitate to experiment with flavors in both your chicken and dip, as well as the sides you choose to serve. This recipe is versatile, and there’s always room for creativity in the kitchen. Whether you’re preparing a casual family dinner or hosting a festive gathering, these chicken tenders can be the star of the show.
Incorporate your unique twist, enjoy the cooking process, and relish the smiles on your loved ones’ faces as they savor each crispy bite. Happy cooking!