Fried chicken is more than just a meal; it’s a celebration of culinary tradition that has transcended generations and geographical boundaries. With its golden-brown crust and juicy, flavorful meat, fried chicken embodies comfort food at its finest. In Southern cuisine, fried chicken holds a special place, often gracing tables during family gatherings, picnics, and festive occasions. The allure of its crispiness combined with tender meat makes it a perennial favorite for many.
At the heart of creating the perfect fried chicken is an ingredient that may seem humble but is undeniably transformative—buttermilk. This tangy dairy product not only adds rich flavor but also plays a crucial role in tenderizing the chicken, ensuring every bite is succulent and delightful. The process of marinating chicken in buttermilk allows the meat to soak up moisture and flavors, producing a result that is both juicy and deliciously seasoned.
In this article, we’ll dive into the art of making Crispy Buttermilk Fried Chicken, exploring its background, the science behind the ingredients, and providing you with a step-by-step guide to prepare this mouthwatering dish. Whether you’re a seasoned home cook or a beginner in the kitchen, this recipe is designed to help you achieve that perfect crunch with each bite.
The Science Behind Buttermilk Fried Chicken
Understanding how buttermilk works its magic is key to mastering this dish. Buttermilk is acidic, which allows it to break down the proteins in the chicken, resulting in tenderness. When chicken is marinated in buttermilk, the acids help to dissolve some of the protein structures, making the meat softer and juicier. This is why soaking your chicken in buttermilk for several hours—or ideally overnight—can elevate your fried chicken from average to extraordinary.
Marinating is not just about tenderness; it’s also about flavor infusion. As the chicken sits in the buttermilk, it absorbs not only the tangy profile of the buttermilk but also any spices or seasonings you add to the marinade. This means that the flavor penetrates deep into the meat, ensuring that each bite is packed with taste.
Moreover, achieving a delicious crust is as critical as the chicken itself. This is where seasoning plays a pivotal role. A well-seasoned coating enhances the overall flavor profile and contributes to that satisfying crunch that fried chicken lovers crave. A combination of spices such as garlic powder, onion powder, paprika, salt, and pepper not only adds depth to the crust but also complements the richness of the buttermilk-soaked chicken.
Ingredients Breakdown
To make the perfect crispy buttermilk fried chicken, it’s essential to gather the right ingredients. Here’s a breakdown of what you’ll need:
Marinade Ingredients
– Buttermilk: The star of the show, buttermilk brings not only moisture but also a unique flavor profile that sets this recipe apart. If you find yourself without buttermilk, you can easily make a substitute by mixing one cup of milk with a tablespoon of vinegar or lemon juice and letting it sit for about 5-10 minutes.
– Hot Sauce: For those who enjoy a bit of heat, adding hot sauce to the buttermilk marinade can elevate the flavor and add a delightful kick. Adjust the amount based on your spice tolerance; even a few dashes can make a significant difference.
Seasoning Spices
– Garlic Powder: Adds an aromatic depth to the marinade and coating.
– Onion Powder: Complements the garlic and enhances the savory aspect of the chicken.
– Paprika: This spice not only adds a beautiful color but also contributes a mild sweetness and depth of flavor.
– Salt and Pepper: Essential for seasoning, these two ingredients elevate the overall taste of the dish.
Chicken Selection
Choosing the right cuts of chicken is crucial for achieving that juicy, flavorful outcome. Here are some popular options:
– Bone-In, Skin-On Chicken Thighs: These are ideal for frying due to their fat content, which keeps the meat moist during cooking.
– Drumsticks: They are another excellent choice, offering a good meat-to-bone ratio and a satisfying texture.
– Whole Chicken Cut into Pieces: For those who prefer a variety of cuts, using a whole chicken allows for a mix of flavors and textures.
When selecting chicken, always opt for fresh, high-quality meat. Organic or free-range chicken can offer even better flavor and texture.
Coating Ingredients
– All-Purpose Flour: The primary coating ingredient, flour is essential for creating that crispy exterior.
– Baking Powder: Adding a small amount of baking powder to the flour mixture introduces air pockets, resulting in a lighter and crunchier crust.
Combining these ingredients will set you on the path to creating a perfectly crispy fried chicken that is both delicious and satisfying.
Step-by-Step Guide to Preparing Crispy Buttermilk Fried Chicken
Preparing the Marinade
1. Combine Buttermilk and Seasonings: In a large bowl, pour in about 2 cups of buttermilk. Add your desired amount of hot sauce, along with the garlic powder, onion powder, paprika, salt, and pepper. Whisk everything together until well combined.
2. Marinate the Chicken: Add your chicken pieces to the marinade, ensuring that each piece is fully submerged. Cover the bowl with plastic wrap or transfer everything to a resealable plastic bag. Place it in the refrigerator and let it marinate for at least 4 hours, but preferably overnight. This will ensure maximum flavor and tenderness.
Coating the Chicken
Once your chicken has marinated, it’s time to prepare it for frying.
1. Set Up Your Coating Station: Prepare a shallow dish with about 2 cups of all-purpose flour mixed with a teaspoon of baking powder. Season this flour mixture with additional salt, pepper, and your choice of spices to enhance the crust.
2. Remove Chicken from Marinade: Take the chicken out of the refrigerator and let any excess marinade drip off. You want it to be moist but not dripping wet.
3. Coat the Chicken: One piece at a time, dredge the chicken in the flour mixture. Make sure to coat each piece thoroughly, pressing the flour onto the chicken to ensure it adheres well. Shake off any excess flour and place the coated chicken on a wire rack or plate.
4. Rest the Coated Chicken: Allow the coated chicken to rest for about 10-15 minutes. This resting period helps the flour adhere better during frying, resulting in a crispier crust.
By following these steps, you’ll be well on your way to creating a batch of Crispy Buttermilk Fried Chicken that will impress family and friends alike. Stay tuned as we delve deeper into the frying process and share more tips for achieving that perfect crunch in the next section.
{{image_1}}
Techniques for Achieving an Even Coating
Achieving an even coating on your crispy buttermilk fried chicken is crucial for both flavor and texture. The key lies in the dredging process, where you coat the chicken pieces in a seasoned flour mixture after marinating them in buttermilk. Here’s how to ensure a perfect coating:
1. Marinate Thoroughly: Allow the chicken to soak in the buttermilk mixture for at least 4 hours, or ideally overnight. This not only infuses flavor but also helps the flour adhere better.
2. Use a Dredging Station: Set up a dredging station with three separate containers—one for the buttermilk, one for the seasoned flour, and another for the coated chicken. This organization prevents clumping and ensures even application.
3. Shake Off Excess: After dipping each piece in the flour mixture, gently shake off any excess. A thick coating can lead to uneven frying and a gummy texture.
Importance of the Dredging Process
The dredging process is where the magic happens. It creates the crunchy outer layer that contrasts beautifully with the juicy meat inside. Here’s why it matters:
– Flavor Infusion: The seasoned flour adds an extra layer of flavor to the chicken. You can customize this mixture with spices like paprika, garlic powder, onion powder, and cayenne pepper for a kick.
– Texture: A proper dredging technique results in a crispy shell that protects the moisture of the chicken during frying. This is essential for achieving that satisfying crunch.
Frying Techniques
Frying chicken at home requires attention to detail to achieve that ideal crispy texture. Here are some effective frying techniques:
1. Use the Right Oil: Choose oils with high smoke points, such as peanut or canola oil, to ensure a clean fry without burning.
2. Double Frying: For an extra layer of crispiness, consider double frying your chicken. Fry it once until golden brown, let it rest for a few minutes, and then fry it again for a shorter duration.
3. Maintain Consistent Heat: Keep the temperature steady at around 350°F (175°C). If the oil is too hot, the chicken will burn on the outside while remaining raw inside. If it’s too low, the coating will absorb oil and become greasy.
Best Practices for Frying Chicken at Home
To make the frying process as straightforward and effective as possible, follow these best practices:
– Preheat Oil: Always preheat your oil before adding the chicken. You can use a thermometer to measure the temperature accurately.
– Work in Batches: Frying in small batches allows for better temperature control and ensures that each piece gets the attention it deserves. This prevents overcrowding, which can lower the oil temperature.
– Use a Wire Rack: After frying, place the chicken on a wire rack instead of paper towels. This prevents steam from building up and keeps the chicken crispy.
Tools and Equipment Needed for Frying
Having the right tools at your disposal can make a significant difference in your frying experience. Here’s what you’ll need:
– Heavy-Bottomed Pot or Dutch Oven: A sturdy pot helps maintain oil temperature and prevents hot spots.
– Thermometer: A candy or deep-fry thermometer is essential for monitoring oil temperature accurately.
– Tongs or Slotted Spoon: Use tongs to handle the chicken carefully and a slotted spoon to retrieve it from the oil.
– Wire Rack: Ideal for cooling the chicken post-fry and maintaining its crispiness.
Monitoring Oil Temperature for Optimal Results
Monitoring oil temperature is paramount for achieving perfectly fried chicken. Here’s how to do it effectively:
1. Thermometer Usage: Always use a thermometer to check the oil’s temperature before and during frying. Aim for a consistent range of 325°F to 350°F (160°C to 175°C).
2. Adjusting Heat: If you notice that the oil temperature drops significantly when you add chicken, increase the heat slightly. Conversely, if the oil starts to smoke, reduce the heat immediately.
3. Test a Small Piece: If you’re unsure about the oil temperature, test a small piece of chicken. If it bubbles vigorously upon entry, the oil is ready. If it sinks without much action, it’s too cool.
Tips for Achieving the Perfect Crunch
The quest for the perfect crunch is all about technique and patience. Here are some expert tips to help you nail that crispy texture:
– The Role of the Flour Mixture: Choose the right blend of flour and cornstarch (about 70% flour to 30% cornstarch) in your dredging mixture. Cornstarch enhances the crispiness while flour provides structure.
– Avoid Overcrowding the Pan: Frying too many pieces at once lowers the oil temperature and can lead to soggy chicken. Stick to 2-3 pieces at a time, depending on the size of your pot.
– Resting Chicken: After frying, let the chicken rest on a wire rack for 5-10 minutes. This allows the steam to escape and the crust to firm up, ensuring a crunchy bite.
Serving Suggestions and Pairings
Once your crispy buttermilk fried chicken is ready, presentation and pairing can elevate your meal. Here are some ideas:
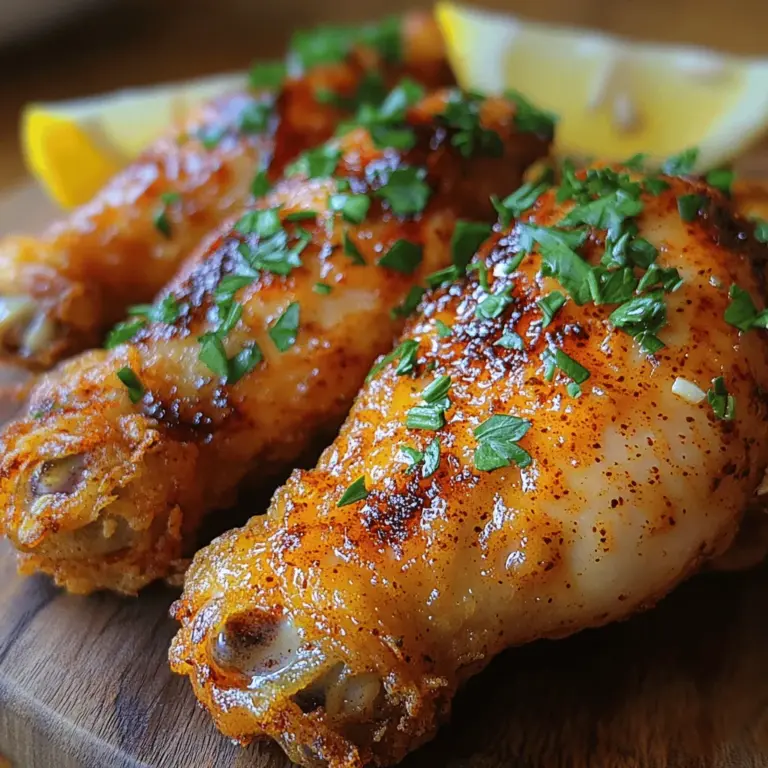
– Presentation Ideas: Serve the chicken on a large platter lined with parchment paper or a wooden cutting board for a rustic look. Garnish with fresh herbs like parsley or thyme for a pop of color.
– Suggested Sides: Pair your fried chicken with classic sides such as creamy coleslaw, buttery mashed potatoes, and sweet corn on the cob. For a lighter option, consider a fresh garden salad.
– Beverage Pairings: Complement your meal with refreshing beverages. Sweet tea is a traditional choice, but you could also opt for a crisp lager or a sparkling lemonade to balance the richness of the chicken.
Nutritional Information
Understanding the nutritional content of your homemade crispy buttermilk fried chicken is essential for maintaining a balanced diet. Here’s a brief overview:
– Calories: A serving of fried chicken (approximately 4 ounces) can range from 400 to 500 calories, depending on the cooking method and ingredients used.
– Proteins and Fats: Fried chicken is a good source of protein, with around 30 grams per serving. However, it also contains fats—about 25 grams, depending on the oil used for frying.
– Balance and Moderation: While fried chicken is undeniably indulgent, enjoy it in moderation and balance it with healthier sides to create a well-rounded meal.
Conclusion
Making homemade crispy buttermilk fried chicken is a rewarding culinary endeavor that brings comfort and joy to the table. The process may seem daunting at first, but with the right techniques and a bit of practice, anyone can achieve that perfect crunch and flavorful bite. Embrace the art of frying at home, and you’ll not only impress your family and friends but also enjoy the satisfaction of creating comfort food from scratch. So roll up your sleeves, gather your ingredients, and dive into a delicious frying adventure that promises to deliver a delightful meal every time.
