Introduction
Chimichangas are a delightful fusion of Mexican and American culinary traditions, celebrated for their crispy exterior and savory fillings. This beloved dish features flour tortillas that are generously stuffed with a variety of flavorful ingredients before being deep-fried to golden perfection. Among the many variations of chimichangas, the Crunchy Chicken Chimichangas stand out for their incredible taste and ease of preparation. They are perfect for a quick weeknight dinner or a festive gathering, offering a satisfying meal that is sure to impress family and friends.
What makes this particular recipe so appealing is its simplicity. By utilizing rotisserie chicken and canned beans, you can whip up a delicious meal in no time. Not only does this save on preparation time, but it also ensures that you can enjoy the crispy, indulgent experience of chimichangas without spending hours in the kitchen. Let’s dive deeper into the origins of chimichangas and explore how to prepare these crunchy delights.
Understanding Chimichangas
The chimichanga is thought to have originated in the southwestern United States, particularly in Arizona, where it has become a staple in many Mexican-American households. While the exact origins are somewhat disputed, the dish is believed to have been created by accident when a burrito was inadvertently deep-fried, resulting in the crispy, golden treat we know today.
Chimichangas are characterized by their deep-fried tortillas, which encase a variety of fillings including meats, cheese, beans, and vegetables. The versatility of this dish allows for endless variations; from beef and cheese to vegetarian options, the possibilities are as diverse as the regions they come from. In American households, chimichangas have gained popularity due to their satisfying crunch and the ability to customize them to suit individual tastes.
This dish is not just about the crispy outer layer; it’s also about the warm, flavorful filling that awaits inside. The combination of textures—the crunch of the fried tortilla and the tender filling—creates an irresistible eating experience that has made chimichangas a favored choice for both casual dinners and special occasions.
The Ingredients: What Makes This Recipe Special
Every great chimichanga starts with quality ingredients, each playing a vital role in creating the perfect balance of flavor and texture. Here’s a closer look at what makes our Crunchy Chicken Chimichangas truly special:
1. Cooked Shredded Chicken: For this recipe, rotisserie chicken is an excellent choice. It not only saves time but also adds a depth of flavor that is hard to replicate. The pre-cooked chicken is tender and juicy, providing a robust base for your filling. You can easily shred the chicken and mix it with spices to create a flavorful blend that will elevate your chimichangas.
2. Refried Beans: These creamy beans serve as a hearty accompaniment to the chicken, enhancing the overall texture of the filling. Refried beans are not only delicious but also packed with protein and fiber, making them a nutritious addition to your meal. They help to bind the filling together while adding richness that balances the crispiness of the chimichanga.
3. Cheese: No chimichanga is complete without cheese! It adds a gooey, satisfying bite that melts beautifully during the cooking process. Whether you opt for traditional Mexican cheeses like Oaxaca or a blend of sharp cheddar and Monterey Jack, the cheese contributes to the overall creaminess and flavor of the dish.
4. Spices and Herbs: The flavor profile of your chimichangas can be enhanced with a mix of spices and herbs. Cumin, chili powder, and garlic powder are classic choices that complement the chicken and beans, while fresh cilantro adds a burst of brightness to the filling. Experimenting with different spices allows you to tailor the dish to your taste preferences.
5. Salsa: A zesty salsa is essential for balancing the richness of the filling. Whether you prefer mild or spicy, fresh salsa adds acidity and freshness that cuts through the heaviness of the fried tortilla. Plus, it’s a great way to incorporate additional vegetables into your meal.
Preparing the Crunchy Chicken Chimichangas
Now that we’ve covered the ingredients, let’s get started on preparing these crunchy delights. The process is straightforward and can be broken down into a few clear steps to ensure everything goes smoothly.
Step 1: Preheating the Oven
Before you begin assembling your chimichangas, it’s crucial to preheat your oven to the right temperature. This step is often overlooked but is fundamental to achieving that desired crunchiness. Preheating the oven to 400°F (200°C) allows the tortillas to crisp up nicely, ensuring that your chimichangas are not only cooked through but also have a satisfying golden-brown exterior.
As the oven heats up, gather your ingredients and prepare your workspace. This will streamline the assembly process and make it easier to create uniform chimichangas.
Step 2: Preparing the Filling
While the oven is preheating, it’s time to prepare the filling. In a mixing bowl, combine the shredded rotisserie chicken, refried beans, and your choice of cheese. Add in the spices and herbs, adjusting the amounts to suit your taste. For a little extra kick, consider adding diced jalapeños or a splash of hot sauce to the mixture.
Mix everything together until well combined, ensuring that the flavors meld together. This filling can be made in advance and stored in the refrigerator, making it a convenient option for meal prep.
Step 3: Assembling the Chimichangas
Once your filling is ready and the oven is preheated, it’s time to assemble your chimichangas. Lay a tortilla flat on a clean surface. Spoon a generous amount of the chicken and bean mixture onto the center of the tortilla, being careful not to overfill, as this can make it difficult to seal.
To fold the chimichanga, start by folding in the sides of the tortilla, then roll it up from the bottom, tucking the filling in as you go. Make sure to roll tightly but gently to avoid tearing the tortilla. Repeat this process for the remaining tortillas and filling.
Step 4: Baking for Crunchiness
Once your chimichangas are assembled, place them seam-side down on a baking sheet lined with parchment paper. This will help prevent sticking and make cleanup easier. To achieve that perfect crunch, lightly brush the tops of each chimichanga with oil. This will enhance browning and give them an appealing sheen as they bake.
With the chimichangas ready to go, place them in the preheated oven and bake for about 20-25 minutes, or until they are golden brown and crispy. Keep an eye on them as they cook, turning them halfway through for even browning.
As the chimichangas bake, the enticing aroma will fill your kitchen, promising a delicious meal ahead. Once they’re finished baking, you’ll be ready to enjoy the fruits of your labor—crispy, cheesy, and packed with flavor.
Stay tuned for the next part of this article, where we will explore serving suggestions, dipping sauces, and tips for customizing your Crunchy Chicken Chimichangas to make them your own.
Preparing the Filling
The filling is the heart of your Crunchy Chicken Chimichangas, and getting it just right is crucial for a delicious outcome. To begin, you’ll want to ensure that all your ingredients are well-mixed for an even distribution of flavors. Here’s how to prepare the filling effectively:
1. Cook the Chicken: Start with boneless, skinless chicken breasts. Season them with salt, pepper, and a sprinkle of cumin. Cook the chicken in a skillet over medium heat until it’s fully cooked, about 6-7 minutes per side. Once cooked, let the chicken rest for a few minutes before shredding it with two forks. This step allows the juices to redistribute, keeping the meat tender.
2. Mixing Ingredients: In a large mixing bowl, combine the shredded chicken with black beans, corn, diced bell peppers, and chopped onions. Adding spices like chili powder, garlic powder, and a squeeze of lime juice enhances the flavor profile. Mix everything gently but thoroughly to ensure that every bite is packed with flavor.
3. Cheese and Cilantro: Fold in shredded cheese (cheddar or Monterey Jack works beautifully) and freshly chopped cilantro. The cheese will melt during baking, binding the ingredients together, while the cilantro adds a refreshing touch.
Assembling the Chimichangas
Once your filling is prepared, it’s time to assemble the chimichangas. Proper wrapping is crucial to prevent your filling from spilling out during baking. Here’s a step-by-step guide on how to do it:
1. Prepare the Tortillas: Warm your flour tortillas in a dry skillet for about 30 seconds on each side. This makes them pliable and easier to fold without cracking.
2. Add the Filling: Place about 1/3 cup of the chicken filling in the center of each tortilla.
3. Folding Technique: To wrap the chimichangas:
– Start by folding the sides of the tortilla over the filling.
– Then, fold the bottom of the tortilla up over the filling.
– Finally, roll the tortilla tightly from the bottom to the top, ensuring it is sealed well.
– For extra security, you can use toothpicks to hold them together if needed.
4. Visual Cues: Aim for a snug but not overly tight wrap. You want the filling to stay inside while allowing for expansion as they bake.
Baking to Perfection: Achieving the Ultimate Crunch
Baking your chimichangas to perfection is where the magic happens. Here’s how to achieve that coveted crispy, golden-brown exterior:
1. Brush with Olive Oil or Butter: Before placing the chimichangas in the oven, brush them lightly with olive oil or melted butter. This step is vital as it promotes browning and adds a rich flavor. The oil helps create that crunchy texture that makes chimichangas so irresistible.
2. Baking Instructions: Preheat your oven to 425°F (220°C). Arrange the chimichangas seam-side down on a baking sheet lined with parchment paper. Bake them for about 25-30 minutes or until they are golden brown.
3. Flipping for Even Cooking: Halfway through the baking time, carefully flip the chimichangas using tongs. This ensures that both sides get an equal amount of heat and crisp up nicely.
4. Timing: To determine when your chimichangas are perfectly baked, look for a deep golden color and a crunchy texture. If you tap on them lightly, they should sound hollow. Allow them to cool for a few minutes before serving, as the filling will be extremely hot.
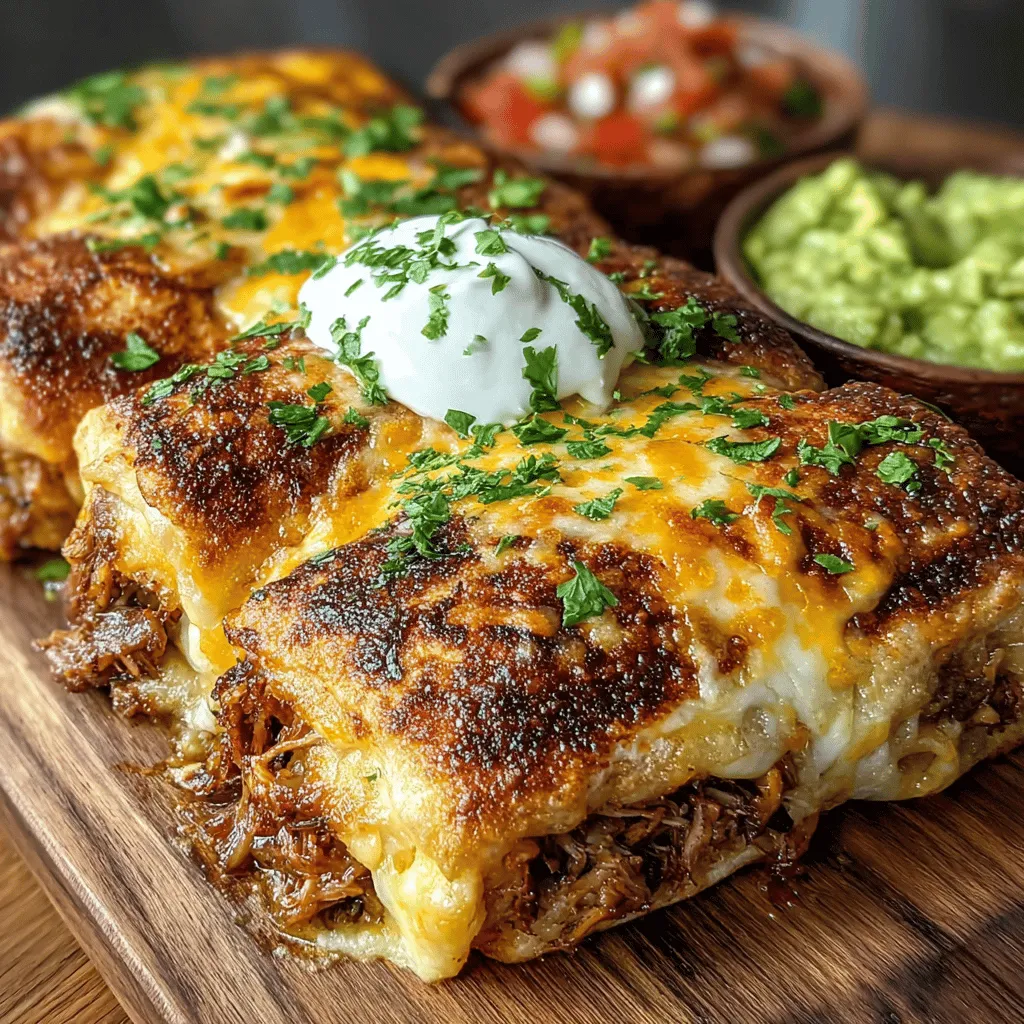
Serving Suggestions: Elevate Your Meal
Now that your Crunchy Chicken Chimichangas are baked to perfection, it’s time to think about how to serve them. With the right accompaniments, you can elevate this dish to a whole new level:
Homemade Salsa Variations
Salsa is a great way to add freshness and zest to your meal. Here are some variations you can easily prepare:
– Mild Salsa: Combine diced tomatoes, red onion, cilantro, lime juice, and a pinch of salt for a refreshing mild salsa.
– Spicy Salsa: For those who love heat, add chopped jalapeños or serrano peppers to your mild salsa.
– Fruit-Based Salsa: Consider a mango or pineapple salsa by mixing diced fruit with red onion, cilantro, and lime juice. This sweet and tangy option pairs wonderfully with the savory chimichangas.
Condiments
Adding creaminess to your dish can balance the crunchiness of the chimichangas. Here are two classic options:
– Sour Cream: A dollop of sour cream adds a rich, tangy flavor that complements the spices in the filling.
– Guacamole: Homemade guacamole brings a creamy texture and the flavor of ripe avocados, making it a perfect dipping companion.
Side Dishes
Enhance your meal with complementary sides that can round out your dining experience:
– Mexican Rice: Fluffy rice cooked with tomatoes, garlic, and spices makes for a hearty side.
– Corn Salad: A fresh corn salad with diced peppers and lime dressing adds a vibrant touch.
– Fresh Green Salad: A simple green salad with lettuce, avocado, and a light vinaigrette can provide a refreshing contrast to the richness of the chimichangas.
Nutritional Information
Crunchy Chicken Chimichangas not only provide a delightful taste but also offer several nutritional benefits. Here’s a brief overview of what makes them a great choice for a balanced diet:
– Protein: The chicken and black beans provide a robust source of protein, helping to keep you full and satisfied.
– Calcium: The cheese in the filling contributes calcium, important for bone health.
– Freshness: Ingredients like cilantro and lime juice add vitamins and freshness, enhancing the overall nutrient profile of the dish.
This recipe is versatile and can fit well into a balanced diet, especially when served with fresh sides.
Conclusion
Preparing and enjoying Crunchy Chicken Chimichangas is a joyful culinary adventure that highlights the vibrant flavors of Mexican cuisine. Whether you’re serving them at a family gathering, a casual dinner party, or just for a cozy night at home, these chimichangas are sure to impress.
Their versatility allows you to customize the filling and toppings based on personal preferences, making them a go-to recipe for various occasions. Embrace this delightful dish and savor the satisfaction of creating a meal that brings everyone together to share in the flavors of Mexico right in your own kitchen. So, roll up your sleeves, gather your ingredients, and dive into this delicious recipe that promises to be a hit at your table!