Introduction
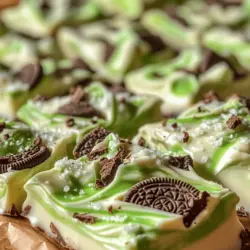
Mint Oreo Bark is a delightful fusion of flavors and textures that has captured the hearts of dessert lovers everywhere. This unique treat combines the classic creaminess of white chocolate with the refreshing zing of mint and the beloved crunch of Oreo cookies, creating a confection that is not only visually appealing but also incredibly satisfying to the palate. The irresistible allure of Oreos, paired with the invigorating taste of mint, makes this dessert a must-try for any occasion, whether you’re hosting a festive gathering, celebrating a special event, or simply indulging in a casual snack at home.
The popularity of Oreos is undeniable; these iconic cookies have been a favorite for generations, often inspiring creative culinary endeavors. Mint-flavored desserts, on the other hand, enjoy a dedicated following, particularly during the holiday season when peppermint treats abound. Mint Oreo Bark effortlessly marries these two trends, resulting in a sweet treat that is both nostalgic and refreshing.
One of the most appealing aspects of Mint Oreo Bark is its simplicity. With just a few basic ingredients and straightforward steps, even novice bakers can create this impressive dessert. It requires minimal preparation time and is perfect for those who want a quick yet delicious option for parties, potlucks, or even as homemade gifts. In this article, we’ll walk you through the essential ingredients, their significance, and the step-by-step preparation process to ensure your Mint Oreo Bark turns out perfectly every time.
Understanding the Ingredients
Before diving into the preparation of Mint Oreo Bark, let’s take a closer look at the key ingredients that contribute to its decadent flavor and appealing texture.
White Chocolate
The foundation of any great bark recipe, white chocolate is essential for creating a creamy and sweet base. When selecting white chocolate for your Mint Oreo Bark, it’s crucial to choose high-quality varieties that contain cocoa butter, as this will enhance both the flavor and texture of your finished treat. Lower-quality white chocolate may contain waxes or fillers that can affect the melting process and overall taste. A good-quality white chocolate will melt smoothly and create a luscious coating that complements the crunchiness of the Oreos.
Green Candy Melts
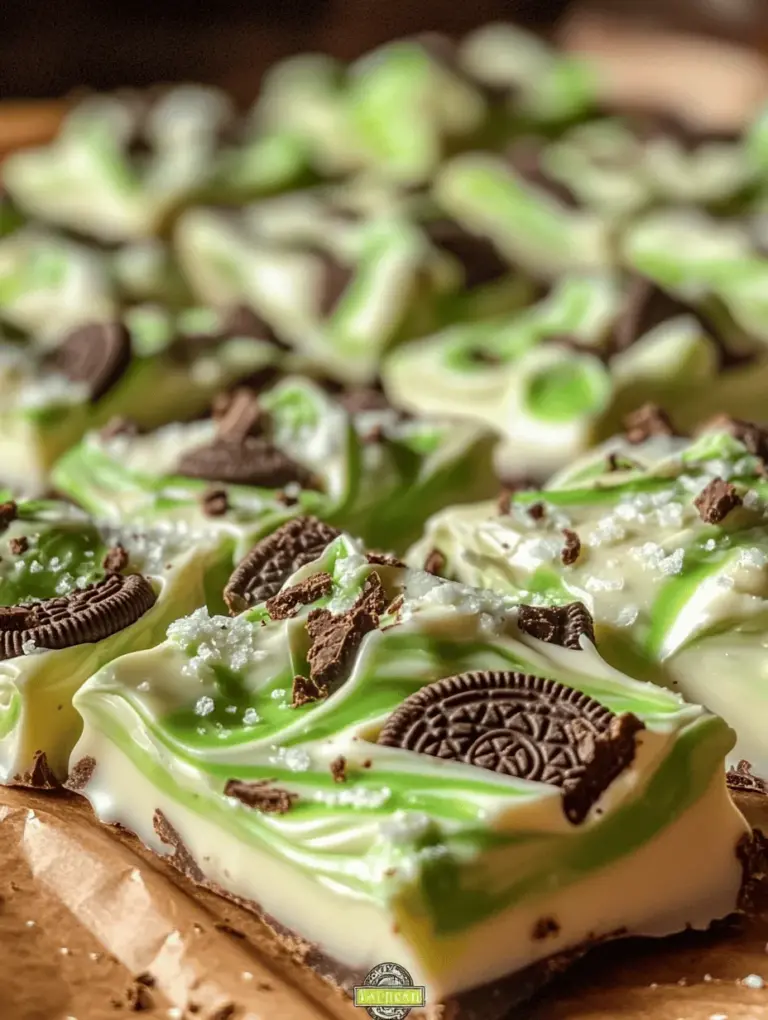
Green candy melts are often utilized in recipes like Mint Oreo Bark to provide a vibrant color and an additional layer of flavor. These melts are made from a combination of sugar, fats, and flavorings, and they melt down easily, making them perfect for coating and decorating. The vibrant green hue of the candy melts not only enhances the visual appeal of the bark but also adds a subtle minty flavor that perfectly complements the Oreos and white chocolate.
Mint Oreo Cookies
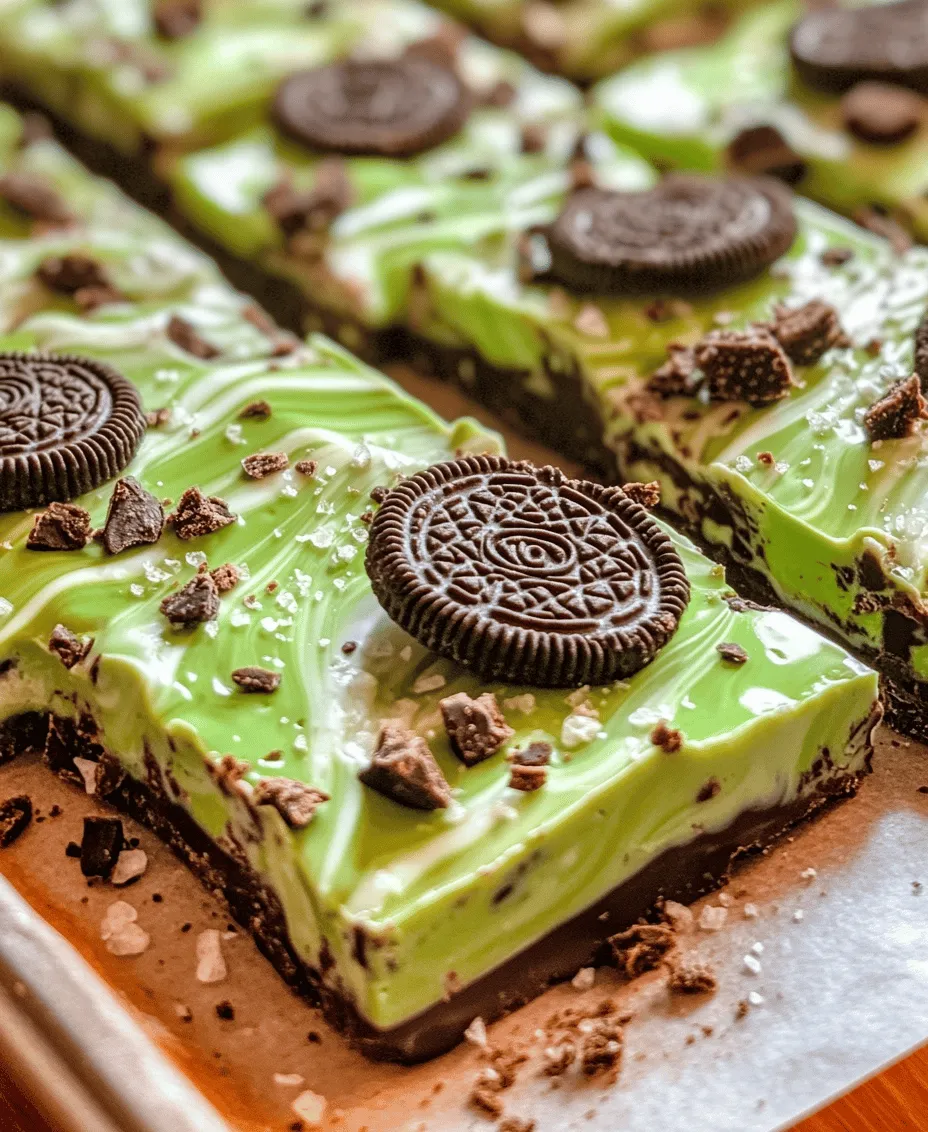
Of course, the star ingredient of this recipe is the Mint Oreo cookies themselves. With their signature chocolate wafer cookies sandwiching a refreshing mint-flavored cream filling, Mint Oreos bring a delightful contrast of flavors to the bark. Their unique taste profile enhances the overall mint experience of the dessert while providing a satisfying crunch. Whether you choose to chop them coarsely for an even distribution throughout the bark or leave them in larger pieces for a visually stunning finish, Mint Oreos are an essential component of this treat.
Peppermint Extract
To elevate the mint flavor in your Mint Oreo Bark, peppermint extract is a must-have. This concentrated extract intensifies the overall minty notes, creating a refreshing experience in every bite. When adding peppermint extract, it’s important to start with a small amount, as a little goes a long way. You can always add more if desired, but be cautious not to overpower the other flavors. The extract ensures that each piece of bark delivers a delightful burst of mint.
Sea Salt
While it may seem counterintuitive to add salt to a sweet treat, a pinch of sea salt plays a crucial role in balancing the sweetness of the white chocolate and Oreos. The contrast of salty and sweet enhances the overall flavor profile, making each bite more complex and satisfying. The slight crunch of sea salt also adds an appealing texture to the bark, making it even more enjoyable.
Optional Crushed Oreos
For those who want to take their Mint Oreo Bark to the next level, consider adding crushed Oreos on top of the bark before it sets. This not only provides an extra layer of texture and crunch but also enhances the visual appeal of the finished product. The additional Oreo crumbs can create a beautiful contrast against the creamy white chocolate and vibrant green candy melts, making your Mint Oreo Bark a feast for the eyes as well as the taste buds.
Preparation Steps for Mint Oreo Bark
Now that we’ve explored the key ingredients, it’s time to dive into the preparation steps for Mint Oreo Bark. Following these simple guidelines will ensure that your bark is delicious and visually appealing.
Preparing the Baking Sheet
The first step in making Mint Oreo Bark is to prepare your baking sheet. It’s important to line the baking sheet with parchment paper or a silicone baking mat. This will prevent the bark from sticking and make removal much easier once it has set. Additionally, lining the baking sheet helps with clean-up, allowing you to enjoy your homemade treat without the hassle of scrubbing stubborn residue off the surface.
Melting the White Chocolate
Next, it’s time to melt the white chocolate, which is a critical step in the process. The best way to melt white chocolate is to use a microwave-safe bowl. Start by chopping the white chocolate into small, uniform pieces to ensure even melting. Place the chopped chocolate in the microwave and heat it in 30-second intervals, stirring well after each interval. This method helps prevent the chocolate from overheating or seizing, which can happen if it’s melted too quickly. Once the chocolate is smooth and fully melted, remove it from the microwave and let it cool slightly before adding the other ingredients.
Incorporating Flavor
Once your white chocolate is melted to perfection, it’s time to incorporate the peppermint extract. Add a few drops of peppermint extract to the melted chocolate and gently stir to combine. This step is crucial for achieving an even distribution of mint flavor throughout the bark. Be sure to taste the mixture before adding more extract; the goal is to enhance the mint flavor without overwhelming it.
Combining Mixtures
With the white chocolate and peppermint extract ready, it’s time to combine the mixtures. Start by adding the chopped Mint Oreo cookies to the bowl of melted chocolate. Use a spatula to gently fold the cookies into the chocolate, ensuring they are well-coated while maintaining their structure. Be careful not to overmix, as you want to preserve the texture of the Oreos and create a visually appealing bark with distinct pieces of cookie throughout.
As you fold, keep an eye on the consistency of the mixture; it should be thick and slightly chunky, with the Oreos evenly distributed. This will contribute to a delightful texture in your finished Mint Oreo Bark. Once everything is well combined, pour the mixture onto your prepared baking sheet, spreading it out evenly to create a uniform layer.
—
By following these steps, you’re well on your way to creating a delicious batch of Mint Oreo Bark that is sure to impress friends and family alike. The combination of high-quality ingredients and careful preparation ensures a treat that is both satisfying and irresistible. Stay tuned for the next part, where we’ll delve into the final steps of making this delectable dessert and provide some tips for achieving the best results!
Spreading the Mixture
Once your chocolate mixture is perfectly melted and combined with crushed Mint Oreos, it’s time to spread it out. Achieving the right thickness is essential for a satisfying bark texture. Ideally, the bark should be about ¼ inch thick. Here’s how to do it effectively:
1. Choose the Right Pan: Select a baking sheet or pan lined with parchment paper. A standard 9×13-inch pan works well for this quantity. The parchment paper will prevent sticking and make it easy to lift the bark once it’s set.
2. Pour and Spread: Carefully pour the melted chocolate mixture onto the prepared pan. Use a spatula to spread it evenly across the surface. Start from the center and work your way outwards, ensuring that the mixture covers the base uniformly. If you prefer thicker bark, feel free to keep it closer to ½ inch, but be aware that it may take longer to set.
3. Smooth the Surface: Once the mixture is spread out, gently tap the pan on the counter to remove any air bubbles and to help the chocolate settle evenly. A smooth, level surface will not only make your bark look more appealing but will also help it break into clean pieces later.
Creating the Marbled Effect
Melting the Green Candy Melts
To create a striking marbled effect with your Mint Oreo Bark, you’ll need to melt green candy melts. Here’s how to do it properly:
1. Select Your Melts: Choose high-quality green candy melts. These can typically be found at craft stores or baking supply shops.
2. Melting Technique: Place the candy melts in a microwave-safe bowl. Heat them in 30-second intervals, stirring in between until fully melted. This method ensures that you don’t overheat the melts, preventing them from seizing up. Aim for a smooth, pourable consistency.
3. Consistency Check: If the melted candy melts appear too thick, add a small amount of vegetable oil or shortening to achieve the desired texture. This will help the candy melts drizzle smoothly over the chocolate layer.
Drizzling and Swirling
Now that your green candy melts are ready, it’s time to create that beautiful marbled effect:
1. Prepare Your Drizzling Tool: Use a piping bag or a zip-top plastic bag with a corner snipped off to drizzle the melted candy melts. This will give you better control over the design.
2. Drizzle the Candy Melts: Begin drizzling the melted green candy melts over the top of the chocolate layer in a zig-zag pattern. Don’t worry about being perfect; the more random, the better!
3. Swirling Technique: Once you’ve drizzled the green melts, take a toothpick or a skewer and gently swirl it through the chocolate and green candy melts. This will create a marbled effect. Be careful not to over-swirl, as you want to maintain some distinct lines of green.
Finishing Touches
To elevate the appearance and texture of your Mint Oreo Bark, consider these finishing touches:
1. Adding Sea Salt: Before the chocolate sets, sprinkle a light dusting of sea salt over the top. The salty contrast beautifully enhances the sweetness of the chocolate and complements the mint flavor.
2. Crushed Oreos: For added texture and visual appeal, sprinkle additional crushed Mint Oreos across the top while the chocolate is still melty. This not only reinforces the minty flavor but also adds a delightful crunch.
Setting the Bark
Chilling the Bark
Setting the bark properly is crucial for achieving the right texture. Here’s how to chill it effectively:
1. Refrigerate: Place the pan in the refrigerator and let it chill for at least 30 minutes, or until the chocolate is completely set. Avoid the freezer, as this can cause the chocolate to become too hard and lose its smooth texture.
2. Check for Firmness: After chilling, gently press the surface of the chocolate with your finger. If it feels firm and holds its shape, it’s ready for the next step.
Breaking into Pieces
Once the bark is set, it’s time to break it into pieces. Follow these tips for aesthetically pleasing results:
1. Use a Sharp Knife: For cleaner edges, use a sharp knife to cut the bark into squares or rectangles. If you prefer a rustic look, simply break the bark into irregular pieces with your hands.
2. Store Properly: If you’re not serving the bark immediately, store the pieces in an airtight container at room temperature. This will help maintain their freshness and prevent the chocolate from becoming sticky.
Serving Suggestions
Presentation Ideas
Creating an appealing presentation can enhance the enjoyment of your Mint Oreo Bark:
1. Decorative Boxes: Arrange the bark pieces in decorative gift boxes or cellophane bags tied with a ribbon. This makes for a delightful homemade gift.
2. Platter Display: Serve the bark on a beautiful platter, perhaps garnished with mint leaves or additional crushed Oreos for that extra touch.
3. Individual Treats: For parties, consider placing individual pieces in mini cupcake liners for a fun and easy-to-eat treat.
Pairings
To elevate the experience of enjoying Mint Oreo Bark, consider these delicious pairings:
1. Beverages: A glass of cold milk, a hot cup of coffee, or even a creamy mint-flavored shake would complement the flavors perfectly.
2. Dessert Combinations: Pair the bark with vanilla ice cream or a scoop of mint chocolate chip ice cream for a decadent dessert experience.
Nutritional Information
Each serving of Mint Oreo Bark provides a delightful combination of flavors and textures. Here’s a general breakdown of the nutritional values per serving (assuming the recipe yields about 16 pieces):
– Calories: Approximately 150-200 calories
– Total Fat: 9g
– Saturated Fat: 5g
– Cholesterol: 5mg
– Sodium: 50mg
– Carbohydrates: 20g
– Fiber: 1g
– Sugars: 15g
– Protein: 2g
Dietary Considerations
For those with dietary restrictions or preferences, this recipe can be adapted. You can use dairy-free chocolate and candy melts to create a vegan version of Mint Oreo Bark. Always check the labels of your ingredients to ensure they meet your dietary needs.
Conclusion
Making Mint Oreo Bark is not only a fun and straightforward process, but it also results in a visually stunning and delicious treat that’s perfect for various occasions. This bark appeals to chocolate and mint lovers alike, making it a hit at parties, holiday gatherings, or simply as a delightful snack at home.
The beauty of this recipe lies in its versatility. Feel free to explore your own variations, such as adding other flavors of candy melts or incorporating different types of cookies. Whether you’re creating it for yourself or as a thoughtful gift for loved ones, Mint Oreo Bark is sure to impress.
So grab your ingredients, unleash your creativity, and enjoy the delightful experience of making and sharing this minty chocolate treat!