
When it comes to dessert, few things can rival the allure of a beautifully crafted cheesecake. Now, imagine that classic dessert taking on the luxurious flavors of red velvet cake — rich, decadent, and oh-so-delightful. Mini red velvet cheesecakes are not only visually stunning with their vibrant red hue and creamy white topping, but they also offer an irresistible combination of flavors and textures that make them perfect for any occasion. Whether you’re celebrating a special event, hosting a gathering, or simply looking to indulge in a sweet treat at home, these mini cheesecakes will undoubtedly impress your guests and satisfy your sweet tooth.
The charm of mini red velvet cheesecakes lies not only in their taste but also in their size, making them a convenient dessert option that allows for portion control without sacrificing flavor. These delightful bites are perfect for birthday parties, holiday celebrations, or even as an elegant addition to a casual dinner. The rich cream cheese filling paired with the subtle hint of cocoa from the red velvet base creates a mouthwatering experience that keeps people coming back for more.
Understanding Red Velvet Cheesecakes
The origins of red velvet cake date back to the late 19th century, with a rich history woven into the fabric of American cuisine. The unique flavor profile of red velvet is primarily attributed to cocoa powder, but it’s the addition of buttermilk and vinegar that gives it that signature tang, making it a favorite among many dessert enthusiasts. Over the years, red velvet has transcended its original cake form to become a beloved flavor in various desserts, including cookies, brownies, and of course, cheesecakes.
Red velvet cheesecakes marry this classic flavor with the creamy, luscious texture of traditional cheesecake. Unlike a standard cheesecake that often leans heavily on a rich cream cheese base, the red velvet cheesecake introduces a subtle chocolate flavor, complemented by the velvety smoothness that cheesecake lovers adore. This fusion results in a dessert that is both indulgent and sophisticated, making it truly special. As you take a bite, the creamy filling melts in your mouth, while the crumbly crust provides a satisfying contrast, elevating the overall experience.
Ingredients Overview
Creating the perfect mini red velvet cheesecakes begins with understanding the ingredients that come together to achieve their unique flavor and texture. Let’s take a closer look at what you’ll need to make these delightful treats.
For the Crust
The foundation of any great cheesecake is the crust, and for our mini red velvet cheesecakes, we will be using Oreo cookie crumbs. Here’s why these ingredients are essential:
– Oreo Cookie Crumbs: The classic chocolate flavor of Oreo cookies provides the perfect base for our cheesecakes. Their rich and slightly sweet taste complements the red velvet filling while adding a delightful crunch.
– Melted Butter: This ingredient acts as a binding agent, helping the cookie crumbs adhere together to form a firm crust. The butter also adds richness, enhancing the overall flavor of the base.
– Granulated Sugar: A touch of sugar is added to the crust mixture to balance the flavors and add sweetness. It helps to create a delectable crust that perfectly contrasts with the creamy cheesecake filling.
For the Cheesecake Filling
The filling is where the magic happens, and each ingredient plays a crucial role in achieving that signature creaminess and flavor:
– Cream Cheese: The star of the filling, cream cheese provides the rich and creamy texture that cheesecakes are known for. It’s essential to use full-fat cream cheese for the best results.
– Granulated Sugar: Similar to the crust, sugar is used in the filling to sweeten the cheesecake and enhance its overall flavor.
– Eggs: Eggs are essential for providing structure and stability to the cheesecake. They help to bind the ingredients together while contributing to the overall creaminess.
– Red Food Coloring: This ingredient is what gives the cheesecake its signature red hue. Depending on your preference, you can use liquid, gel, or powder food coloring to achieve the desired shade.
– Cocoa Powder: A small amount of unsweetened cocoa powder adds a subtle chocolate flavor to the cheesecake, enhancing the red velvet experience without overpowering it.
For the Cream Cheese Frosting
No cheesecake is complete without a luscious topping, and our cream cheese frosting elevates these mini cheesecakes to new heights:
– Cream Cheese: Just like in the filling, cream cheese is used in the frosting to create a smooth and creamy texture. It adds a rich flavor that pairs beautifully with the red velvet.
– Powdered Sugar: This ingredient sweetens the frosting and helps achieve a smooth consistency that’s easy to pipe or spread over the cheesecakes.
– Vanilla Extract: A splash of vanilla extract enhances the overall flavor of the frosting, adding depth to the sweetness.
Preparing the Mini Red Velvet Cheesecakes
Now that we’ve covered the essential ingredients, it’s time to dive into the preparation process. Making mini red velvet cheesecakes is an easy and rewarding endeavor that can be broken down into a few simple steps. By following these instructions, you’ll be well on your way to creating a batch of these delicious treats.
Step-by-Step Instructions for the Crust
1. Preheat Your Oven: Start by preheating your oven to 325°F (163°C). This ensures that your cheesecakes will bake evenly and achieve the perfect texture.
2. Prepare Your Muffin Tin: Line a standard muffin tin with paper liners. This will make it easy to remove the cheesecakes later and provide a neat presentation.
3. Mix the Crust Ingredients: In a medium-sized mixing bowl, combine the Oreo cookie crumbs, melted butter, and granulated sugar. Use a fork or your fingers to mix until the crumbs are fully moistened and resemble wet sand.
4. Press the Mixture into the Muffin Liners: Take a tablespoon of the crust mixture and press it firmly into the bottom of each muffin liner. It’s important to pack it down tightly to ensure stability when you add the cheesecake filling. You can use the bottom of a shot glass or a measuring cup to help press it down evenly.
5. Bake the Crusts: Once all the crusts are pressed into the liners, place the muffin tin in the preheated oven and bake for 8-10 minutes, or until set. Remove from the oven and allow them to cool while you prepare the cheesecake filling.
Creating the Cheesecake Filling
1. Beat the Cream Cheese: In a large mixing bowl, use an electric mixer to beat the cream cheese until it is smooth and creamy. Be sure to scrape down the sides of the bowl to ensure all the cream cheese is fully incorporated.
2. Add the Sugar: Gradually add in the granulated sugar, mixing on low speed until combined. This step is crucial to avoid incorporating too much air, which can lead to cracks in your cheesecake.
3. Incorporate the Eggs: Add the eggs, one at a time, mixing on low speed after each addition. This helps to create a smooth filling while preventing overmixing.
4. Mix in the Key Ingredients: Next, add the red food coloring and cocoa powder, mixing until fully combined. Adjust the amount of food coloring based on your desired shade of red. The filling should be a vibrant red color with a slightly chocolaty aroma.
5. Smooth Out the Mixture: Finally, mix the batter on medium speed for a few seconds to ensure a silky-smooth consistency. Make sure to scrape down the sides of the bowl one last time to catch any lumps.
With the crusts baked and the cheesecake filling prepared, you’re almost ready to bring these mini red velvet cheesecakes to life. The next steps will involve filling the crusts and baking the cheesecakes to perfection. Stay tuned as we guide you through the remaining steps to create these extraordinary desserts that are sure to wow anyone who takes a bite.
Filling the Crusts
Once your crusts are ready and cooled, it’s time to fill them with the rich, velvety cheesecake batter. Using a ladle or a measuring cup, carefully pour the cheesecake filling into each crust, ensuring an even distribution. Aim to fill each mini cheesecake about ¾ full to allow room for slight expansion during baking. This method not only helps achieve a uniform appearance but also guarantees that every bite is filled with the luscious cheesecake flavor.
To ensure an even distribution, you can use a small offset spatula or the back of a spoon to gently smooth the top of each filled crust. This step is crucial as it promotes even baking and an aesthetically pleasing finish. Make sure to tap the muffin tin gently on the counter to release any air bubbles trapped in the filling, which can lead to uneven textures after baking.
Baking the Cheesecakes
Now that your mini red velvet cheesecakes are filled, it’s time to bake them to perfection.
Optimal Baking Time and Temperature
Preheat your oven to 325°F (160°C), a temperature that allows the cheesecakes to bake evenly without cracking. Place the filled muffin tin on the center rack of the oven and bake for approximately 18-20 minutes. It’s essential to monitor the cheesecakes closely during this time. You’ll know they are done when the edges appear set, but the center still has a slight jiggle when you gently shake the pan. This jiggliness indicates that the cheesecakes will continue to cook as they cool, resulting in a creamy texture.
Avoid overbaking, as this can lead to dry cheesecakes. Checking for doneness a few minutes prior to the suggested baking time can help prevent this issue and ensure your mini cheesecakes remain indulgently rich.
Cooling Techniques
Once baked, remove the muffin tin from the oven and let it cool on a wire rack for about 10-15 minutes. This cooling period is critical as it helps the cheesecakes set properly and reduces the likelihood of cracking. After they have cooled slightly, transfer the cheesecakes to the refrigerator for at least 2 hours, or until fully chilled. Cooling them in the muffin tin allows them to maintain their structure and makes it easier to remove them later.
For an extra precaution against cracks, you can run a small knife around the edges of each cheesecake after they have cooled to help loosen them from the pan. This technique makes it easier to remove them without damaging the delicate crust.
Making the Cream Cheese Frosting
While your cheesecakes are chilling, you can prepare the delightful cream cheese frosting that will elevate your mini red velvet cheesecakes.
Mixing Techniques for Creamy Frosting
To achieve the perfect creamy frosting, start by allowing your cream cheese and butter to come to room temperature. This step is essential as it helps create a smooth, lump-free frosting. In a mixing bowl, beat the softened cream cheese and butter together with an electric mixer on medium speed until the mixture is light and fluffy. This process typically takes about 2-3 minutes.
Once the cream cheese and butter are well combined, gradually add in powdered sugar and vanilla extract. Continue to mix on low speed to prevent the sugar from flying everywhere. Increase the speed to medium and beat until the frosting achieves a creamy and spreadable consistency. Taste the frosting and adjust the sweetness or flavor by adding more sugar or vanilla as desired.
Frosting Application Methods
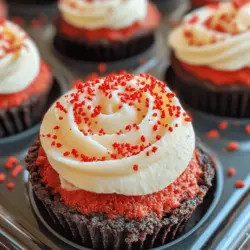
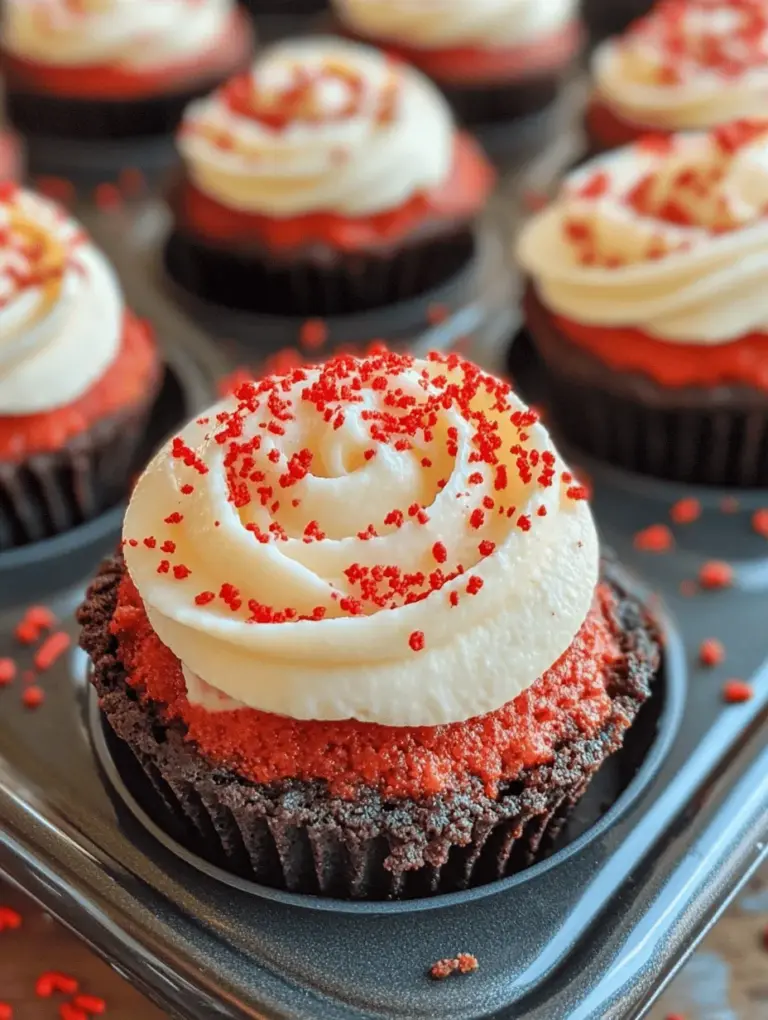
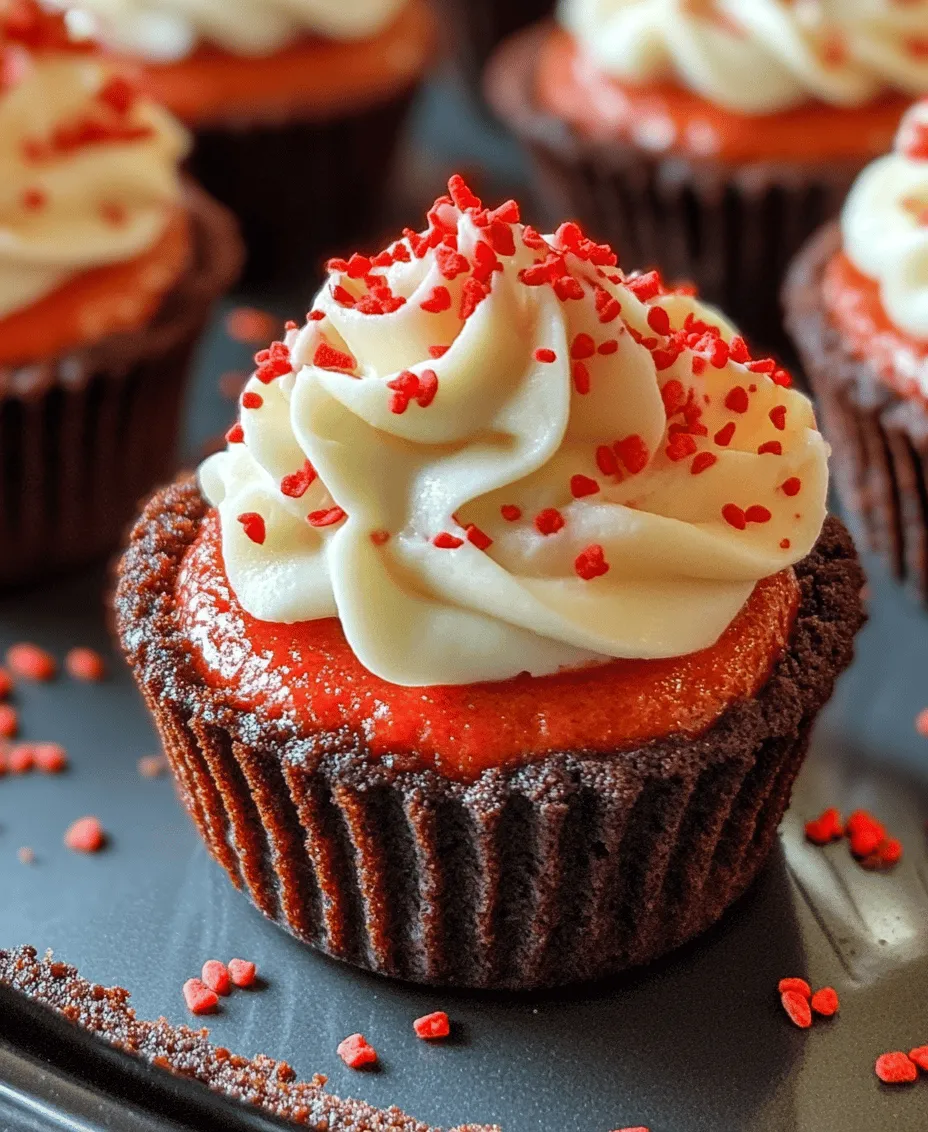
For a visually appealing finish, consider using a piping bag fitted with a star tip to frost your mini red velvet cheesecakes. This method allows for elegant swirls and designs, making them look professionally made. If you prefer a more rustic approach, you can simply spread the frosting using an offset spatula.
Regardless of the method you choose, ensure that the cheesecakes are completely chilled before frosting. This will help the frosting adhere better and maintain its shape. For added flair, consider garnishing with red velvet cake crumbs, sprinkles, or even a drizzle of chocolate sauce to enhance the presentation and flavor.
Chilling and Serving the Cheesecakes
Once frosted, return the cheesecakes to the refrigerator and let them chill for an additional hour. This step allows the flavors to meld and the frosting to set, ensuring a delightful experience when served.
When ready to serve, carefully remove the mini cheesecakes from the muffin tin. You can use a small offset spatula to lift them out gently. Arrange them on a serving platter and add your desired garnishes. These cheesecakes can be served as they are or alongside a scoop of vanilla ice cream or a dollop of whipped cream for an extra indulgence.
Nutritional Information
Understanding the nutritional content of your mini red velvet cheesecakes can help you make informed decisions, especially when serving guests or considering dietary restrictions. Each mini cheesecake contains approximately 200 calories, with a serving size typically being one mini cheesecake. The key nutritional components include:
– Calories: 200 per serving
– Total Fat: 13g
– Saturated Fat: 7g
– Cholesterol: 45mg
– Sodium: 220mg
– Total Carbohydrates: 20g
– Dietary Fiber: 1g
– Sugars: 12g
– Protein: 3g
While these mini cheesecakes are a treat, moderation is key, especially for those monitoring their sugar intake or following specific dietary guidelines. Consider making adjustments to the recipe, such as using low-fat cream cheese or substituting sweeteners, to create a lighter version.
Conclusion
Making mini red velvet cheesecakes is a delightful experience that combines the rich flavors of red velvet with the creamy indulgence of cheesecake. This recipe is perfect for both novice and experienced bakers, offering an opportunity to impress friends and family with a visually stunning and scrumptious dessert. Whether for a birthday celebration, holiday gathering, or simply as a sweet treat to enjoy at home, these mini cheesecakes are sure to be a hit.
Don’t hesitate to try this recipe for your next special occasion, and enjoy the joy of baking. The combination of flavors, textures, and beautiful presentation makes these mini red velvet cheesecakes a true celebration of culinary creativity. Enjoy the process, and most importantly, savor every bite!