Welcome to the delightful world of baking where flavors blend harmoniously to create irresistible treats. Today, we will explore the beloved and indulgent 7 Layer Coconut Magic Bars. These bars are not only visually stunning with their vibrant layers, but they also offer a symphony of textures and tastes — from the crunch of nuts to the creaminess of sweetened condensed milk. Perfect for gatherings, celebrations, or a sweet indulgence at home, this recipe is straightforward yet impressive. In this article, we will delve into the history, variations, and step-by-step instructions for making these delectable treats, ensuring you have all the information needed to create your own batch of magic bars.
Understanding the 7 Layer Coconut Magic Bars
Exploring the Origins of Magic Bars
Magic Bars, also known as “Hello Dolly Bars,” have a storied history that dates back to the mid-20th century. These treats gained popularity in American kitchens during the 1960s and 1970s, particularly among home bakers looking for simple yet crowd-pleasing desserts. The concept behind Magic Bars is simple: layering a variety of ingredients to create a delicious treat that requires minimal effort.
The classic version features a graham cracker crust topped with an array of ingredients such as chocolate chips, nuts, coconut, and the star ingredient, sweetened condensed milk. This unique combination not only provides a rich flavor but also creates a gooey, decadent texture that is hard to resist. Over the years, various adaptations and regional variations have emerged, with bakers putting their own spin on the original recipe. From adding fruits to experimenting with different types of chips, the versatility of Magic Bars is part of what makes them a beloved staple in many households.
Key Ingredients and Their Roles
To truly appreciate the magic of these bars, it’s essential to understand the key ingredients that come together to create this confection. Each component plays a vital role in contributing to the overall flavor and texture, ensuring that every bite is a delight.
1. Graham Cracker Crumbs: The base of flavor, graham cracker crumbs provide a sweet and slightly nutty foundation for the bars. They offer a perfect balance to the richness of the toppings and create a sturdy structure.
2. Unsalted Butter: Butter is crucial in baking, adding richness and moisture. In this recipe, it helps bind the graham cracker crumbs together, forming a cohesive crust that contrasts beautifully with the soft, gooey layers above.
3. Sweetened Flaked Coconut: This ingredient brings a tropical twist to the bars. Its chewy texture and natural sweetness complement the other flavors, creating a delightful contrast with the crunchy nuts.
4. Semi-Sweet Chocolate Chips: A classic choice, semi-sweet chocolate chips offer a rich chocolate flavor without being overly sweet. They melt beautifully and create a luscious layer that enhances the overall experience.
5. Butterscotch Chips: Adding a sweet contrast to the chocolate, butterscotch chips introduce a unique flavor profile that elevates the bars. Their creamy, buttery essence pairs well with the other ingredients, delivering a delightful surprise in each bite.
6. Sweetened Condensed Milk: Acting as the binding agent, sweetened condensed milk is what makes these bars truly magical. It adds sweetness and moisture, ensuring that the layers meld together perfectly.
7. Chopped Nuts: Nuts add a satisfying crunch to the bars. Whether you choose walnuts, pecans, or almonds, they provide a nutty flavor that complements the sweetness of the other ingredients.
Detailed Ingredient List
Now that we’ve covered the origins and significance of each ingredient, let’s take a closer look at the detailed ingredient list you will need to create your own 7 Layer Coconut Magic Bars.
Graham Cracker Crumbs: The Base of Flavor
Graham crackers are the foundation of the crust in these bars. They provide a subtle sweetness and a delightful crunch that balances the richness of the toppings. When selecting graham crackers, look for high-quality options that are free from artificial flavors or preservatives. For those with dietary restrictions, gluten-free graham crackers can be used as a substitute. Alternatively, crushed digestive biscuits or almond flour can also serve as a suitable base.
Unsalted Butter: Enhancing Richness
Butter enhances the flavor and texture of baked goods, and in this recipe, it plays a crucial role in binding the graham cracker crumbs together. Using unsalted butter allows you to control the saltiness of the bars, ensuring a perfect balance of flavors. When choosing butter, opt for high-quality brands made from cream for the best taste. If you’re looking for a healthier alternative, coconut oil or vegan butter can be used as substitutes.
Sweetened Flaked Coconut: A Tropical Twist
Sweetened flaked coconut adds a delightful texture and flavor to the bars. Its natural sweetness complements the richness of the chocolate and butterscotch chips. Look for unsweetened coconut if you prefer a less sugary option or want to control the sweetness of the recipe. For those who may not enjoy coconut, consider using crushed graham crackers or oats as an alternative topping.
Semi-Sweet Chocolate Chips: The Classic Choice
Semi-sweet chocolate chips are the ideal choice for baking, providing a balanced flavor that is not overly sweet. They melt beautifully, creating a luscious layer throughout the bars. If you’re feeling adventurous, consider experimenting with dark chocolate chips for a richer taste, or even white chocolate chips for a different twist.
Butterscotch Chips: A Sweet Contrast
Butterscotch chips add a unique layer of flavor that sets these bars apart. Their creamy, buttery taste complements the chocolate and coconut beautifully. If you’re looking to mix things up, try using peanut butter chips or even caramel bits for an exciting variation.
Sweetened Condensed Milk: The Binding Agent
Sweetened condensed milk is the star ingredient in these bars, providing moisture and sweetness while binding all the layers together. Its thick consistency ensures that the bars hold their shape after baking. For those who are lactose intolerant or vegan, there are plant-based alternatives available, such as coconut condensed milk or homemade nut-based condensed milks.
Chopped Nuts: Adding Crunch
Nuts are optional in this recipe, but they add a wonderful crunch and enhance the overall flavor. Chopped walnuts, pecans, or almonds work beautifully. If you have nut allergies, feel free to omit them or replace them with seeds, such as sunflower or pumpkin seeds, for added texture.
Getting Started: The Initial Steps
Now that we have a clear understanding of the ingredients, let’s jump into the initial steps of preparing these scrumptious 7 Layer Coconut Magic Bars.
Step 1: Preheat Your Oven
Before you start mixing ingredients, preheat your oven to 350°F (175°C). This ensures that your bars will bake evenly and achieve that perfect golden-brown color.
Step 2: Prepare the Baking Dish
Line a 9×13-inch baking dish with parchment paper, allowing some overhang on the sides. This will make it easier to lift the bars out once they are cooled. Lightly spray the parchment paper with non-stick cooking spray to prevent sticking.
Step 3: Make the Graham Cracker Crust
In a medium mixing bowl, combine the graham cracker crumbs and melted unsalted butter. Stir until the crumbs are evenly coated and resemble wet sand. Press this mixture firmly into the bottom of the prepared baking dish, ensuring an even layer. This crust will serve as the sturdy base for the layers above.
Step 4: Layer the Ingredients
Now comes the fun part: layering the ingredients! Start by evenly sprinkling the semi-sweet chocolate chips over the crust, followed by the butterscotch chips. Next, add the sweetened flaked coconut, spreading it out to cover the chips completely. If you’re using chopped nuts, sprinkle them on top of the coconut layer.
Step 5: Drizzle with Sweetened Condensed Milk
Finally, pour the sweetened condensed milk evenly over the entire surface, ensuring that it seeps through all the layers. This step is crucial as it binds everything together and adds that irresistible gooeyness to the bars.
Step 6: Bake to Perfection
Place the baking dish in the preheated oven and bake for 25-30 minutes or until the top is golden and the edges are bubbly. Keep an eye on the bars during the last few minutes of baking to prevent over-browning. Allow them to cool in the pan for at least 30 minutes before lifting them out using the parchment paper overhang.
With the crust baked and layers carefully assembled, you are well on your way to creating a batch of these delectable 7 Layer Coconut Magic Bars. In the next part of our article, we will cover additional tips for achieving the best results, variations to try, and answers to common questions about this delightful recipe. Stay tuned as we continue this journey into the world of baking magic!
{{image_1}}
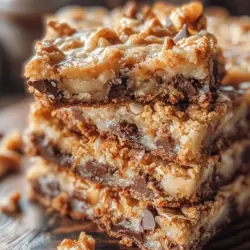
The Choice Between Walnuts and Pecans
When it comes to adding nuts to your 7 Layer Coconut Magic Bars, the choice between walnuts and pecans can significantly influence both flavor and texture. Walnuts offer a slightly bitter, earthy flavor that complements the sweetness of the other ingredients, while pecans bring a buttery, rich taste that enhances the overall sweetness of the bars.
Incorporating nuts not only adds a delightful crunch but also enhances the nutritional profile of your dessert. Nuts are packed with healthy fats, protein, and essential nutrients such as vitamin E and magnesium. They provide a satisfying contrast to the creamy layers of coconut, chocolate, and sweetened condensed milk, making your bars more enjoyable and satisfying.
Step-by-Step Instructions
Prepping the Oven and Baking Dish
Importance of Preheating the Oven
Before you begin mixing ingredients, it’s crucial to preheat your oven to 350°F (175°C). Preheating ensures that your bars bake evenly, allowing the flavors to meld beautifully while achieving that perfect gooey texture in the middle.
Best Practices for Preparing Your Baking Dish
For the best results, line a 9×13-inch baking dish with parchment paper, allowing some overhang on the sides. This overhang will help you lift the bars out easily after baking. Grease the parchment lightly with butter or a non-stick spray to prevent sticking. This preparation will make it effortless to remove the bars and ensure they maintain their shape when cut.
Creating the Perfect Crust
Techniques for Pressing the Graham Cracker Mixture Evenly
To create the crust, combine crushed graham crackers with melted butter and sugar. Press the mixture firmly into the bottom of the prepared baking dish. Use a flat-bottomed measuring cup or your hands to ensure an even layer. The goal is to compact the crumbs tightly to form a solid base that won’t crumble when you cut the bars.
Tips for Achieving the Ideal Crust Texture
For an even better crust, consider baking it for about 10 minutes before adding the subsequent layers. This pre-baking step helps to set the crust, making it sturdier and less likely to fall apart when you cut into the finished bars. Keep an eye on it; you want it to be lightly golden but not overly browned.
Layering the Ingredients for Maximum Flavor
How to Layer Effectively for Even Distribution
Once your crust is ready, it’s time to layer the remaining ingredients. Start with a generous sprinkle of chocolate chips over the crust, followed by a layer of shredded coconut. Make sure to distribute these ingredients evenly so that every bite is packed with flavor.
Creative Ways to Modify the Layering Process
Feel free to get creative with your layering. You could add a layer of butterscotch chips for an extra burst of flavor or alternate layers of nuts and chips for a unique twist. The key is to ensure that each layer is evenly spread to maintain the balance of flavors throughout the bars.
Pouring the Sweetened Condensed Milk
Techniques for Even Coverage
Pour the sweetened condensed milk over the layered ingredients slowly and evenly. Use a spatula to gently spread it out if necessary. This step is crucial as it acts as a binding agent, holding the layers together while adding sweetness and moisture.
How This Step Impacts the Final Texture of the Bars
The sweetened condensed milk will soak into the layers and create a rich, gooey filling. Ensuring even coverage will help each bite have that delightful combination of textures, from the crunch of the crust to the creamy center.
Baking to Perfection
Recognizing When the Bars Are Done
Bake your 7 Layer Coconut Magic Bars in the preheated oven for about 25-30 minutes. You’ll know they are done when the edges are lightly golden, and the center looks set but still slightly soft. A toothpick inserted in the middle should come out with a few moist crumbs but not wet batter.
Tips for Preventing Over-Baking
To avoid over-baking, keep a close eye on your bars in the final minutes of baking. Ovens can vary, so it’s essential to check for doneness a few minutes before the recommended time. Remember, the bars will continue to cook slightly while cooling in the pan.
Cooling and Cutting the Bars
Best Practices for Cutting Clean Squares or Bars
Once baked, remove the bars from the oven and allow them to cool in the pan for at least 10-15 minutes. This cooling period helps the layers set further. After this initial cooling, lift the bars out of the pan using the parchment overhang. Transfer to a cutting board to slice into squares or bars. Use a sharp knife for clean cuts, wiping it with a damp cloth between cuts to maintain neat edges.
Importance of Cooling Before Cutting
Cooling the bars completely before cutting is essential, as this allows the layers to firm up, making them easier to slice and handle. If you are impatient and cut them too soon, you might end up with a gooey mess instead of clean squares!
Serving Suggestions
Ideal Pairings for 7 Layer Coconut Magic Bars
These bars are decadently sweet and pair well with various beverages. A cup of strong coffee or a creamy latte is an excellent choice, as the bitterness of the coffee balances the richness of the bars. For something more refreshing, consider serving them with iced tea or a tropical smoothie, echoing the coconut theme.
Creative Ways to Present the Bars at Gatherings
When serving at gatherings, consider arranging the bars on a decorative platter. Dust them lightly with powdered sugar for an elegant touch. For added flair, you could garnish with toasted coconut flakes or place them in colorful cupcake liners for individual servings. This presentation not only makes them visually appealing but also makes it easy for guests to grab a piece.
Storing Leftovers for Maximum Freshness
How to Store Magic Bars Properly
To keep your 7 Layer Coconut Magic Bars fresh, store them in an airtight container at room temperature for up to 3 days. If you want to extend their shelf life, you can refrigerate them, where they will last for up to a week. Just ensure they are well-covered to prevent them from drying out.
Shelf Life and Signs of Spoilage
When stored correctly, these bars can remain delicious for up to a week. However, if you notice any changes in texture, such as excessive dryness or a hard crust, it may be time to discard them. Additionally, if you see any signs of mold or off-smells, it’s best to err on the side of caution and throw them away.
Conclusion
The 7 Layer Coconut Magic Bars are a delightful treat that brings joy and satisfaction to any occasion. With their rich layers and harmonious flavors, they are sure to impress friends and family alike. Whether you enjoy them warmed or at room temperature, these bars are a testament to the beauty of simple, comforting desserts. By following the steps outlined in this article, you can create these magic bars in your own kitchen, adding a touch of sweetness to your day. Happy baking!