
Introduction
The delightful combination of chocolate and peanut butter has captured the hearts (and taste buds) of dessert lovers for generations. From classic candy bars to gourmet pastries, the marriage of rich, velvety chocolate with the creamy, nutty flavor of peanut butter creates a harmonious balance that is simply irresistible. Chocolate peanut butter cups, in particular, stand out not only for their delectable taste but also for their simplicity in preparation. Whether you’re hosting a gathering, treating yourself, or seeking a creative gift, these homemade treats are sure to impress.
The appeal of making your own chocolate peanut butter cups lies in their ease of preparation and the satisfaction that comes from creating something delicious from scratch. In under an hour, you can whip up a batch of these indulgent confections that are perfect for any occasion—be it a cozy night in, birthday celebrations, or holiday festivities. Plus, the recipe’s versatility allows you to customize it to your liking. Want a crunch? Add some chopped nuts or a sprinkle of sea salt. Prefer a sweeter bite? Adjust the sugar levels in the filling. The possibilities are endless, and the result is always a crowd-pleaser.
In this article, we will delve into the ingredients that make these divine treats so special, explore their historical context, and guide you through the step-by-step process of creating your very own chocolate peanut butter cups.
Understanding the Ingredients
Before diving into the recipe, let’s take a closer look at the key ingredients that contribute to the rich flavor and satisfying texture of chocolate peanut butter cups.
Semi-Sweet Chocolate Chips
The star of the show is undoubtedly the chocolate. For this recipe, semi-sweet chocolate chips are the go-to choice. These chips are not only readily available but also provide the perfect balance of sweetness and richness. When selecting chocolate, consider the quality; high-quality chocolate will yield a smoother, more flavorful result. Brands such as Guittard or Ghirardelli are excellent options for achieving that decadent chocolate coating. You can also experiment with dark chocolate if you prefer a more intense flavor profile.
Creamy Peanut Butter
Next up is peanut butter, which serves as the luscious filling for our cups. You have a couple of options here: natural or processed peanut butter. Natural peanut butter, made from just peanuts and salt, offers a more authentic taste and is free from added sugars and oils. On the other hand, processed peanut butter tends to be creamier and easier to work with, thanks to added stabilizers. Choose whichever fits your taste preference and dietary needs. If you’re a fan of variety, try using almond butter or cashew butter for a unique twist!
Powdered Sugar
Powdered sugar plays a crucial role in achieving that silky-smooth filling. It dissolves easily, allowing for a lump-free mixture that blends seamlessly with the peanut butter. Additionally, it sweetens the filling without overwhelming the natural flavors of the peanuts. The amount can be adjusted to your preference—if you like your filling sweeter, feel free to add a bit more.
Vanilla Extract
A splash of vanilla extract is essential for enhancing the overall flavor of your peanut butter filling. This ingredient adds depth and complexity, making your chocolate peanut butter cups taste more indulgent. Always opt for pure vanilla extract over imitation varieties when possible, as the quality will significantly affect the flavor profile.
Sea Salt
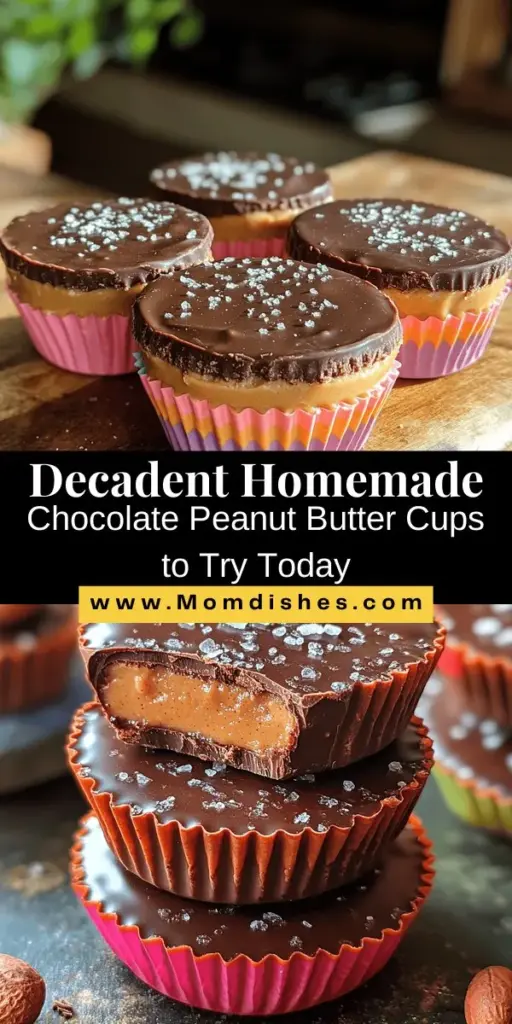
Finally, a sprinkle of sea salt is key to balancing the sweetness of the chocolate and the richness of the peanut butter. The contrast of sweet and salty elevates the flavor, creating a more dynamic taste experience. A finishing touch of flaky sea salt on top of the chocolate can also add an appealing visual element to your treats.
The Allure of Chocolate Peanut Butter Cups
Chocolate and peanut butter are a classic culinary pairing with a rich history. The combination gained popularity in the early 20th century and has since evolved into a beloved staple in American cuisine. The texture contrast between the creamy filling and the firm chocolate coating creates a delightful mouthfeel that keeps people coming back for more.
Beyond their delicious taste, these treats often evoke feelings of nostalgia. Many people have fond memories of indulging in store-bought chocolate peanut butter cups as children, making the homemade version even more special. Crafting these confections in your own kitchen not only allows you to recreate those cherished moments but also offers an opportunity to share them with friends and family, creating new memories along the way.
Step-by-Step Guide to Making Divine Chocolate Peanut Butter Cups
Now that we’ve covered the essential ingredients and the charm behind chocolate peanut butter cups, it’s time to get into the nitty-gritty of how to make them. Follow this detailed guide for a foolproof method to create your very own divine chocolate peanut butter cups.
Preparation and Assembly
1. Gather Your Ingredients: Start by assembling all the necessary ingredients. You will need semi-sweet chocolate chips, creamy peanut butter, powdered sugar, vanilla extract, and sea salt. Make sure you have a muffin tin and cupcake liners ready for the assembly process.
2. Melt the Chocolate: Begin by melting your semi-sweet chocolate chips. You can do this using a double boiler or a microwave. If using the microwave, place the chocolate chips in a microwave-safe bowl and heat in 30-second intervals, stirring in between, until smooth. Be cautious not to overheat the chocolate, as it can become grainy and lose its creamy texture.
3. Prepare the Muffin Tin: Line your muffin tin with paper cupcake liners. This will make it easier to remove the cups once they’ve set and add a nice presentation.
4. Create the Chocolate Base: Using a spoon or a small ladle, pour a layer of melted chocolate into the bottom of each cupcake liner, filling them about one-third of the way. Use the back of a spoon to spread the chocolate evenly across the base and up the sides slightly. This will create a sturdy shell for your peanut butter filling.
5. Chill to Set: Place the muffin tin in the refrigerator for about 15 minutes to allow the chocolate to set. This step is crucial, as it ensures that the filling will not mix with the chocolate base when added.
6. Prepare the Peanut Butter Filling: While the chocolate is setting, prepare the peanut butter filling. In a medium mixing bowl, combine the creamy peanut butter, powdered sugar, and vanilla extract. Mix until smooth and creamy, adjusting the sugar according to your taste.
7. Fill the Cups: Once the chocolate base has set, remove the muffin tin from the refrigerator. Spoon a generous dollop of the peanut butter filling into each cup, ensuring you leave a little room for the final layer of chocolate on top.
8. Top with Chocolate: Return the melted chocolate to the microwave for a few seconds if it has cooled and thickened. Pour another layer of melted chocolate over the peanut butter filling, covering it completely. Use a spoon to smooth it out and ensure the filling is well-sealed.
9. Final Chill: Place the muffin tin back into the refrigerator for another 30 minutes to allow the chocolate to fully set.
In these early steps, you’ll see how simple it is to create a decadent treat that rivals store-bought versions while allowing you the freedom to tailor the flavors to your liking. With the ingredients prepared and the assembly underway, you’ll soon be enjoying your own homemade chocolate peanut butter cups!
Stay tuned for the next section, where we will discuss additional tips for achieving the best results and answer some common questions about this delightful recipe.
{{image_1}}
Preparing the Muffin Tin
To ensure your Divine Chocolate Peanut Butter Cups come out perfectly shaped and are easy to remove, the type of muffin tin liner you use is crucial. Silicone liners are a fantastic option as they are flexible and non-stick, allowing for effortless removal once the cups have set. Alternatively, if you prefer paper liners, choose the unbleached kind, which tends to have a less chemical taste and may also be easier to peel away from the chocolate.
Before pouring in your melted chocolate, make sure to lightly grease the inside of the liners with a small amount of coconut oil or non-stick spray. This extra step can help the chocolate cups slide out smoothly. Whichever liner you choose, ensure the muffin tin is placed on a sturdy baking sheet for easy transfer to and from the refrigerator.
Creating the Chocolate Layer
The first layer of your Divine Chocolate Peanut Butter Cups is crucial for a solid foundation. Begin by melting your chocolate using a double boiler or microwave, stirring frequently to avoid burning. Once melted, let it cool slightly before pouring a spoonful into each muffin liner.
To ensure even distribution, use the back of a spoon or a small silicone spatula to spread the chocolate up the sides of the liner, creating a uniform layer. This technique will also help create a strong structure that can hold the peanut butter filling without collapsing. Remember to leave enough chocolate for the top layer, as you want to seal in the filling thoroughly.
Crafting the Peanut Butter Filling
Achieving the right consistency for your peanut butter filling is key to the overall success of your chocolate peanut butter cups. Start with smooth, creamy peanut butter, and for a more indulgent flavor, consider using natural peanut butter without added sugars or oils.
In a mixing bowl, combine the peanut butter with powdered sugar and a pinch of salt. The powdered sugar helps thicken the mixture, balancing the smoothness of the peanut butter. If you prefer a creamier filling, feel free to add a splash of coconut oil or melted butter to the mix, which will also enhance the richness. Aim for a thick yet spreadable consistency that can easily be molded into the chocolate base without oozing out.
Assembling and Layering
Once your chocolate layer has set, it’s time to assemble your cups. Carefully spoon a generous dollop of the peanut butter mixture into the center of each chocolate-lined muffin cup. Don’t worry about making it perfectly neat; the chocolate will cover it in the next step.
After adding the peanut butter filling, use the remaining melted chocolate to cover each cup fully. Ensure that the chocolate flows smoothly over the peanut butter, sealing it in and preventing any from leaking out during the chilling process. For best results, gently tap the muffin tin on the counter to release any air bubbles and help the top layer settle evenly.
Final Touches
Before placing your assembled cups in the refrigerator, sprinkle a tiny pinch of flaky sea salt on top of each one. This final touch not only enhances the chocolate and peanut butter flavor but also adds a delightful contrast that elevates the overall taste experience. The saltiness balances the sweetness, making each bite more satisfying.
Chilling Time
To achieve the perfect texture and flavor, chilling is essential. Allow your Divine Chocolate Peanut Butter Cups to chill in the refrigerator for at least one hour. This time allows the chocolate to harden completely and the flavors to meld beautifully. For a firmer texture, consider chilling them for a longer period, or even overnight.
Once chilled, gently remove the cups from the muffin tin. If using paper liners, carefully peel them away, taking care not to disturb the shape of the cups. You’ll be left with perfectly formed, indulgent treats ready for enjoyment.
Serving Suggestions and Pairings
These Divine Chocolate Peanut Butter Cups are delightful on their own, but there are several ways to elevate their presentation and make them even more enticing for gatherings or casual snacking.
1. Ideas for Serving: Arrange your chocolate peanut butter cups on a decorative platter for parties or gatherings. You can also drizzle some melted chocolate on top for an added touch of elegance. For a fun twist, serve them alongside fresh fruit like strawberries or banana slices, which complement the rich flavors beautifully.
2. Presentation Styles: For a festive touch, consider wrapping each cup in colorful foil or placing them in cupcake liners with fun designs. This not only enhances their visual appeal but also makes them easy to grab and enjoy.
3. Beverage Pairings: To complement the rich flavors of the chocolate and peanut butter, serve your cups with a glass of cold milk or a rich cup of coffee. For a more decadent experience, pair them with a dessert wine or a creamy dessert stout.
4. Variations on the Recipe: Feel free to experiment with different flavors and ingredients. Add crushed nuts, such as almonds or hazelnuts, into the peanut butter filling for an added crunch. Alternatively, try using dark chocolate, milk chocolate, or even white chocolate for the outer layer to create distinct flavor profiles.
Nutritional Information and Benefits
Understanding the nutritional profile of the ingredients used in your Divine Chocolate Peanut Butter Cups can help you appreciate their value as a treat.
– Overview of Nutritional Profile: Each cup primarily consists of dark chocolate and peanut butter, both of which contain beneficial nutrients. Dark chocolate is rich in antioxidants, while peanut butter provides healthy fats and protein.
– Potential Health Benefits: Consuming chocolate and peanut butter in moderation can offer various health benefits. Dark chocolate may improve heart health and boost mood, while peanut butter is an excellent source of protein and can help satisfy hunger, making it a great energy source.
– Indulgence vs. Guilt-Free Treats: While these cups are undeniably indulgent, enjoying them in moderation can fit into a balanced diet. Homemade treats often have less sugar and no preservatives compared to store-bought options, allowing for a guilt-free indulgence.
Conclusion
Creating homemade Divine Chocolate Peanut Butter Cups is not only simple but also incredibly satisfying. With just a few key ingredients and some straightforward steps, you can craft these delicious treats that are sure to impress friends and family alike.
Don’t hesitate to experiment with flavors and variations to suit your palate. Whether you add a touch of sea salt, incorporate different types of chocolate, or mix in your favorite nuts, the possibilities are endless. The joy of creating and sharing these homemade delights is unmatched—so gather your ingredients, follow these steps, and enjoy the delicious results!
