Introduction
Delight in the warm, comforting flavors of homemade Cinnamon Roll Bliss Bars, a delightful twist on the classic cinnamon roll. These bars combine the rich taste of cinnamon with a creamy glaze, making them a perfect treat for breakfast, dessert, or simply a sweet snack. With easy-to-follow instructions and simple ingredients, this recipe invites bakers of all skill levels to indulge in a bit of bliss.
Cinnamon rolls have long been a beloved breakfast staple, celebrated for their fluffy dough, aromatic spices, and sweet, gooey center. However, as culinary creativity flourishes, so does the desire for more convenient and versatile options. Enter Cinnamon Roll Bliss Bars: a delicious adaptation that captures the essence of a traditional cinnamon roll but presents it in a format that is not only portable but also incredibly easy to prepare.
These blissful bars are perfect for a wide range of occasions—from a leisurely weekend brunch to a delightful dessert at family gatherings. They are a guaranteed crowd-pleaser, appealing to both the young and the young at heart. The combination of warm cinnamon and creamy glaze creates a heavenly experience that lingers with every bite, making it hard to resist having just one.
Understanding the Essence of Cinnamon Roll Bliss Bars
The evolution of traditional recipes often leads to innovative creations. Cinnamon Roll Bliss Bars are an excellent example of this, merging the iconic flavors of cinnamon rolls into a portable, easy-to-make format. The history of cinnamon rolls can be traced back to the Swedish “kanelbullar,” which translates to cinnamon buns. This delectable treat has since traveled around the globe, finding its way into various cuisines and cultures.
In the United States, cinnamon rolls became a popular breakfast item, especially in bakeries and coffee shops. Their rise to fame is largely attributed to the convenience of ready-to-bake dough and the widespread availability of cinnamon, making them an easy indulgence for many. As the love for these sweet rolls grew, so did the desire to innovate.
Cinnamon Roll Bliss Bars honor this tradition while offering a new way to enjoy the beloved flavors. Instead of rolling and slicing dough, bakers can mix, spread, and bake—resulting in a rich, dense bar that retains all the gooey goodness of its predecessor. The allure of these bars lies not only in their delicious taste but also in their adaptability. They can be enjoyed warm out of the oven, served at room temperature, or even chilled, making them a versatile option for any occasion.
Ingredients Breakdown
A detailed look at the key ingredients that make these Cinnamon Roll Bliss Bars a must-try:
Core Ingredients
– All-Purpose Flour: The foundation that provides structure and texture. Using the right flour is crucial; all-purpose flour gives these bars the necessary density without making them too heavy.
– Rolled Oats: Adding heartiness and a chewy texture. The oats contribute to the overall flavor and provide a bit of nutty goodness, enhancing the bars’ nutritional profile.
– Brown Sugar: For that rich, caramel flavor that complements cinnamon. Brown sugar’s moisture content helps keep the bars soft and chewy, while its deep flavor adds complexity.
– Unsalted Butter: Offers moisture and richness to the batter. Using unsalted butter allows for better control over the overall saltiness of the bars, ensuring the sweetness and cinnamon flavors shine through.
– Maple Syrup: A natural sweetener that enhances the flavor profile. Maple syrup not only adds sweetness but also infuses a subtle, earthy flavor that pairs beautifully with cinnamon.
– Milk: Contributes to the moisture and softness of the bars. Whole milk is preferred for its creaminess, but alternatives such as almond or oat milk can also be used for a dairy-free version.
– Ground Cinnamon: The star ingredient that provides warmth and spice. The amount of cinnamon can be adjusted based on personal preference, but a generous portion is recommended to create that signature cinnamon flavor.
– Nuts (Optional): For added crunch and flavor. Chopped pecans or walnuts can be folded into the batter or sprinkled on top, giving an additional layer of texture and taste.
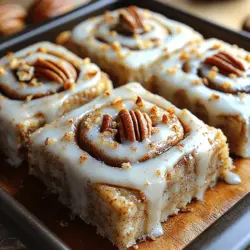
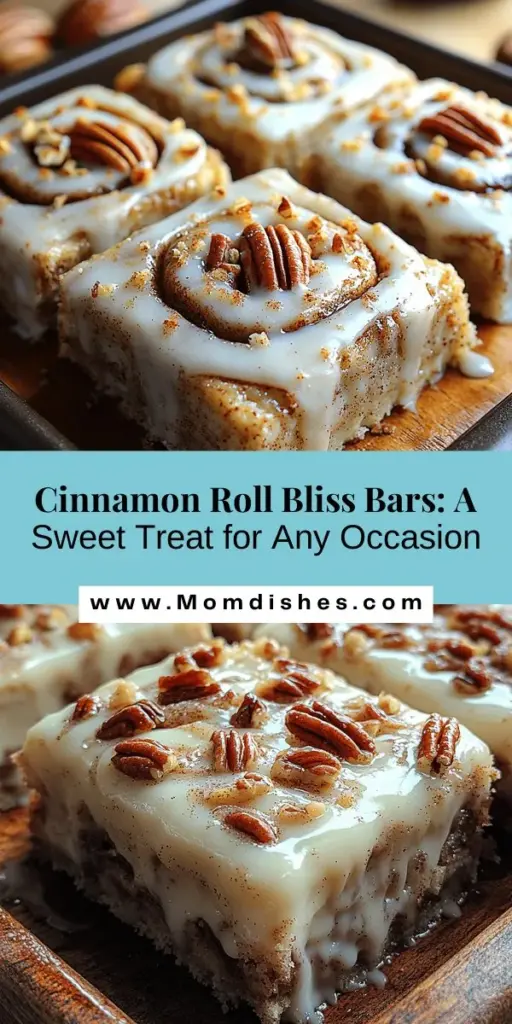
Cinnamon Swirl and Cream Cheese Glaze
The cinnamon swirl is essential in creating layers of flavor and replicating the classic cinnamon roll experience. This mixture, typically made from a combination of cinnamon, sugar, and butter, is swirled through the batter before baking, resulting in a delightful surprise in every bite.
The cream cheese glaze is another crucial element that elevates the bars to a new level. This creamy topping adds a delightful sweetness and a smooth texture that contrasts beautifully with the spiced bars beneath. The glaze can be drizzled on top after baking, providing a finishing touch that not only enhances the visual appeal but also the overall flavor profile of the Cinnamon Roll Bliss Bars.
Step-by-Step Guide to Making Cinnamon Roll Bliss Bars
Now that we’ve covered the background and essential ingredients, let’s dive into the preparation process for these indulgent Cinnamon Roll Bliss Bars. Following this step-by-step guide will help ensure your baking experience is enjoyable and successful.
Step 1: Preheat the Oven
Start by preheating your oven to 350°F (175°C). This step is crucial as it ensures that the bars cook evenly and rise properly. While the oven heats up, you can prepare the baking pan.
Step 2: Prepare Your Baking Dish
Grease a 9×13-inch baking dish with butter or line it with parchment paper for easy removal. If using parchment paper, make sure to leave some overhang on the sides for easy lifting once the bars are baked.
Step 3: Mix the Dry Ingredients
In a large mixing bowl, combine the all-purpose flour, rolled oats, brown sugar, and ground cinnamon. Whisk these ingredients together until well blended, ensuring that there are no lumps of brown sugar left. The combination of dry ingredients is essential for the bars’ texture and flavor.
Step 4: Combine the Wet Ingredients
In a separate bowl, melt the unsalted butter and allow it to cool slightly. Then, add the milk and maple syrup, whisking until fully incorporated. If you prefer a richer flavor, you may choose to use buttermilk instead of regular milk. This will add a tangy note that complements the sweetness of the bars.
Step 5: Combine Wet and Dry Ingredients
Pour the wet ingredients into the bowl with the dry ingredients. Stir until just combined, being careful not to overmix. The batter should be thick, yet spreadable. If you’re adding nuts, fold them in at this stage.
Step 6: Make the Cinnamon Swirl Mixture
In a small bowl, mix together softened butter, brown sugar, and cinnamon to create the cinnamon swirl mixture. This will be the tantalizing layer that runs through the bars, creating that delightful cinnamon roll flavor.
Step 7: Assemble the Bars
Spread half of the batter into the prepared baking dish, smoothing it out evenly with a spatula. Next, dollop the cinnamon swirl mixture over the batter. Use a knife or toothpick to create swirls, ensuring it remains visible on the top. Finally, spread the remaining batter over the swirl mixture, smoothing it out to cover completely.
Step 8: Bake
Place the baking dish in the preheated oven and bake for 25-30 minutes, or until the edges start to turn golden and a toothpick inserted in the center comes out clean. Be mindful not to overbake, as you want the bars to remain soft and chewy.
Step 9: Prepare the Cream Cheese Glaze
While the bars are baking, you can prepare the cream cheese glaze. In a medium bowl, beat softened cream cheese with powdered sugar and a splash of vanilla extract until smooth and creamy. If the glaze is too thick, add milk a teaspoon at a time until you reach the desired consistency.
Step 10: Glaze and Cool
Once the bars are out of the oven, allow them to cool in the pan for about 10 minutes before transferring them to a wire rack. Once they’ve cooled slightly, drizzle the cream cheese glaze over the top, allowing it to soak in slightly for added sweetness.
This step-by-step guide ensures that you’ll be able to create the perfect Cinnamon Roll Bliss Bars, brimming with comforting flavors and delightful textures. Stay tuned for more tips and variations to make this recipe your own!
{{image_1}}
Prepping Your Kitchen
Preheating the Oven
Before diving into the delicious world of Cinnamon Roll Bliss Bars, it’s crucial to preheat your oven. Proper temperature is vital for baking, ensuring that your bars rise evenly and achieve that delightful golden-brown finish. Set your oven to 350°F (175°C) and allow it to reach the desired temperature before placing your baking pan inside. This simple step can significantly affect the final texture and flavor of your treats, so don’t skip it!
Preparing the Baking Pan
Next, you’ll want to prepare your baking pan. A 9×13 inch baking dish is ideal for this recipe, but you can also use a larger pan if you prefer thinner bars. Greasing the pan is essential to prevent sticking. You can use butter or cooking spray, but for an easy release, consider lining the bottom and sides of the pan with parchment paper. This not only ensures that your bars come out cleanly but also makes for easy cleanup.
Creating the Base Mixture
Combining Dry Ingredients
The foundation of your Cinnamon Roll Bliss Bars begins with the dry ingredients. In a large mixing bowl, combine all-purpose flour, rolled oats, baking powder, baking soda, and a pinch of salt. Mixing these ingredients together is more than just combining them; it’s a science. The flour and oats provide structure, while the leavening agents (baking powder and baking soda) create air pockets that help the bars rise during baking. Be sure to whisk them thoroughly to ensure even distribution of the leavening agents, which is key to achieving the right texture.
Mixing Wet Ingredients
In a separate bowl, mix your wet ingredients: melted butter, brown sugar, vanilla extract, and eggs. The key to a smooth batter is to combine these ingredients well. Use a whisk or electric mixer to beat the mixture until it is creamy and well-blended. This step is important because it helps to incorporate air into the batter, making your bars light and fluffy. Once combined, gradually add the dry ingredients to the wet mix, stirring gently until just combined. Be careful not to overmix, as this can lead to dense bars.
Building the Layers
Techniques for Layering the Batter and Cinnamon Mixture
Creating the layers in your Cinnamon Roll Bliss Bars is where the magic happens. Begin by pouring half of the batter into the prepared baking pan, spreading it evenly across the bottom. Next, prepare your cinnamon mixture by combining cinnamon and sugar in a small bowl. Sprinkle this mixture generously over the batter layer, ensuring complete coverage. Carefully dollop the remaining batter on top, and then use a spatula or the back of a spoon to spread it evenly over the cinnamon layer.
Swirling the Cinnamon
To achieve that signature cinnamon swirl, use a knife or a skewer to gently swirl the top layer of batter and the cinnamon mixture. Make sure to use a light hand; the goal is to create swirls without overmixing. Too much mixing can lead to a uniform batter, which diminishes the distinct layers you want to showcase.
Baking to Perfection
Understanding Baking Times
With your layers built, it’s time to bake! Place your pan in the preheated oven and set a timer for 25-30 minutes. Baking times can vary based on your oven and the type of pan used, so it’s essential to keep an eye on your bars as they bake. You’ll know they’re done when the edges start to pull away from the sides of the pan, and a toothpick inserted in the center comes out clean or with a few moist crumbs attached.
Cooling the Bars
Once baked, remove the bars from the oven and allow them to cool in the pan for about 10-15 minutes. After that, transfer them to a wire rack to cool completely. Cooling is a crucial step, as glazing warm bars can lead to a runny glaze that won’t set properly. Allow them to cool for at least 30 minutes before you consider glazing them.
Crafting the Cream Cheese Glaze
Step-by-Step Instructions for Making a Smooth Glaze
While your bars cool, you can prepare the delightful cream cheese glaze. In a medium bowl, beat softened cream cheese with a hand mixer until it’s smooth and creamy. Gradually add powdered sugar, mixing well to combine. Finally, drizzle in a little milk and vanilla extract, continuing to mix until the glaze reaches a smooth and pourable consistency. Adjust the amount of milk as needed; you want it to be thick enough to hold its shape when drizzled but not so thick that it won’t pour.
Adjusting Consistency
If your glaze is too thick, add a teaspoon of milk at a time until you reach the desired drizzling consistency. If it is too thin, simply add more powdered sugar until thickened. The goal is to create a glaze that can elegantly coat the top of your bars without running off completely.
Serving Suggestions and Storage
Presentation Ideas
When it comes to serving your Cinnamon Roll Bliss Bars, presentation can make a significant difference. Cut the cooled bars into squares or rectangles and arrange them on a decorative platter. For an extra touch, dust the tops lightly with powdered sugar or drizzle additional glaze over the bars for a visually appealing finish. You can also garnish with a sprinkle of cinnamon or some chopped nuts for added texture and flavor.
Best Practices for Storing Leftovers
To keep your Cinnamon Roll Bliss Bars fresh, store them in an airtight container at room temperature for up to three days. If you want to prolong their shelf life, consider refrigerating them, where they can last up to a week. For longer storage, these bars freeze beautifully. Wrap them individually in plastic wrap and then place them in a freezer-safe bag. They can be frozen for up to three months. When you’re ready to enjoy, simply thaw at room temperature or warm them up in the microwave for a few seconds.
Nutritional Considerations
Cinnamon Roll Bliss Bars not only delight your taste buds but also offer some nutritional benefits. The oats provide a good source of fiber, which is essential for digestive health. Additionally, the healthy fats from the butter and any nuts you may choose to add contribute to satiety, helping you feel full and satisfied. If you’re looking to modify the recipe for dietary restrictions, consider using gluten-free flour instead of all-purpose flour to accommodate those with gluten sensitivities. You can also substitute dairy-free cream cheese and almond milk for a completely dairy-free option without sacrificing flavor.
Conclusion
Cinnamon Roll Bliss Bars are not just a recipe; they are an experience that brings warmth and comfort to any gathering. With simple preparation and delightful taste, these bars are sure to become a beloved addition to your baking repertoire. Enjoy the rich flavors and the joy of sharing these sweet treats with friends and family, making memories one bite at a time. Whether served at a holiday gathering, a brunch with friends, or simply as a cozy treat for yourself, these bars are destined to impress and satisfy. So roll up your sleeves, gather your ingredients, and get ready to enjoy the bliss of baking!