Introduction
No-bake desserts have taken the culinary world by storm, offering a quick and simple solution for satisfying sweet cravings without the need for an oven. One such delightful creation is the Crunchy Butterfinger Balls, which have become a favorite among dessert lovers. These treats not only deliver a perfect balance of flavors but also captivate with their delightful crunch and velvety chocolate coating. Whether you’re preparing for a holiday gathering, a birthday celebration, or just a cozy night in, these bite-sized confections are sure to impress.
What makes Crunchy Butterfinger Balls particularly appealing is their straightforward preparation process. With just a handful of ingredients and minimal kitchen equipment, you can whip up a batch that rivals any bakery offering. The joy of making these treats lies in their versatility; they can be customized to fit any occasion and are always a hit with both kids and adults. So, let’s dive into the world of Crunchy Butterfinger Balls and explore the ingredients and preparation steps that make this no-bake dessert a must-try.
Understanding the Ingredients
To create the perfect Crunchy Butterfinger Balls, it’s essential to understand the key ingredients that contribute to their rich flavor and delightful texture.
Peanut Butter
At the heart of this recipe lies creamy peanut butter, which not only adds a rich, nutty flavor but also provides some nutritional benefits. Peanut butter is a great source of protein, healthy fats, and essential vitamins and minerals, including Vitamin E and magnesium. When combined with the sweetness of the other ingredients, it balances the flavor while contributing to the treat’s satisfying texture.
Butterfinger Bars
The star of the show in this recipe is undoubtedly the Butterfinger bars. These candy bars are known for their unique combination of crunchy peanut butter center coated in a chocolate shell. When chopped and mixed into the batter, they impart their signature flavor and crunchy texture, elevating these balls from ordinary to extraordinary. The caramel notes and crispiness of the Butterfinger bars create a delightful contrast with the smoothness of the peanut butter.
Graham Cracker Crumbs
Graham cracker crumbs play a crucial role in achieving the ideal texture for the Crunchy Butterfinger Balls. They act as a binding agent, helping to hold the mixture together while providing a subtle sweetness and a hint of crunch. The crumbs also absorb moisture, preventing the mixture from becoming overly sticky, which can hinder the rolling process. Additionally, graham crackers add a nostalgic touch, reminding many of childhood treats and s’mores.
Powdered Sugar
To enhance the sweetness and improve the consistency of the mixture, powdered sugar is incorporated. Its fine texture allows it to blend seamlessly with the other ingredients, creating a smooth and manageable dough that is easy to roll into balls. While it adds sweetness, powdered sugar also contributes to the overall structure of the treat, making it firm enough to hold its shape without being too dense.
Chocolate Coating
The final touch on these indulgent treats is the chocolate coating. While semi-sweet chocolate is commonly used, you can experiment with different varieties such as milk chocolate or dark chocolate to suit your preferences. Each type of chocolate brings its unique flavor profile, allowing you to customize these treats to your liking. Melting chocolate correctly is vital to achieving a smooth and glossy finish that not only looks appealing but also provides a satisfying snap when bitten into.
Preparation Steps Explained
Now that we have a good understanding of the ingredients, let’s walk through the preparation steps involved in making Crunchy Butterfinger Balls. This no-bake recipe is designed to be straightforward, making it perfect for both novice and experienced bakers.
Preparing the Mixture
1. Gather Your Ingredients: Start by collecting all the ingredients needed for the recipe. You’ll need peanut butter, chopped Butterfinger bars, graham cracker crumbs, and powdered sugar. Make sure you have your chocolate ready for melting later on.
2. Mix the Base: In a mixing bowl, combine the peanut butter and powdered sugar. Use a spatula or a hand mixer to combine them until you achieve a smooth consistency. This step is crucial, as it ensures that the sugar is evenly distributed throughout the peanut butter, preventing any clumps.
3. Incorporate Dry Ingredients: Gradually fold in the graham cracker crumbs and chopped Butterfinger bars. The mixture should start to come together and become thick but still pliable. If it feels too sticky, you can add a bit more graham cracker crumbs to help with the consistency.
4. Achieving the Right Consistency: The mixture should be firm enough to hold its shape when rolled into balls. If it’s too soft, you may need to chill it in the refrigerator for about 15 minutes to make it easier to handle. Proper consistency is key to forming uniform balls that won’t fall apart when coated in chocolate.
Shaping the Balls
1. Rolling the Mixture: Once the mixture has reached a suitable consistency, take small portions—about one tablespoon each—and roll them between your palms to form balls. Aim for uniformity in size, as this will ensure even coating and a professional appearance.
2. Techniques for Uniformity: To achieve uniformity, consider using a small cookie scoop or your hands to portion the dough. This method not only saves time but also helps maintain consistency in size, resulting in a more appealing presentation.
3. Placing on a Tray: Line a baking sheet with parchment paper. As you shape each ball, place it on the parchment-lined tray. This will prevent sticking and make it easier to transfer the balls to the refrigerator for chilling.
The Chilling Process
1. Chill the Balls: Once all the balls are shaped, place the tray in the refrigerator for at least 30 minutes. This chilling process is crucial, as it firms up the balls, making them easier to coat with chocolate later. It also helps the flavors meld together, enhancing the overall taste of the treat.
2. Preparing for Coating: While the balls are chilling, you can prepare for the chocolate coating. Set up a workspace with your melting chocolate and any additional toppings you wish to use, such as crushed nuts or sprinkles.
Melting and Coating Techniques
The final step in creating your Crunchy Butterfinger Balls is the melting and coating of chocolate, which adds a decadent finish to these treats.
How to Melt Chocolate Perfectly
1. Choosing Your Chocolate: Select high-quality chocolate for melting. Semi-sweet chocolate is a popular choice, but feel free to experiment with milk or dark chocolate based on your taste preferences.
2. Microwave Method: Place your chocolate in a microwave-safe bowl. Microwave it in short bursts, starting with 30 seconds, stirring in between intervals. This method prevents overheating, which can cause the chocolate to seize. Continue microwaving until the chocolate is nearly melted, then stir until completely smooth.
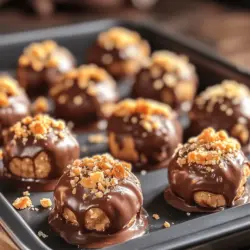
3. Coating the Balls: Once your chocolate is melted and smooth, remove the chilled balls from the refrigerator. Using a fork or a toothpick, dip each ball into the melted chocolate, ensuring it is fully coated. Shake off any excess chocolate and return the coated ball to the parchment-lined tray.
4. Adding Toppings: If you desire, sprinkle crushed nuts or additional Butterfinger pieces on top of the chocolate-coated balls before the chocolate sets. This not only enhances the visual appeal but also adds an extra crunch to the finished treat.
By following these steps, you’ll create irresistible Crunchy Butterfinger Balls that are sure to be a hit at any occasion!
{{image_1}}
The Addition of Coconut Oil for a Smoother Coating
To achieve a beautifully smooth and shiny chocolate coating for your Crunchy Butterfinger Balls, consider adding coconut oil to the melted chocolate. Coconut oil not only enhances the texture but also adds a subtle flavor that pairs beautifully with the rich chocolate and crunchy filling. The oil helps to thin out the chocolate, making it easier to work with and providing a more even coating.
How to Incorporate Coconut Oil:
1. When melting the chocolate, add one to two tablespoons of coconut oil for every cup of chocolate chips. This will help the chocolate melt more uniformly and create a glossy finish once it hardens.
2. Stir the coconut oil in until fully combined before dipping the Butterfinger balls. This will ensure that the oil is evenly distributed, allowing for a smoother coating.
Step-by-Step Guide on Coating the Balls with Chocolate
Coating your Crunchy Butterfinger Balls with chocolate can be a rewarding process if done properly. Follow these step-by-step instructions to ensure a perfect coating every time:
1. Prepare Your Setup: Line a baking sheet with parchment paper or a silicone mat to catch any drips and provide a non-stick surface for the coated balls.
2. Melt the Chocolate: In a microwave-safe bowl, combine your chocolate chips (and coconut oil, if using). Heat in the microwave in 30-second intervals, stirring between each interval until the chocolate is fully melted and smooth. Be careful not to overheat, as this can cause the chocolate to seize.
3. Dip the Balls: Using a fork, gently lower a Butterfinger ball into the melted chocolate. Use the fork to roll the ball around, ensuring it’s fully coated. Tap the fork against the side of the bowl to allow excess chocolate to drip off.
4. Transfer to Baking Sheet: Carefully lift the coated ball out of the chocolate and place it on the prepared baking sheet. Repeat this process for all the balls, ensuring they are spaced apart to prevent sticking.
5. Chill to Set: Once all the balls are coated, place the baking sheet in the refrigerator for about 30 minutes, or until the chocolate has fully set.
The Art of Adding Toppings: Timing and Technique for Crushed Butterfinger Bits
To elevate your Crunchy Butterfinger Balls, consider adding crushed Butterfinger bits as a topping. Timing and technique are crucial for achieving a professional finish:
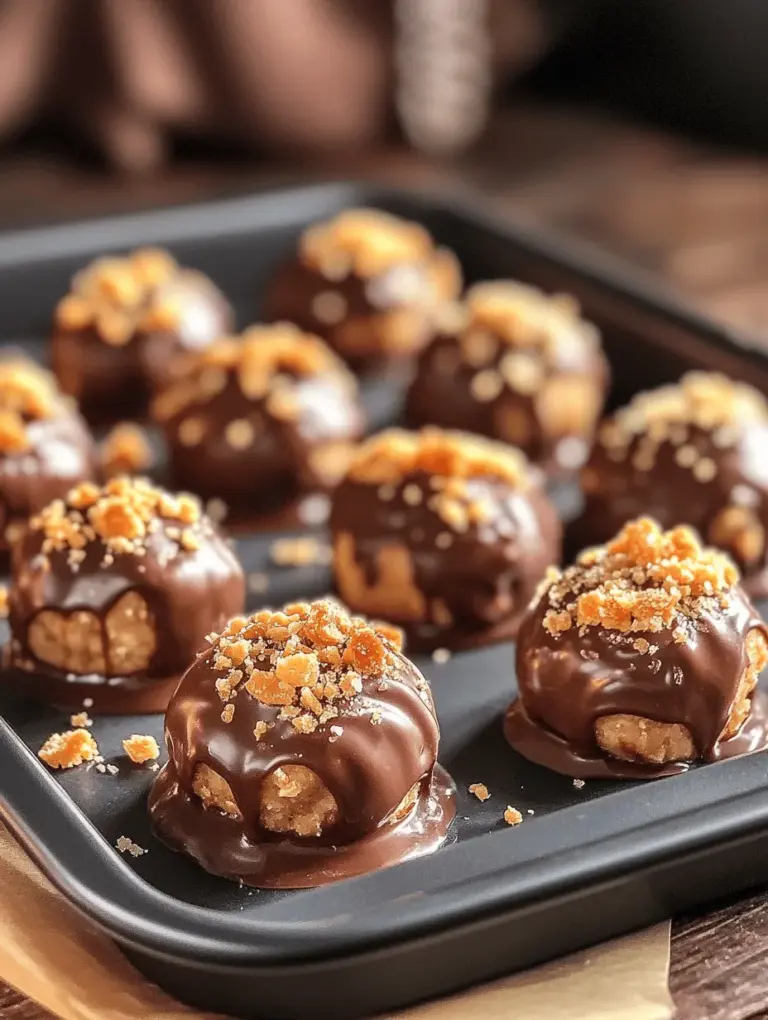
1. Timing: The best time to add the crushed Butterfinger bits is immediately after coating the balls with chocolate while the chocolate is still wet. This allows the bits to adhere perfectly to the surface.
2. Crush the Butterfinger: Place Butterfinger bars in a resealable plastic bag and crush them using a rolling pin or a meat mallet. Aim for a mix of fine crumbs and small chunks to create a visually appealing texture.
3. Sprinkle Generously: Once the balls are coated in chocolate, sprinkle the crushed Butterfinger bits over the tops. You can use your fingers or a small spoon to help distribute the bits evenly.
4. Press Lightly: For better adherence, lightly press the crushed bits into the chocolate before it sets. This will ensure they stay in place once the chocolate hardens.
Storage and Serving Suggestions
Best Practices for Storing Crunchy Butterfinger Balls
To keep your Crunchy Butterfinger Balls fresh and delicious, proper storage is essential. Here are some best practices:
– At Room Temperature: These treats can be stored at room temperature in an airtight container for up to a week. Make sure to keep them in a cool, dry place away from direct sunlight to prevent the chocolate from melting or becoming too soft.
– In the Refrigerator: If you prefer a firmer texture, refrigerate the balls. They can last up to two weeks when stored in an airtight container in the fridge. Just be aware that refrigeration may lead to a slightly harder chocolate coating.
– Freezing: For longer storage, you can freeze Crunchy Butterfinger Balls. Place them in a single layer on a baking sheet until frozen, then transfer them to an airtight container or freezer bag. They will keep well for up to three months. Simply thaw them in the refrigerator before serving.
Serving Ideas: Pairing with Beverages or as Part of Dessert Platters
Crunchy Butterfinger Balls are versatile treats that can be enjoyed in various ways:
– Beverage Pairings: These sweet delights pair wonderfully with a glass of cold milk or a warm cup of coffee. For a more indulgent option, serve them alongside hot chocolate topped with whipped cream.
– Dessert Platters: Include these balls as part of a dessert platter for parties or special occasions. They complement other desserts like brownies, cookies, or fruit, creating a diverse offering that appeals to all palates.
– Holiday or Party Presentations: For festive occasions, consider arranging the balls in decorative cupcake liners or placing them in clear treat bags tied with ribbons. This not only enhances their visual appeal but makes them perfect for gifting.
Nutritional Information
Understanding the nutritional content of your treats helps you enjoy them responsibly. Here’s a breakdown of the nutritional information per serving (two balls):
– Calories: Approximately 210
– Total Fat: 12g
– Saturated Fat: 7g
– Carbohydrates: 25g
– Sugars: 18g
– Protein: 3g
Discussion on Modifying the Recipe for Dietary Preferences
If you’re looking to make Crunchy Butterfinger Balls suitable for different dietary needs, consider the following modifications:
– Gluten-Free: Ensure that the ingredients, particularly the crushed Butterfinger bars, are certified gluten-free. You can also substitute with other gluten-free alternatives or candies.
– Vegan Options: For a vegan version, replace the chocolate chips with dairy-free chocolate and use a plant-based butter alternative. Additionally, ensure that your Butterfinger bars are dairy-free, or substitute with a similar vegan candy.
– Balance of Indulgence and Moderation: While these treats are indulgent, enjoying them in moderation allows for a guilt-free experience. Consider serving smaller portions or sharing them with friends and family.
Why These Treats Are Perfect for Any Occasion
Crunchy Butterfinger Balls are not just delightful in taste; they are also perfect for a variety of occasions:
– Parties and Gatherings: Whether it’s a birthday party, a holiday celebration, or a casual get-together, these treats are sure to impress guests of all ages. Their fun appearance and delicious flavor make them a favorite.
– Holidays: During festive seasons, these balls can be themed with seasonal colors or served alongside other holiday treats. Their rich taste often evokes nostalgia, making them a perfect addition to holiday celebrations.
– Gifts: Homemade treats carry a personal touch that store-bought gifts often lack. Crunchy Butterfinger Balls make thoughtful gifts for colleagues, friends, and family, showcasing your culinary skills while sharing something special.
– Appealing to All Ages: With their sweet and crunchy texture, these treats are loved by both kids and adults. They are an ideal sweet to serve at children’s parties while also appealing to adult palates.
Conclusion
In summary, Crunchy Butterfinger Balls are a delightful blend of crunchy, sweet, and rich flavors that make them an irresistible treat for any occasion. Their simple preparation process, combined with the joy of creating something special, makes this recipe a must-try. Whether you’re serving them at a party, gifting them to loved ones, or simply enjoying them yourself, these treats are sure to create memorable moments.
We encourage you to try your hand at making these delectable bites. The satisfaction of crafting your own treats is unparalleled, and we believe you’ll enjoy sharing them just as much as making them. Embrace the joy of cooking and sharing with friends and family, and let Crunchy Butterfinger Balls be a part of your sweet moments.