Crispy Garlic Chicken Tenders: A Comforting Family Favorite
There’s something undeniably comforting about the aroma of fried chicken wafting through the house. For many, including myself, this enticing scent is a nostalgic reminder of family gatherings, where laughter mingled with the delicious warmth of crispy chicken tenders sizzling in the kitchen. From my childhood days of eagerly awaiting my turn to help, dipping chicken into flour and breadcrumbs with excited hands, the experience was more than just cooking—it was about creating memories. Today, I’m excited to share my recipe for Crispy Garlic Chicken Tenders, a dish that’s not only simple to prepare but also perfect for any occasion—be it a cozy family dinner or a lively get-together with friends.
The Allure of Crispy Garlic Chicken Tenders
Chicken tenders are a universally loved comfort food, often associated with childhood favorites and family traditions. Their versatility allows them to be served in a variety of ways, from classic plates with mashed potatoes to gourmet sandwiches and salads. The crispy garlic chicken tender recipe takes this beloved dish to the next level, infusing it with rich flavors and a satisfying crunch that will have everyone asking for seconds.
The beauty of this recipe lies in its simplicity and the ability to customize it based on your preferences. Whether you enjoy a little extra kick of spice or prefer to keep it mild, you can easily adjust the seasoning to suit your taste. Additionally, the ingredients are readily available at most grocery stores, making it convenient for anyone to recreate this dish at home.
Ingredients That Shine
To create these mouthwatering chicken tenders, gather the following ingredients:
– Chicken Tenders: The star of the show, a pound of chicken tenders provides a tender and juicy base for your dish. These strips of chicken breast are not only easy to work with but also cook quickly, making them an ideal choice for weeknight dinners.
– All-Purpose Flour: This forms the first layer of flavor and helps the egg mixture adhere to the chicken. The flour creates a foundation that ensures the chicken stays moist while achieving a crispy finish.
– Eggs: Two large eggs act as a binding agent, ensuring your breadcrumbs stick beautifully to the chicken. The eggs also contribute to the overall richness of the dish.
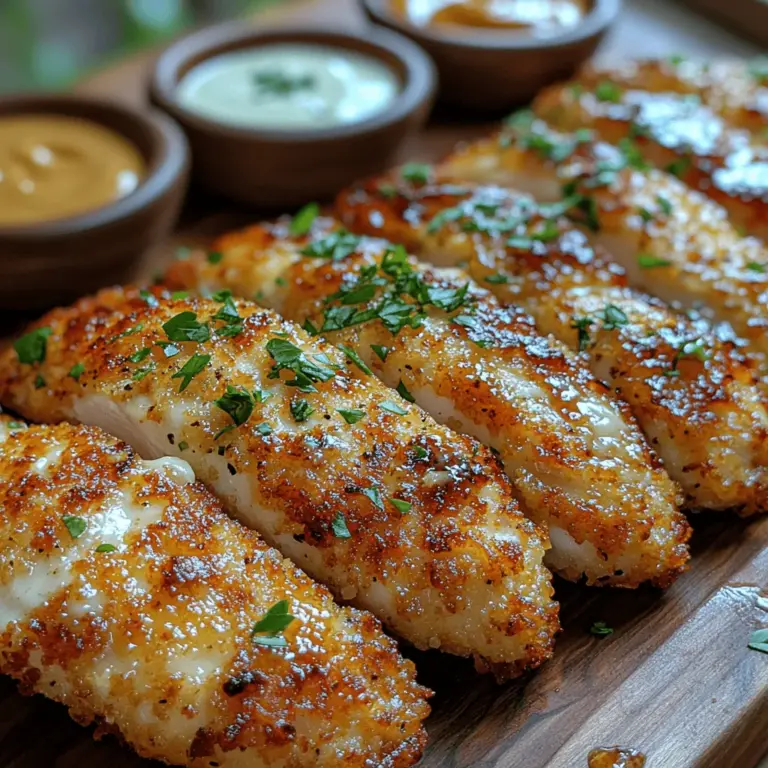
– Panko Breadcrumbs: For that crispy exterior, panko breadcrumbs offer a light and crunchy texture that’s hard to beat. Unlike traditional breadcrumbs, panko is coarser and provides a superior crunch when fried.
– Spices: A blend of paprika, garlic powder, onion powder, salt, black pepper, and a pinch of cayenne pepper (if you like a kick) will elevate the flavor profile of your tenders. These spices work together to create a harmonious balance of savory and slightly spicy notes.
– Parmesan Cheese: A quarter cup of grated Parmesan adds a savory depth that complements the garlic perfectly. This ingredient is optional but highly recommended for an extra layer of flavor.
– Garlic: Four cloves of minced garlic bring that unmistakable aroma and flavor to the dish. Fresh garlic is key to achieving that authentic garlic taste that makes these tenders irresistible.
– Fresh Parsley: Chopped parsley serves as a vibrant garnish, adding a fresh touch to the final dish. This herb not only brightens the presentation but also enhances the overall flavor.
– Vegetable Oil: Essential for frying, it allows the tenders to achieve that golden-brown perfection. The oil should be heated to the right temperature to ensure the chicken cooks evenly and develops a crispy crust.
Initial Steps to Prepare Crispy Garlic Chicken Tenders
Now that you have your ingredients ready, let’s delve into the initial steps involved in preparing these delicious chicken tenders.
1. Prep Your Ingredients: Begin by gathering all your ingredients on the countertop. This will streamline your cooking process and ensure that you have everything on hand. Pre-chop the garlic and parsley, and measure out the spices, flour, and breadcrumbs for ease of use.
2. Set Up a Dredging Station: To create the perfect crispy coating on your chicken tenders, you’ll need to set up a dredging station. Use three shallow bowls: one for the all-purpose flour, one for the beaten eggs, and one for the panko breadcrumbs mixed with spices and Parmesan cheese. This setup will make the coating process quick and efficient.
3. Season the Flour: In the bowl with the flour, add a pinch of salt, pepper, and a teaspoon of paprika. This step is crucial as it adds flavor right from the start. Mix the dry ingredients together with a fork to ensure an even distribution of the spices.
4. Prepare the Egg Wash: In the second bowl, crack the two large eggs and whisk them until well beaten. This egg wash will act as the glue that holds the breadcrumbs to the chicken, ensuring that every bite is packed with flavor and crunch.
5. Mix the Breadcrumbs: In the third bowl, combine the panko breadcrumbs with garlic powder, onion powder, grated Parmesan cheese, and any additional spices you wish to include. This mixture will provide the crispy texture and flavor that makes these chicken tenders so special.
6. Coat the Chicken Tenders: Take a chicken tender and first dip it into the seasoned flour, shaking off any excess. Then, transfer it to the egg wash, ensuring it is fully coated. Finally, let the excess egg drip off before placing it in the breadcrumb mixture. Press down gently to ensure the breadcrumbs adhere well to the chicken. Repeat this process for all the chicken tenders, placing them on a plate lined with parchment paper.
7. Heat the Oil: While you’re coating the chicken, pour enough vegetable oil into a large skillet to cover the bottom by about half an inch. Heat the oil over medium-high heat until it reaches about 350°F (175°C). To check if the oil is ready, you can drop a small piece of bread into the oil; if it sizzles and browns within a minute, you’re good to go.
As you continue with these steps, the anticipation for the final dish builds. Soon, your kitchen will be filled with the mouthwatering aroma of crispy garlic chicken tenders, inviting everyone to gather and enjoy a delightful meal together. Stay tuned for the next part of the recipe, where we will explore the frying process and tips to achieve the perfect crunch.

Now that we have our ingredients ready, let’s walk through the preparation steps. It’s a straightforward process, but the results will impress everyone at your table.
Preparation Steps: Making Magic Happen
Setting Up Your Breading Station
Start by setting up your breading station. Arrange three shallow bowls in a row:
1. First Bowl: Combine 1 cup of all-purpose flour, 1 teaspoon of salt, 1 teaspoon of paprika, 1/2 teaspoon of black pepper, and 1/4 teaspoon of cayenne pepper (optional for heat). This seasoned flour will provide a flavorful base for the chicken tenders.
2. Second Bowl: In this bowl, crack 2 large eggs and whisk them until they’re well mixed. This egg wash will help the breadcrumb coating adhere to the chicken.
3. Third Bowl: Mix 1 cup of panko breadcrumbs with 1 teaspoon of garlic powder, 1 teaspoon of onion powder, 1/4 cup of grated Parmesan cheese, and a pinch of salt. The panko will give the tenders their signature crispy texture.
Breading Process
Next, take each chicken tender and begin the breading process.
1. First, coat the chicken in the flour mixture, shaking off any excess. This first layer is crucial as it helps to create a barrier that keeps the moisture of the chicken inside while allowing the outside to crisp up.
2. Then, dip the floured chicken into the beaten eggs, allowing any extra to drip off. This step ensures that the breadcrumbs stick well.
3. Finally, roll the chicken in the panko mixture, pressing the breadcrumbs gently onto the chicken to ensure a good coating. This step is essential for achieving that crunchy texture that everyone loves.
Frying the Chicken Tenders
Once your tenders are breaded, it’s time to fry. In a large, deep skillet, heat about half an inch of vegetable oil over medium-high heat until it reaches 350°F (175°C). A quick test for readiness is to drop in a small piece of bread; if it sizzles, your oil is hot enough.
1. Carefully add the breaded chicken tenders to the hot oil in batches, making sure not to overcrowd the pan. Overcrowding can lower the oil temperature and result in soggy tenders.
2. Fry for about 4-5 minutes on each side until they are golden brown and reach an internal temperature of 165°F (74°C). It’s important to monitor the temperature to ensure even cooking and prevent burning.
Preparing the Garlic Butter Infusion
While the chicken is frying, you can prepare a simple garlic butter infusion. In a small saucepan over medium heat, melt 2 tablespoons of butter and add 2-3 cloves of minced garlic. Sauté for about 1-2 minutes until fragrant—be careful not to let it brown! This garlic butter will enhance the flavor of your chicken tenders, making them even more irresistible.
Draining and Garnishing
Once the chicken tenders are cooked, transfer them to a paper towel-lined plate to absorb any excess oil. This step is crucial to ensure that your tenders remain crispy and not greasy.
1. Drizzle the garlic butter over the hot tenders, allowing the buttery goodness to soak in.
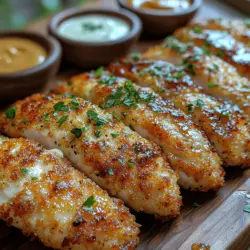
2. Finally, garnish with freshly chopped parsley for a pop of color and freshness.
Tips & Tricks for Perfect Tenders
For crispy chicken tenders that rival your favorite restaurant, here are a few tips to keep in mind:
– Temperature Control: Maintaining the right oil temperature is crucial. Too hot, and the tenders will burn; too cold, and they’ll absorb too much oil and become greasy. Use a thermometer to keep track of the oil temperature.
– Breading Technique: Make sure each piece is thoroughly coated in flour, egg, and breadcrumbs for the best texture. Press down on the breadcrumbs to ensure they adhere well. This will create a thicker, crunchier crust.
– Batch Cooking: Fry your tenders in small batches to prevent overcrowding, which can lower the oil temperature and result in soggy chicken. This allows them to cook evenly and become perfectly crispy.
– Use Fresh Spices: Fresh spices will provide a more vibrant flavor. If you can, grind your spices right before using them to maximize their potency.
– Rest Before Serving: Let the chicken tenders rest for a few minutes after frying. This allows the juices to redistribute throughout the meat, ensuring that each bite is juicy and flavorful.
Serving Suggestions
Crispy garlic chicken tenders are versatile and can be served in various ways. Here are some suggestions to elevate your meal:
– Classic Dipping Sauces: Serve with a selection of dipping sauces such as ranch dressing, honey mustard, barbecue sauce, or sriracha mayo. Each sauce adds a unique flavor profile that pairs perfectly with the crispy tenders.
– Salads: Add sliced crispy chicken tenders to a fresh salad for a hearty meal. A Caesar salad or a mixed greens salad with a tangy vinaigrette would complement the flavors beautifully.
– Sandwiches: Create a delicious chicken tender sandwich by placing the tenders on a toasted bun with lettuce, tomato, and your favorite sauce. This makes for a satisfying lunch option.
– Wraps: Use the chicken tenders as the star ingredient in a wrap. Add fresh veggies, avocado, and a zesty sauce for a quick and tasty meal.
– Platter: For gatherings, arrange the chicken tenders on a platter with an assortment of dipping sauces and fresh vegetable sticks. This makes for an impressive appetizer that guests will love.
Common Questions
How do I store leftover chicken tenders?
Leftover chicken tenders can be stored in an airtight container in the refrigerator for up to 3 days. To keep them crispy, reheat them in an oven or air fryer rather than a microwave.
Can I freeze the chicken tenders?
Yes, you can freeze the breaded chicken tenders before frying. Place them on a baking sheet in a single layer and freeze until solid, then transfer them to a freezer-safe bag. They can be stored for up to 3 months. When ready to cook, fry them directly from frozen, adding a couple of extra minutes to the cooking time.
What sides pair well with crispy chicken tenders?
Crispy chicken tenders pair well with various sides, such as French fries, coleslaw, mashed potatoes, or steamed vegetables. Choose sides that complement the flavors of the chicken and round out the meal.
Conclusion
Crispy garlic chicken tenders are a delightful addition to any meal, offering a satisfying crunch and rich flavor that is sure to please everyone at your table. With simple ingredients and easy preparation steps, you can create a restaurant-quality dish right in your own kitchen. Whether enjoyed as a main course, in a sandwich, or as part of a festive platter, these tenders are versatile and sure to be a hit.
So why wait? Gather your ingredients, follow the steps outlined, and treat yourself and your loved ones to these irresistible crispy garlic chicken tenders. Enjoy the satisfying crunch, the rich flavor of garlic, and the joy of sharing a homemade meal that everyone will love.