Introduction
There’s something truly magical about homemade treats. The aroma wafting through your kitchen, the anticipation of tasting something fresh and delicious—it’s an experience that brings joy to bakers and dessert lovers alike. Among the myriad of delightful baked goods, donut holes hold a special place in our hearts. They are bite-sized morsels of happiness, perfect for sharing or indulging in during a cozy afternoon. This recipe, “Sweet Maple Dreams: Maple-Glazed Donut Holes,” captures the essence of comfort food with its sweet flavor profile and delightful texture.
The charm of this recipe lies not only in its delectable taste but also in the process of creating these little delights from scratch. Imagine crafting your own fluffy, golden-brown donut holes, each one generously coated in a rich maple glaze that adds an irresistible touch of sweetness. The beauty of this recipe is that it allows you to create a gourmet treat in the comfort of your own kitchen, making it a perfect choice for special occasions or a simple weekend indulgence.
Using quality ingredients is crucial in enhancing the flavors of your baked goods. For these maple-glazed donut holes, every component plays an essential role in achieving the perfect balance of sweetness and richness. From the flour to the maple syrup, selecting high-quality ingredients will elevate your homemade treats and ensure they are truly delightful. Let’s dive deeper into the ingredients that make up this recipe and their importance in creating the ultimate donut hole experience.
Understanding the Ingredients
To create the perfect maple-glazed donut holes, it’s essential to understand the role each ingredient plays in the recipe. Here’s a detailed description of the core components that contribute to the flavor and texture of these delicious treats:
All-Purpose Flour
All-purpose flour is the backbone of many baking recipes, and it is no different for our donut holes. Its versatility allows it to provide the right structure and texture needed for baked goods. When combined with the other ingredients, all-purpose flour helps achieve a light yet sturdy donut hole that can hold its shape while being fried. Its balance of protein content ensures that the donuts are neither too dense nor too airy, making it an ideal choice for this recipe.
Sugar
Sugar is crucial for imparting sweetness to our donut holes. However, it serves more purposes than just adding flavor. Sugar also contributes to the texture of the donuts, helping them achieve a tender crumb. In the frying process, sugar caramelizes, creating a slight crunch on the exterior while keeping the inside soft and moist. For this recipe, granulated sugar is typically used, but you can experiment with brown sugar for a deeper flavor profile.
Baking Powder
Baking powder is a leavening agent that plays a vital role in making our donut holes light and fluffy. When combined with the wet ingredients, baking powder creates carbon dioxide bubbles that help the dough rise during frying. This results in a tender texture that contrasts beautifully with the crispy exterior. Ensuring that your baking powder is fresh is essential for optimal results, as expired leavening agents can lead to dense and undercooked donuts.
Salt and Nutmeg
These two spices are often overlooked, but they are essential for enhancing the overall flavor of the donut holes. Salt balances the sweetness of the sugar, allowing the flavors to shine without overwhelming the palate. Nutmeg, on the other hand, adds a warm and aromatic note that elevates the donut’s taste profile. A pinch of nutmeg can transform an ordinary donut into a delightful treat that tantalizes the taste buds.
Whole Milk and Eggs
Richness and moisture are key components in creating delicious donut holes, and that’s where whole milk and eggs come into play. Whole milk not only adds creaminess but also contributes to the overall texture of the donuts. The fat content in whole milk helps create a richer flavor. Eggs are equally important; they act as binders, bringing all the ingredients together and providing structure. They also add moisture, resulting in soft and tender donut holes.
Melted Butter and Vanilla Extract
Melted butter adds a luxurious texture and flavor to the donut dough. It contributes to the overall richness and helps achieve a golden-brown color when fried. Vanilla extract is another important ingredient that imparts a warm, sweet aroma and enhances the donut holes’ flavor. Using pure vanilla extract, if possible, will yield the best results and give your donuts a gourmet touch.
Frying Oils
Choosing the right frying oil can significantly impact the texture and taste of your donut holes. Oils with high smoke points, such as vegetable oil or canola oil, are ideal for frying. These oils allow the donut holes to fry evenly without burning, resulting in a crisp exterior. Additionally, they have a relatively neutral flavor that won’t overpower the sweetness of the maple glaze.
Maple Glaze Ingredients
The pièce de résistance of this recipe is undoubtedly the maple glaze. Made with pure maple syrup, powdered sugar, and a touch of milk, this glaze is what takes these donut holes from delicious to unforgettable. Pure maple syrup provides a rich, natural sweetness and a unique flavor that perfectly complements the donuts. The powdered sugar creates a smooth, velvety texture that adheres beautifully to the donut holes, while the milk ensures the glaze has the right consistency for dipping.
Step-by-Step Guide to Making Maple-Glazed Donut Holes
Now that we’ve explored the ingredients and their roles, let’s get started on the exciting process of making these maple-glazed donut holes. Follow this step-by-step guide to achieve the best results:
Preparation of the Dough
1. Mixing Dry Ingredients: Begin by whisking together the all-purpose flour, granulated sugar, baking powder, salt, and nutmeg in a large mixing bowl. This ensures that the leavening agent is evenly distributed throughout the flour, leading to consistent rising during frying.
2. Combining Wet Ingredients: In a separate bowl, combine the whole milk, eggs, melted butter, and vanilla extract. Whisk these ingredients until well blended. The melted butter should be slightly cooled to prevent cooking the eggs.
3. Bringing It Together: Gradually add the wet mixture to the dry mixture, stirring gently with a spatula or wooden spoon. Be careful not to overmix; you want to combine the ingredients until just incorporated. The dough should be slightly sticky but manageable.
Techniques for Shaping Donut Holes
1. Portioning the Dough: Once the dough is ready, lightly flour your work surface to prevent sticking. Use a tablespoon or cookie scoop to portion out the dough. Aim for uniform sizes to ensure even frying.
2. Rolling the Dough: With floured hands, gently roll each portion of dough into a smooth ball. The size can vary, but generally, they should be about 1 to 1.5 inches in diameter. Make sure to handle the dough gently to avoid deflating it.
Importance of Oil Temperature in Frying
1. Preparing the Frying Oil: In a large, deep pot, heat enough oil to submerge the donut holes (about 2-3 inches deep). Use a thermometer to monitor the oil temperature, aiming for around 350°F (175°C). This is crucial; oil that is too hot will burn the donuts, while oil that is too cool will lead to greasy, undercooked treats.
2. Frying the Donut Holes: Carefully drop a few donut holes into the hot oil, being cautious not to overcrowd the pot. Fry them for about 2-3 minutes on each side or until they achieve a beautiful golden brown color. Use a slotted spoon to flip them gently and remove them from the oil once cooked.
3. Draining Excess Oil: Place the fried donut holes on a plate lined with paper towels to absorb any excess oil. Allow them to cool slightly before dipping them into the maple glaze.
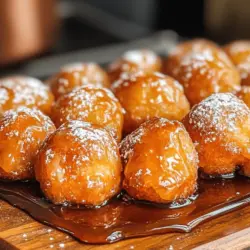
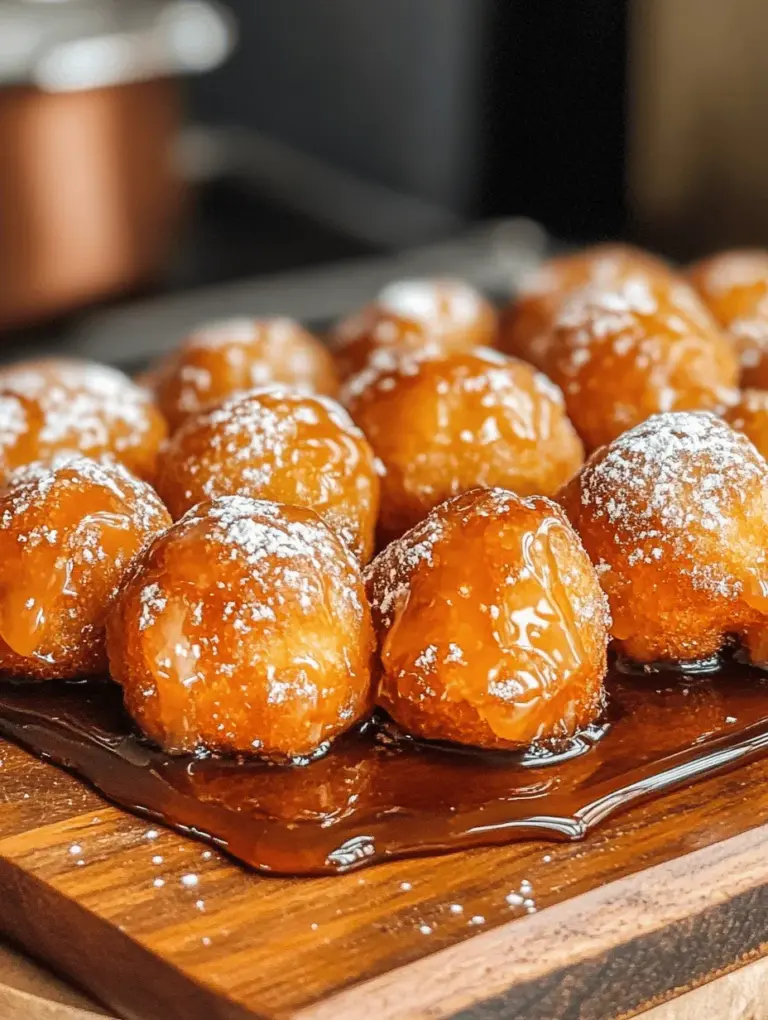
With the first part of this delightful journey into making Sweet Maple Dreams: Maple-Glazed Donut Holes complete, you’re well on your way to creating an irresistible treat that will bring joy to anyone lucky enough to indulge in them. Stay tuned for the next steps where we’ll cover the essential maple glaze preparation and some tips for achieving the best results with your homemade donut holes.
{{image_1}}
Step-by-Step Frying Process: Ensuring Even Cooking and Avoiding Oil Splatter
Frying donut holes may seem intimidating, but with the right approach, you can achieve perfectly cooked treats every time. Begin by heating your oil in a deep pan or a deep fryer to a temperature of 350°F (175°C). It’s crucial to monitor the oil temperature closely; too hot, and the outside will burn before the inside is cooked; too cool, and the donut holes will absorb excess oil, resulting in greasy treats.
1. Prepare Your Workspace: Set up a designated area for frying. Use a large, heavy-bottomed pot or a deep fryer and keep a slotted spoon or spider tool handy for easy retrieval of the donut holes. Line a plate with paper towels to drain excess oil after frying.
2. Fry in Batches: Carefully drop 3-4 donut holes into the hot oil at a time, ensuring not to overcrowd the pan. Overcrowding can drastically lower the oil temperature, leading to uneven cooking.
3. Avoid Oil Splatter: To minimize splatter, gently lower the donut holes into the oil rather than dropping them in. This will help prevent hot oil from splashing out of the pot.
4. Monitor Cooking Time: Fry each batch for about 2-3 minutes, turning them occasionally to ensure even browning. The donut holes should turn a beautiful golden brown on all sides.
5. Cooling: Once they reach the desired color, use your slotted spoon to remove the donut holes from the oil and place them on the prepared plate lined with paper towels. This will absorb any excess oil, keeping your treats light and fluffy.
Creating the Maple Glaze: Achieving the Perfect Consistency for Dipping
The glaze is what elevates the simple donut holes into a sweet, irresistible treat. To create a delicious maple glaze, follow these steps:
1. Ingredients for the Glaze:
– 1 cup powdered sugar
– 2-3 tablespoons pure maple syrup
– 1 tablespoon milk (or non-dairy milk for a vegan option)
– A pinch of salt
2. Mixing the Glaze: In a mixing bowl, combine the powdered sugar and a pinch of salt. Gradually add the maple syrup and milk, whisking until smooth. Adjust the consistency by adding more syrup for a thicker glaze or more milk for a thinner glaze. The goal is to achieve a pourable yet thick consistency that will adhere well to the donut holes without running off.
3. Testing the Glaze: To ensure the perfect consistency, dip a donut hole into the glaze. It should coat the donut evenly without dripping excessively. If it drips too much, add more powdered sugar; if it’s too thick, add a touch more milk.
Glazing Techniques: How to Maximize Glaze Coverage Without Excess
To give your donut holes that perfect glaze, consider these techniques:
1. Dip Method: Hold each donut hole by one end and dip it into the glaze. Allow any excess glaze to drip off before placing it on a wire rack. This method provides even coverage while minimizing excess glaze.
2. Drizzle Method: For a more decorative look, use a fork or a piping bag to drizzle the glaze over the donut holes. This adds a beautiful touch and allows you to control the amount of glaze.
3. Toppings: For added texture and flavor, consider rolling the glazed donut holes in sprinkles, crushed nuts, or toasted coconut while the glaze is still wet. This will ensure the toppings adhere well.
The Baking Science Behind Donut Holes
Understanding the science behind your baking can enhance your skills and results. Here’s how the ingredients work to create fluffy donut holes:
1. Ingredient Interaction: The combination of flour, sugar, baking powder, and liquid creates a dough that traps air bubbles during frying. These bubbles expand and create the light texture characteristic of donut holes.
2. Frying Temperature and Time: Proper frying temperature is essential. If the oil is too hot, the outside cooks too quickly, while the inside remains raw. Conversely, if the temperature is too low, the donut holes will absorb too much oil. Maintaining a consistent oil temperature ensures that the donut holes cook evenly.
3. The Maillard Reaction: This chemical reaction occurs when sugars and proteins in the dough react under high heat, leading to the browning of the donut holes. This process not only enhances flavor but also contributes to the appealing golden color.
4. Glaze Solidification: Once applied, the glaze begins to cool and solidify, creating a beautiful, glossy finish. The sugar in the glaze crystallizes slightly, providing a sweet, flavorful coating that enhances both the taste and appearance of the donut holes.
Serving Suggestions and Pairings
Once your sweet maple-glazed donut holes are ready, the fun of serving them begins. Here are some delightful suggestions:
1. Alone or With Coffee: Serve donut holes on their own for a sweet snack or pair them with a hot cup of coffee. The rich flavor of the maple glaze complements the bitterness of coffee beautifully.
2. Dessert Platter: Add donut holes to a dessert platter alongside other treats such as brownies, mini cheesecakes, and seasonal fruits. This creates an inviting spread for gatherings or parties.
3. Recommended Beverages: Pair your donut holes with warm beverages like spiced chai, hot chocolate, or even a sweet iced tea. Each of these drinks enhances the maple flavor and provides a comforting experience.
4. Variations on the Recipe: To keep things interesting, consider adding spices like cinnamon or nutmeg to the dough for an extra flavor kick. You can also experiment with alternate glazes, such as a chocolate glaze or a vanilla glaze, to create a variety of delicious donut holes.
Nutritional Information
When it comes to enjoying treats like donut holes, understanding their nutritional aspects is essential:
1. Overview: Homemade donut holes are made with simple ingredients, allowing you to control what goes into them. Using high-quality ingredients can make a significant difference in their overall nutrition.
2. Homemade vs. Store-Bought: Homemade donut holes typically contain fewer preservatives and artificial ingredients compared to store-bought versions. This allows you to enjoy a treat that is not only delicious but also made with care.
3. Portion Control: While it’s easy to indulge, moderation is key. Enjoying a couple of donut holes as an occasional treat can satisfy your sweet tooth without overindulgence. Pair them with a healthy meal to balance your diet.
Conclusion
Making maple-glazed donut holes at home is not only a delightful culinary adventure but also a way to create lasting memories with family and friends. The simplicity of the recipe, combined with the joy of frying and glazing your treats, brings a sense of satisfaction that store-bought alternatives simply cannot match.
As you explore the world of baking, don’t hesitate to experiment with flavors, glazes, and serving ideas. Each batch of donut holes can become a unique creation that reflects your taste and preferences. Gather your loved ones, share these sweet treats, and revel in the happiness that homemade delights can bring. Enjoy the process, and indulge in the delicious outcomes that await you in your kitchen.