Introduction
There’s something undeniably heartwarming about the aroma of freshly baked bread wafting through the kitchen. Homemade dinner rolls, in particular, hold a special place in our culinary hearts. Soft, fluffy, and slathered with butter, these rolls are more than just a side dish; they are a centerpiece of any family gathering or special occasion. Whether served alongside a holiday feast, a cozy Sunday dinner, or simply to elevate a weeknight meal, dinner rolls have an innate ability to bring loved ones together.
What sets this recipe for Heavenly Soft and Buttery Dinner Rolls apart is its simplicity coupled with extraordinary results. The combination of quality ingredients and precise techniques yields rolls that are not only visually appealing but also melt-in-your-mouth delicious. With a golden crust and a pillowy interior, these rolls are bound to impress your family and guests alike.
In this article, we will delve into the unique characteristics of this recipe, exploring each component that contributes to its heavenly texture and flavor. We will also provide a step-by-step guide to making these delightful rolls, ensuring you can recreate them with ease in your own kitchen.
Understanding the Ingredients
To create the perfect dinner rolls, understanding the role of each ingredient is crucial. Below, we’ll break down the components and their contributions to the overall success of the recipe.
All-Purpose Flour
All-purpose flour serves as the backbone of our dinner rolls, providing the necessary structure and texture. Its moderate protein content allows for a balanced rise while still ensuring a tender crumb. When measuring flour, accuracy is key; too much flour can result in dense rolls, while too little can lead to overly sticky dough. To measure flour accurately, spoon the flour into your measuring cup and level it off with a knife, avoiding the common mistake of scooping directly from the bag.
Granulated Sugar
Granulated sugar does more than just sweeten; it plays a vital role in flavor enhancement and browning during baking. It interacts with the yeast, fueling its growth and promoting a lovely rise in the dough. Additionally, sugar contributes to the golden color of the rolls, creating an appealing crust that invites you to take that first bite.
Instant Yeast
Instant yeast is a baker’s best friend, offering convenience and efficiency. Unlike active dry yeast, which requires proofing in warm water before use, instant yeast can be mixed directly with dry ingredients. This means less waiting time and a more straightforward preparation process. Instant yeast also allows for a quicker rise, making it ideal for busy bakers who still want to enjoy fresh rolls without extensive downtime.
Salt
While salt may seem like a simple ingredient, it plays an essential role in bread making. Not only does it enhance the flavor of the rolls, but it also regulates yeast activity, ensuring a controlled fermentation process. The right amount of salt can elevate the taste of your rolls, transforming them from average to extraordinary. It’s important to remember that too much salt can inhibit yeast growth, so be mindful of the measurements.
Whole Milk
Warm whole milk is a key ingredient in this recipe, enriching the dough and helping to activate the yeast. The warmth of the milk creates an ideal environment for the yeast to thrive, leading to a beautifully risen dough. If you’re looking for a dairy-free alternative, unsweetened almond milk or oat milk can be used, though the texture may vary slightly.
Unsalted Butter
Butter is synonymous with flavor and texture in baking, and for dinner rolls, it’s no different. Using unsalted butter allows for better control over the salt content in your recipe. The richness of butter adds a luscious quality to the rolls, while also contributing to their soft, tender crumb.
Egg
The addition of an egg enriches the dough, adding moisture and contributing to the overall structure of the rolls. Eggs are particularly beneficial for achieving a light, airy texture. For those following a plant-based diet, you can replace the egg with a flaxseed meal mixture or an egg substitute, ensuring that the rolls remain just as delightful.
Optional Sea Salt Flakes
While not mandatory, a sprinkle of sea salt flakes on top before baking can provide an attractive finishing touch. This addition enhances the flavor profile, creating a delightful contrast with the sweetness of the rolls. It’s a small touch that makes a big impact on presentation and taste.
Step-by-Step Guide to Making Heavenly Soft and Buttery Dinner Rolls
Preparing the Dough
Now that we have a solid understanding of our ingredients, it’s time to roll up our sleeves and get started on the dough. Follow these steps carefully for the best results:
1. In a large mixing bowl, combine 4 cups of all-purpose flour, ¼ cup of granulated sugar, 1 tablespoon of instant yeast, and 1 teaspoon of salt. Whisk together until evenly combined. The dry ingredients should be well-mixed to ensure even yeast distribution.
2. In a separate bowl, heat 1 cup of whole milk and ½ cup of unsalted butter together until the butter is melted. You can do this in the microwave or on the stovetop, but ensure that the mixture is warm, not hot, to avoid killing the yeast.
3. Add the warm milk mixture to the dry ingredients, and mix with a spatula or wooden spoon until combined. The dough will start to come together, but it may be slightly sticky.
4. Add one large egg to the mixture and continue mixing until fully incorporated. The egg will add richness and help bind the dough.
5. Gradually add additional flour, about ¼ cup at a time, until the dough pulls away from the sides of the bowl and forms a cohesive ball. You may not need to use all the remaining flour, so add it slowly to avoid making the dough too dry.
6. Knead the dough on a lightly floured surface for about 8-10 minutes, or until it becomes smooth and elastic. Kneading is crucial as it develops the gluten structure, which gives the rolls their soft texture.
7. Once kneaded, shape the dough into a ball and place it in a greased bowl, turning it to coat all sides. Cover the bowl with a clean kitchen towel or plastic wrap and let it rise in a warm, draft-free area until it doubles in size, about 1 to 1.5 hours.
As the dough rises, you’ll notice a delightful aroma filling your kitchen—an early indication of the delicious rolls that await you. The next steps will guide you through shaping and baking these heavenly soft and buttery dinner rolls, making your efforts well worth it. Stay tuned for the continuation of this recipe, where we will explore the final steps to achieving dinner roll perfection.
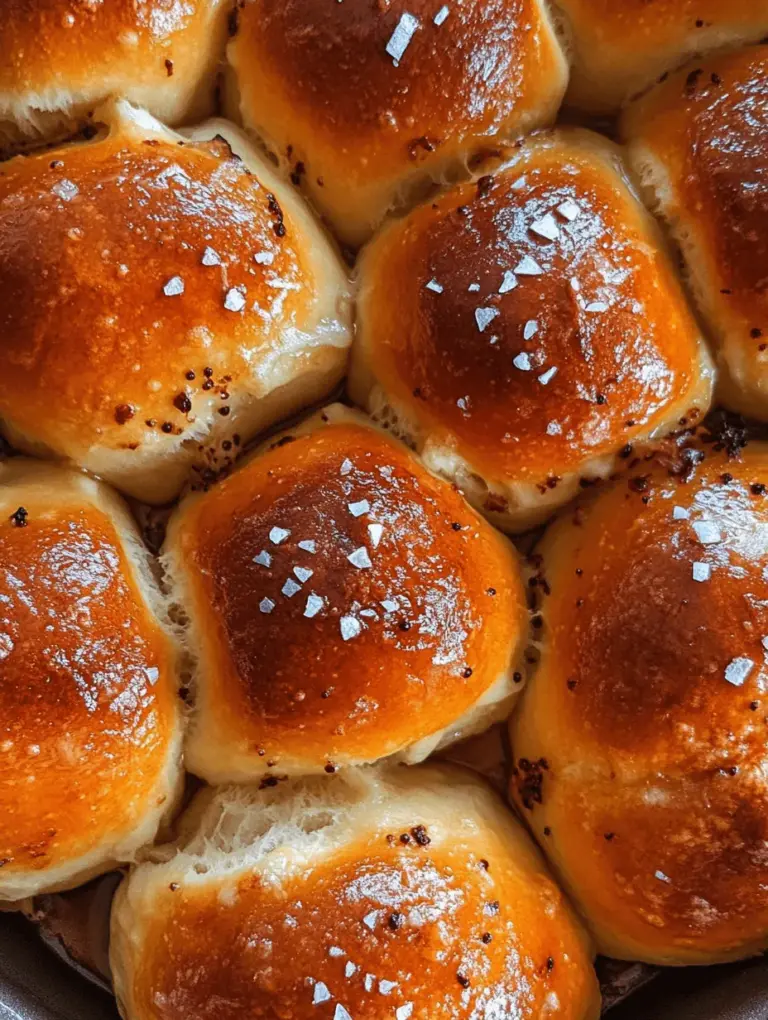
{{image_1}}
Heavenly Soft and Buttery Dinner Rolls
Mixing the Dry Ingredients
To begin with, it’s crucial to mix your dry ingredients correctly, as this sets the foundation for your rolls. In a large mixing bowl, combine all-purpose flour, sugar, and salt. The sugar not only adds sweetness but also feeds the yeast during the fermentation process, while the salt enhances flavor. Use a whisk to blend these ingredients thoroughly, ensuring that the salt and sugar are evenly distributed throughout the flour. This step is vital because if you add the salt directly to the yeast, it can inhibit yeast activity, leading to less fluffy rolls.
Importance of the Warm Milk Mixture
The warm milk mixture is another essential component of your dough. By heating the milk to about 110°F (43°C), you create an environment that encourages yeast activation. This warmth helps to dissolve the sugar and allows the yeast to bloom, which is a critical step for achieving the lightness you desire in your rolls. Make sure the milk is warm to the touch, but not hot, as temperatures above 120°F (49°C) can kill the yeast. Once warmed, combine the milk with melted butter and a beaten egg before adding it to your dry ingredient mixture.
Kneading the Dough
Kneading is the process that develops gluten in the dough, giving your rolls their structure and chewy texture. After combining your wet and dry ingredients, transfer the dough onto a lightly floured surface. Start kneading by folding the dough in half, pushing it down and away with the heel of your hand, and then turning it a quarter turn. Repeat this process for about 8–10 minutes until the dough is smooth and elastic.
Techniques for Kneading Effectively
To knead effectively, focus on your technique rather than the time spent. Keep the surface floured to prevent sticking, but avoid adding too much flour, as this can make the rolls dense. You can also use a stand mixer fitted with a dough hook for this process, which can save you time and effort. Kneading by hand, however, allows you to gauge the dough’s texture and consistency more intuitively.
Signs of Properly Kneaded Dough
Your dough is properly kneaded when it is smooth, elastic, and slightly tacky but not sticky. A good test to check for readiness is the “windowpane test”: take a small piece of dough and stretch it between your fingers. If it stretches thin enough to create a translucent membrane without tearing, your dough is ready for the first rise.
First Rise
After kneading, it’s time for the first rise, also known as fermentation. This step is crucial because it allows the yeast to produce carbon dioxide, which creates air pockets in the dough, contributing to its lightness and fluffiness. Place the dough in a greased bowl and cover it with a clean kitchen towel or plastic wrap.
Importance of Letting Dough Rise
Allow the dough to rise in a warm, draft-free environment until it doubles in size, which usually takes about 1 to 2 hours. This time allows the flavors to develop and enhances the overall texture of your rolls. The ideal conditions for dough rising include a temperature of around 75°F to 80°F (24°C to 27°C). If your kitchen is cool, consider placing the dough near a warm oven or on a countertop with a warm bowl of water to create a gentle heat.
Shaping the Rolls
Once your dough has risen successfully, it’s time to shape the rolls. Gently punch down the dough to release excess air, then transfer it to a floured surface. Divide the dough into equal portions using a bench scraper or a sharp knife, aiming for about 12-16 pieces, depending on your desired roll size.
Techniques for Dividing and Shaping Dough into Balls
To shape each piece, take a portion of dough and gently pull the edges toward the center, creating tension on the top surface. Roll it into a ball using your palms on the work surface. This technique helps create a smooth exterior that will rise beautifully during the second rise.
Tips for Maintaining Even Size for Uniform Baking
For uniform baking, use a kitchen scale to weigh each piece of dough. This will help ensure that all rolls are the same size, leading to even cooking and a cohesive presentation.
Second Rise
After shaping, place the rolls in a greased baking dish or on a parchment-lined baking sheet, ensuring they are close but not touching. Cover them again with a towel or plastic wrap, and let them rise for another 30 to 45 minutes.
Importance of the Second Rise
The second rise is equally important, as this final fermentation allows the dough to relax and expand. This step is critical for achieving that soft, fluffy texture we all love in dinner rolls. A good tip is to look for the rolls to double in size before baking.
Tips for Timing and Covering Dough
Timing is key here; if you let the dough rise for too long, it may collapse. When covering the rolls, ensure the wrap is lightly greased to prevent it from sticking to the dough. You can also create a warm environment by preheating your oven to the lowest setting, turning it off, and placing the covered rolls inside.
Baking the Rolls
Once the second rise is complete, it’s time to bake your rolls. Preheat your oven to 375°F (190°C), which is essential to ensure the rolls cook evenly and develop that beautiful golden crust.
Preheating the Oven and Its Importance
Preheating the oven helps in achieving an immediate burst of heat when the rolls are placed inside, which is crucial for activating the yeast and allowing the rolls to rise further while baking.
Visual Cues for Doneness
To check for doneness, look for a golden-brown exterior and a slightly hollow sound when tapped on the bottom. Depending on your oven, baking can take anywhere from 15 to 20 minutes. If the tops brown too quickly, you can lightly cover them with aluminum foil to prevent burning.
Finishing Touches
After removing the rolls from the oven, brush them with melted butter for added flavor and a beautiful shine. For an extra touch, sprinkle with optional sea salt flakes, which can enhance the overall taste and add a delightful crunch to the soft texture of the rolls.
Serving Suggestions
These heavenly soft and buttery dinner rolls are perfect for a variety of occasions. They shine during holiday feasts, family gatherings, or even casual dinners. Pair them with soups, such as a creamy tomato basil or a hearty beef stew, for a comforting meal. They also complement roasted meats beautifully, making them an ideal side for chicken, beef, or pork dishes.
If you have leftovers, don’t worry; these rolls are incredibly versatile. Transform them into delightful sandwiches filled with deli meats and fresh vegetables, or cut them into cubes to make homemade croutons for salads.
Nutritional Information
Each roll typically contains approximately 120 calories, with 4g of protein, 18g of carbohydrates, and 4g of fat. While these rolls are undoubtedly indulgent, enjoying them in moderation can fit into a balanced diet. Pair them with nutrient-rich dishes to create a well-rounded meal, and remember, the joy of homemade food often outweighs its caloric content.
Conclusion
These heavenly soft and buttery dinner rolls are not only easy to make but also a delightful addition to any meal. With their tender texture and buttery flavor, they are sure to impress your family and friends. We encourage you to try making these rolls at home and experience the satisfaction of sharing freshly baked goods with loved ones. There’s something inherently joyful about gathering around the dinner table with warm, homemade rolls, creating memories that last a lifetime. Enjoy the process, and happy baking!