Introduction
There’s something undeniably magical about biting into a warm, gooey chocolate chip cookie. The comforting combination of sweet, melted chocolate and a soft, buttery base has made this delightful treat a staple in households around the globe. Whether it’s a rainy afternoon or a festive occasion, chocolate chip cookies evoke feelings of nostalgia, reminding many of simpler times spent in the kitchen with loved ones. For both novice bakers and seasoned pros alike, mastering the art of the classic chocolate chip cookie is an essential skill that brings joy to both the baker and those who indulge in the heavenly results.
In this comprehensive guide, we’ll walk you through the process of making the best chocolate chip cookies you’ll ever taste. From selecting the finest ingredients to perfecting your baking technique, this recipe ensures that each batch is not only delicious but also consistently delivers that melt-in-your-mouth experience we all crave. So, roll up your sleeves and get ready to impress family and friends with the ultimate chocolate chip cookie!
The Importance of Quality Ingredients
The journey to cookie perfection begins with understanding the significance of each ingredient. High-quality ingredients not only enhance the flavor but also impact the texture and overall success of your cookies. Here’s a closer look at the essential components of your chocolate chip cookie dough:
Overview of Essential Ingredients
– Flour: The backbone of any cookie recipe, flour provides structure and stability. All-purpose flour is typically used for chocolate chip cookies, but you can experiment with alternatives like whole wheat or gluten-free blends for unique flavors and textures.
– Butter: This is where the magic begins. Unsalted butter is preferred as it allows for better control over the salt content in the recipe. The fat in butter contributes to a rich flavor and tender texture, making your cookies melt in your mouth.
– Sugars: A combination of granulated sugar and brown sugar is crucial. Granulated sugar helps cookies spread and become crispy, while brown sugar adds moisture and a delightful chewiness due to its molasses content.
– Eggs: Eggs act as a binding agent, providing moisture and richness. Using room temperature eggs ensures better emulsification, leading to a smoother dough.
– Chocolate Chips: The star of the show! High-quality chocolate chips, whether semi-sweet, dark, or even milk chocolate, elevate the cookie experience. Choosing premium chocolate can make a significant difference in flavor.
The Impact of Ingredient Quality on Flavor and Texture
Using high-quality ingredients is paramount in achieving the best chocolate chip cookies. Freshly sourced ingredients not only enhance the taste but also contribute to the texture of the cookies. For example, using real butter instead of margarine, or opting for gourmet chocolate chips, can elevate your cookies from good to extraordinary.
Furthermore, the freshness of your flour and eggs can play a pivotal role in the overall outcome. Outdated ingredients may lead to subpar results, so always check dates and invest in the best products available.
Benefits of Using Unsalted Butter and High-Quality Chocolate
Unsalted butter is recommended in most baking recipes to give you control over the saltiness of your baked goods. This is particularly important in cookie recipes, where the balance of flavors can make or break the final product. High-quality chocolate, whether in chip form or chopped bars, offers a more intense and rich flavor profile that enhances the overall taste of your cookies. When chocolate is the highlight, using the best available ensures a truly indulgent experience.
Preparation Steps for Success
Before diving into the mixing and baking, it’s crucial to set the stage for cookie perfection. Proper preparation can greatly affect the outcome, ensuring your cookies turn out just right every time.
The Significance of Preheating the Oven
One of the most important steps that should never be overlooked is preheating your oven. This ensures that your cookies begin to bake at the right temperature, allowing them to spread and rise correctly. A properly heated oven guarantees even baking, which is essential for achieving that perfect golden-brown exterior while maintaining a soft, chewy interior. Aim to preheat your oven to 350°F (175°C) before you start mixing your dough to ensure it’s ready when you are.
Importance of Using Parchment Paper for Easy Removal and Even Baking
Using parchment paper on your baking sheets is a game changer. Not only does it prevent your cookies from sticking, but it also promotes even baking. Parchment paper creates a barrier between the hot metal of the baking sheet and your cookies, reducing the chances of burnt bottoms. This simple step can save you time and frustration, allowing for easy removal and cleanup after baking.
Combining Dry Ingredients
Now that your ingredients are ready, it’s time to create a solid foundation for your cookies. This step is vital for achieving the right texture and consistency in your baked treats.
The Role of Flour and Baking Soda in Cookie Structure
Flour and baking soda are the two primary dry ingredients that contribute to the structure of your cookies. Flour provides the necessary gluten, which gives cookies their shape and texture. Baking soda, a leavening agent, helps cookies rise and spread. When combined with the moisture from the butter and sugars, the reaction creates a perfect balance, resulting in cookies that are both chewy and soft.
Tips for Achieving the Right Consistency in Your Dry Mix
To achieve a uniform mix, start by spooning your flour into the measuring cup rather than scooping directly from the bag. This prevents packing and ensures you don’t end up with too much flour in your mix, which can lead to dry cookies. After measuring, sift your flour with baking soda and a pinch of salt (if using unsalted butter) to ensure an even distribution of these ingredients throughout your dough.
Creaming Butter and Sugars
One of the secrets to achieving a light and fluffy cookie dough lies in the creaming method. This technique is crucial for incorporating air into your mixture, resulting in cookies that are tender and slightly risen.
Explanation of the Creaming Method and Its Benefits
The creaming method involves beating together softened butter and sugars until the mixture is light and fluffy. This process introduces air into the dough, which contributes to the rise and texture of the cookies. It’s recommended to use an electric mixer for this step, as it allows for more efficient mixing and aeration. Creaming typically takes about 3-5 minutes; you’ll know it’s done when the mixture appears pale and has increased in volume.
Techniques for Ensuring Proper Aeration and Texture
To achieve the best results, ensure that your butter is at room temperature, which allows for better incorporation with the sugars. When creaming, start at a low speed to combine the ingredients, then gradually increase to medium speed to incorporate air without splattering. Avoid overmixing once the butter and sugars are creamed, as this can lead to dense cookies.
Incorporating Eggs and Vanilla
With your butter and sugars perfectly creamed, it’s time to add the eggs and vanilla to build flavor and moisture into your dough.
The Importance of Room Temperature Eggs for Emulsification
Just like the butter, using room temperature eggs is crucial for proper emulsification. Cold eggs can cause the butter to solidify, leading to an uneven mixture. To bring eggs to room temperature quickly, you can place them in a bowl of warm water for about 10 minutes. Once ready, add them to your creamed mixture one at a time, mixing well after each addition to ensure a smooth dough.
How Vanilla Extract Enhances the Overall Flavor Profile
Vanilla extract is an essential ingredient in chocolate chip cookies, providing a depth of flavor that complements the sweetness of the sugars and the richness of the chocolate. Opt for pure vanilla extract over imitation for the best flavor. Add it to your mixture along with the eggs, and mix until fully incorporated.
Mixing Dry Ingredients with Wet Ingredients
Now that your wet ingredients are ready, it’s time to bring everything together. Mixing dry and wet ingredients requires a delicate touch to ensure the right consistency without overworking the dough.
Techniques for Gentle Mixing to Prevent Overworking the Dough
When combining the dry ingredients with the wet mixture, use a spatula or wooden spoon to gently fold the flour into the creamed butter and sugars. Avoid using an electric mixer at this stage, as overmixing can develop the gluten in the flour too much, resulting in tough cookies. Mix just until the ingredients are combined—it’s okay if there are a few flour streaks left. The goal is to maintain a soft and slightly sticky dough that will yield perfectly chewy cookies.
As you prepare to bake the ultimate chocolate chip cookies, remember that the heart of this recipe lies in the quality of your ingredients and the precision of your technique. Each step contributes to the final product, making it an enjoyable and rewarding experience. So gather your ingredients, follow these steps, and get ready to create chocolate chip cookies that will have everyone asking for seconds!
{{image_1}}
The Importance of Texture in the Final Product
When it comes to baking the best chocolate chip cookies, texture plays a pivotal role in the overall enjoyment of the cookie. A perfectly baked cookie should have a crispy exterior while maintaining a chewy and gooey inside. Achieving this delightful contrast requires careful attention during the mixing and baking processes.
Folding in Chocolate Chips and Nuts
Enhancing Flavor and Adding Texture
The first step in creating that perfect texture is the method of incorporating chocolate chips and optional nuts into your dough. After you’ve mixed your cookie dough, it’s essential to fold in the chocolate chips and nuts gently. This method ensures that the chips and nuts are evenly distributed throughout the dough without over-mixing, which can lead to tough cookies.
Choosing the Right Type of Chocolate for Your Cookies
The type of chocolate you choose can significantly impact the flavor profile of your cookies. Semi-sweet chocolate chips are the classic choice for chocolate chip cookies, imparting a rich sweetness that perfectly complements the dough. If you’re feeling adventurous, consider using dark chocolate chips for a more intense flavor or milk chocolate for a creamier sweetness.
You can also experiment with chocolate bars, chopping them into chunks for a more rustic look and a mix of melted and solid chocolate textures. This not only enhances the visual appeal but also introduces different melting points, creating pockets of gooey chocolate throughout the cookie.
Discussing Options for Adding Nuts and Their Impact on Flavor and Crunch
Nuts can add a delightful crunch and an additional layer of flavor to your cookies. Walnuts and pecans are popular choices, contributing a buttery richness that pairs well with chocolate. If you prefer a more subtle flavor, try using hazelnuts, which have a mild sweetness.
To incorporate nuts, chop them roughly to ensure they maintain a good texture in the final product. Just like with the chocolate, gently fold the nuts into the dough to avoid overworking it, which helps preserve the desired chewy texture.
Scoop and Shape the Dough
Ensuring Even Baking and Consistent Sizes
Once your dough is ready, the next step is to scoop and shape it. Consistency is key here, as evenly sized cookies bake more uniformly. Using a cookie scoop is the best practice for portioning out your dough. A standard-sized scoop (about two tablespoons) yields cookies that are just the right size for a satisfying bite.
Importance of Spacing on the Baking Sheet
Proper spacing on the baking sheet is crucial to allowing each cookie to spread while baking. Aim for about two inches between each dough ball to prevent them from merging into one large cookie. If you prefer a thicker cookie, you can chill the scooped dough balls in the refrigerator for about 30 minutes before baking, which helps them retain their shape.
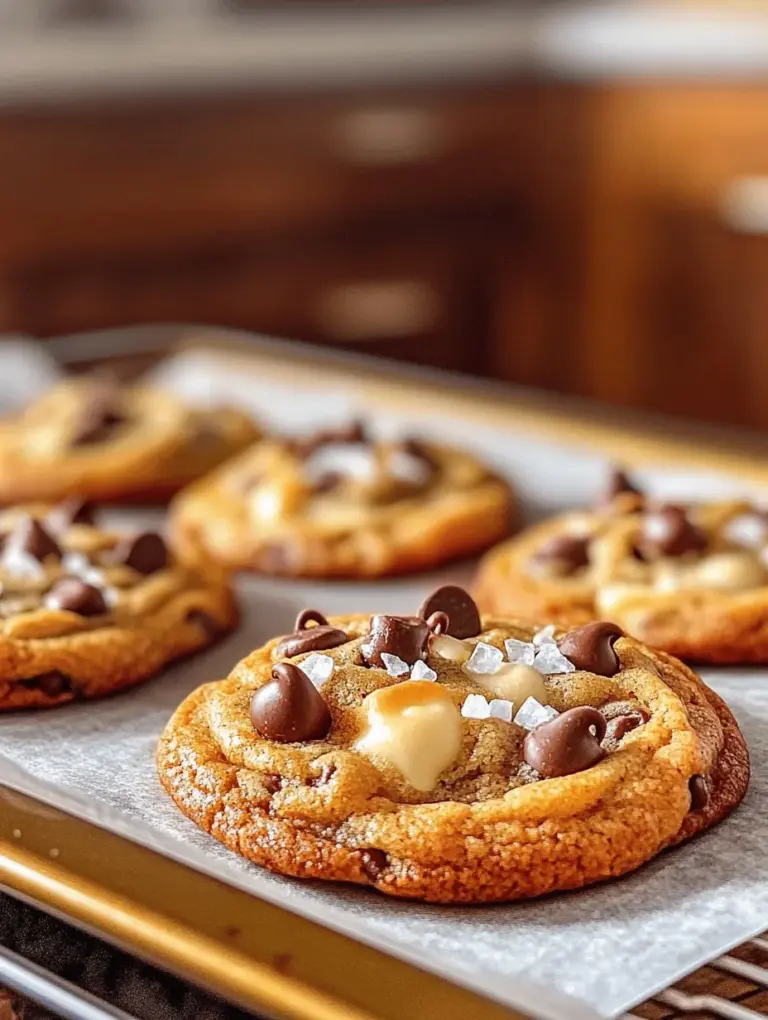
Adding the Finishing Touch: Flaky Sea Salt
Elevating Your Cookies with a Sprinkle
A sprinkle of flaky sea salt on top of your chocolate chip cookies just before baking can elevate their flavor profile to new heights. This finishing touch not only adds a beautiful aesthetic but also creates a delightful contrast to the sweetness of the cookie.
The Benefits of Using Flaky Sea Salt on Sweet Baked Goods
Flaky sea salt is preferred over table salt due to its larger crystals, which provide a more pronounced crunch and burst of flavor. The salt enhances the overall taste of the cookies by balancing the sweetness, making each bite more complex and satisfying. Just a pinch goes a long way, so sprinkle lightly for the best results.
Baking to Perfection
Understanding the Baking Process
Baking is as much a science as it is an art, and understanding the baking process will help you achieve cookie perfection. Preheat your oven to the recommended temperature, usually around 350°F (175°C) for chocolate chip cookies.
Importance of Monitoring Baking Time and Temperature
Keep a close eye on your cookies as they bake. The baking time will typically range from 10 to 12 minutes, but this can vary based on your oven and the size of your cookies. For perfectly baked cookies, look for a golden-brown edge while the center remains slightly soft and underbaked. They will continue to firm up as they cool.
Identifying the Signs of Perfectly Baked Cookies
An important sign of doneness is the way the cookies look. They should be puffed up and slightly cracked on top. If you take them out too early, they may lack the chewy texture you desire. Conversely, if they are too dark, they will taste burnt and lose that coveted soft center.
Cooling and Storing Your Cookies
Ensuring Optimal Texture and Flavor
Once your cookies are out of the oven, let them cool on the baking sheet for about 5 minutes before transferring them to a wire rack. This cooling period allows the cookies to set, ensuring they maintain their shape and texture.
The Cooling Process: Why It Matters
Cooling on a rack is essential for achieving that perfect chewy texture. If left on the baking sheet too long, the bottoms can overcook, leading to a hard texture. The wire rack allows air to circulate around the cookies, preventing them from becoming soggy.
Best Practices for Storing Cookies to Maintain Freshness
To keep your cookies fresh, store them in an airtight container at room temperature. They can last for about a week, but if you want to extend their freshness, consider freezing them. Place the cooled cookies in a single layer in a freezer-safe bag or container, separating layers with parchment paper to prevent sticking. Frozen cookies can maintain their quality for up to three months.
Nutritional Information
Understanding What’s in Your Cookies
It’s always good to be aware of what you’re consuming, even when indulging in treats like chocolate chip cookies. A typical serving size of a chocolate chip cookie is about one large cookie, which averages around 150-200 calories depending on the recipe and ingredients used.
Breakdown of Serving Size and Calorie Count
The calorie count can vary significantly based on the type of chocolate, presence of nuts, and additional ingredients. To give you an idea, a cookie made with semi-sweet chocolate chips, all-purpose flour, and butter will generally fall within that range.
Discussion on Making Healthier Substitutions if Desired
If you’re looking to lighten up your cookies, consider substituting part of the all-purpose flour with whole wheat flour, using coconut oil instead of butter, or opting for dark chocolate chips, which typically have a lower sugar content. Additionally, reducing the amount of sugar or using natural sweeteners like honey or maple syrup can help create a healthier version without sacrificing flavor.
Conclusion
Baking the perfect chocolate chip cookie is not just about following a recipe; it’s about understanding the science behind each step and ingredient. By carefully considering how you fold in the chocolate chips and nuts, shaping the dough, adding flaky sea salt, and monitoring the baking process, you can create cookies that boast a delightful texture and flavor.
Whether enjoyed fresh out of the oven or shared with loved ones, these chocolate chip cookies are sure to become a cherished addition to your baking repertoire. With this comprehensive guide at your fingertips, you’ll be well-equipped to whip up a batch of cookies that evoke the warmth and comfort of home, leaving you and your loved ones craving more. Happy baking!