Introduction
As the holiday season approaches, the air becomes infused with a sense of warmth and joy, inviting us to gather with loved ones and share in the festivities. One of the most cherished traditions during this time of year is baking, a delightful activity that fills our homes with enticing aromas and creates lasting memories. Among the many delectable treats that emerge from our kitchens, chocolate dipped peppermint cookies stand out as a true holiday favorite. This exquisite cookie combines the rich, velvety taste of chocolate with the refreshing zing of peppermint, creating a harmonious blend that tantalizes the taste buds and evokes the spirit of the season.
Sharing these cookies with family and friends not only enhances celebrations but also fosters bonds and creates cherished moments. Whether you’re preparing a tray for a holiday gathering or simply indulging in a sweet treat at home, chocolate dipped peppermint cookies are sure to bring smiles to faces young and old. In this article, we will explore the allure of these festive cookies, delve into the essential ingredients needed for success, and provide you with a step-by-step guide to creating these irresistible delights.
The Allure of Chocolate Dipped Peppermint Cookies
The popularity of peppermint-flavored treats during the holidays is no coincidence. This distinctive flavor has become synonymous with the season, evoking nostalgia and joy. From peppermint bark to candy canes, the fresh and invigorating taste of peppermint brings a sense of cheer that enhances any festive gathering. Chocolate dipped peppermint cookies capture this essence perfectly, offering a delightful contrast of flavors and textures that elevates the cookie experience.
Imagine sinking your teeth into a soft, chewy cookie that melts in your mouth, only to be met with the smooth richness of chocolate enveloping your taste buds. As you bite further, you encounter a hint of crunch from the crushed peppermint candies sprinkled on top, providing a delightful sensory experience that is both comforting and refreshing. Each cookie is a celebration of contrasts—a balance of sweet and minty, soft and crunchy—that makes them uniquely satisfying.
For many, the act of baking these cookies is steeped in personal traditions. Perhaps you remember gathering around the kitchen table with family, rolling out dough and decorating each cookie with care. Or maybe you have fond memories of exchanging cookie platters with neighbors, each showcasing their own special recipes. The cherished act of baking not only fills our homes with delightful scents but also strengthens connections and fosters a sense of belonging during the holiday season.
Essential Ingredients for Chocolate Dipped Peppermint Cookies
Creating the perfect chocolate dipped peppermint cookies begins with understanding the essential ingredients that contribute to their flavor and texture. Here’s a closer look at what you’ll need to make these delightful treats.
Butter and Sugars
The foundation of any great cookie recipe starts with butter. For our chocolate dipped peppermint cookies, using unsalted butter is crucial. Unsalted butter allows you to control the salt content of the cookies, ensuring that the sweetness is well-balanced. It also contributes to a light, tender texture, which is essential when creating a delectable cookie.
Along with the butter, both granulated and powdered sugars play significant roles in the cookie-making process. Granulated sugar helps to create a crisp exterior, while powdered sugar adds a touch of sweetness and aids in achieving a tender crumb. The combination of these two types of sugar ensures that your cookies have the perfect balance of texture and sweetness.
Eggs and Extracts
Fresh eggs are another integral component of our cookies, providing moisture and structure. They help bind the ingredients together and contribute to the overall richness of the cookies. To enhance the flavor profile, vanilla extract is a must. It adds warmth and depth, complementing the chocolate and peppermint beautifully. Additionally, peppermint extract is essential for infusing that signature minty flavor that makes these cookies so special.
Dry Ingredients
The dry ingredients in our recipe include all-purpose flour, baking powder, and salt. All-purpose flour is the backbone of the cookie structure, providing the necessary gluten to hold everything together. Baking powder is crucial for achieving the right rise and texture, ensuring that the cookies are soft and chewy. A pinch of salt enhances the overall flavor, balancing the sweetness and elevating the other ingredients.
Chocolate and Garnishes
No chocolate dipped peppermint cookie would be complete without chocolate! Dark chocolate is the ideal choice for dipping, as its rich, slightly bitter flavor beautifully contrasts with the sweetness of the cookie and the brightness of the peppermint. When melted, dark chocolate creates a smooth coating that adds an indulgent touch to each bite.
To finish off our cookies, crushed peppermint candies are a must. These candies not only provide a vibrant pop of color but also enhance the minty flavor and add a satisfying crunch. For an extra touch of sophistication, consider sprinkling a pinch of sea salt on top of the chocolate before it sets. The salt elevates the flavors and creates a delightful contrast against the sweetness of the cookie.
Step-by-Step Instructions to Create Perfect Cookies
Now that we’ve gathered all our essential ingredients, it’s time to dive into the step-by-step instructions for creating these perfect chocolate dipped peppermint cookies. A well-organized workspace and attention to detail are key to achieving the best results.
Preparing the Workspace
Before you start baking, it’s important to prepare your workspace. Clear off your counters, gather your ingredients, and ensure you have all the necessary tools at hand. Having a clean and organized area will not only make the process smoother but also help you focus on creating delicious cookies without distractions.
Preheating and Lining the Baking Sheets
Preheating your oven is a critical step in baking, as it ensures that your cookies bake evenly and rise properly. Set your oven to 350°F (175°C) and allow it to fully preheat while you prepare your cookie dough. In the meantime, line your baking sheets with parchment paper or silicone baking mats. This will prevent the cookies from sticking and make for easy cleanup.
Creaming Method Explained
The creaming method is a fundamental technique in cookie baking that involves beating together the butter and sugars until light and fluffy. Start by placing your softened unsalted butter in a large mixing bowl. Add the granulated and powdered sugars, and use an electric mixer to beat them together on medium speed. This process incorporates air into the mixture, resulting in a light and tender cookie. Continue creaming the mixture for about 3-5 minutes, or until it appears pale and fluffy.
Incorporating Wet and Dry Ingredients
Once the butter and sugars are creamed, it’s time to add the eggs and extracts. Beat in the fresh eggs one at a time, ensuring each is fully incorporated before adding the next. Then, mix in the vanilla and peppermint extracts until just combined.
In a separate bowl, whisk together the all-purpose flour, baking powder, and salt. Gradually add the dry ingredients to the wet mixture, stirring until just combined. Be careful not to overmix, as this can lead to tough cookies. The dough should be soft and slightly sticky, perfect for shaping.
Shaping and Spacing Cookies
When it comes to shaping your cookies, use a cookie scoop or tablespoon to portion out the dough. Roll each portion into a ball and place them onto the lined baking sheets, ensuring they are spaced about 2 inches apart. Proper spacing is crucial, as it allows the cookies to spread evenly while baking and prevents them from sticking together.
Baking to Perfection
Before placing the cookies in the oven, take a moment to check your oven temperature with an oven thermometer to ensure accuracy. Bake the cookies for 10-12 minutes, or until the edges are lightly golden and the centers appear set. The cookies will continue to firm up as they cool, so be careful not to overbake them.
After baking, remove the trays from the oven and allow the cookies to cool on the baking sheets for a few minutes before transferring them to wire racks to cool completely. This step is essential for achieving the perfect texture—soft on the inside with a slightly crisp exterior.
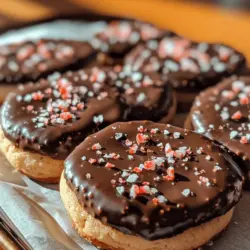
With these initial steps, you are well on your way to creating a batch of chocolate dipped peppermint cookies that will be the highlight of your holiday celebrations. Stay tuned for the next part, where we will guide you through the exciting process of dipping these cookies in chocolate and adding the finishing touches that make them truly spectacular.
{{image_1}}
Cooling Process
Once your chocolate dipped peppermint cookies have come out of the oven, the next crucial step is the cooling process. It is essential to allow your cookies to cool on a wire rack rather than leaving them on the baking sheet. Cooling on a wire rack promotes air circulation around the cookies, which helps them retain their texture. This method prevents sogginess that can occur if the cookies are left on a hot surface, where steam can accumulate. Furthermore, a wire rack allows the cookies to cool evenly, ensuring that they set properly before you dip them in chocolate.
Melting Chocolate: Techniques and Tips
Now that your cookies are cool, it’s time to melt the chocolate for dipping. There are two popular methods for melting chocolate: the microwave and the double boiler, each with its advantages.
Microwave Method: Start by chopping your chocolate into small, even pieces to ensure consistent melting. Place the chocolate in a microwave-safe bowl and heat it in 30-second intervals, stirring in between. This method is quick and convenient, but be cautious not to overheat the chocolate, as it can seize and become unusable.
Double Boiler Method: For those who prefer a more controlled melting process, the double boiler is an excellent choice. Fill a pot with water and bring it to a simmer. Place a heatproof bowl on top, ensuring it does not touch the water. Add your chocolate to the bowl and stir until melted. This method allows for gentle, even heating, reducing the risk of burning the chocolate.
Regardless of which melting method you choose, tempering the chocolate is crucial for achieving that glossy finish that makes chocolate dipped cookies so appealing. Tempering involves carefully melting the chocolate, cooling it down, and then reheating it slightly. This process stabilizes the cocoa butter crystals, ensuring a smooth and shiny coating that snaps when bitten into.
To avoid common melting mistakes, remember the following tips:
1. Always use high-quality chocolate, as it melts better and tastes richer.
2. Avoid water at all costs; even a small drop can cause chocolate to seize.
3. If chocolate becomes too thick after melting, you can add a small amount of vegetable oil to thin it out.
Dipping and Decorating Your Cookies
Once your chocolate is perfectly melted and tempered, it’s time to dip your cookies! Here’s a step-by-step guide to ensure a mess-free dipping experience:
1. Prepare Your Workstation: Line a baking sheet with parchment paper to place your dipped cookies. This will prevent sticking and make cleanup easier.
2. Dip the Cookie: Grasp a cookie by the edges, holding it over the bowl of melted chocolate. Submerge half of the cookie into the chocolate, allowing it to coat the bottom and sides.
3. Remove Excess Chocolate: Gently tap the cookie against the edge of the bowl to remove any excess chocolate. This step is crucial to avoid puddles of chocolate forming under your cookies.
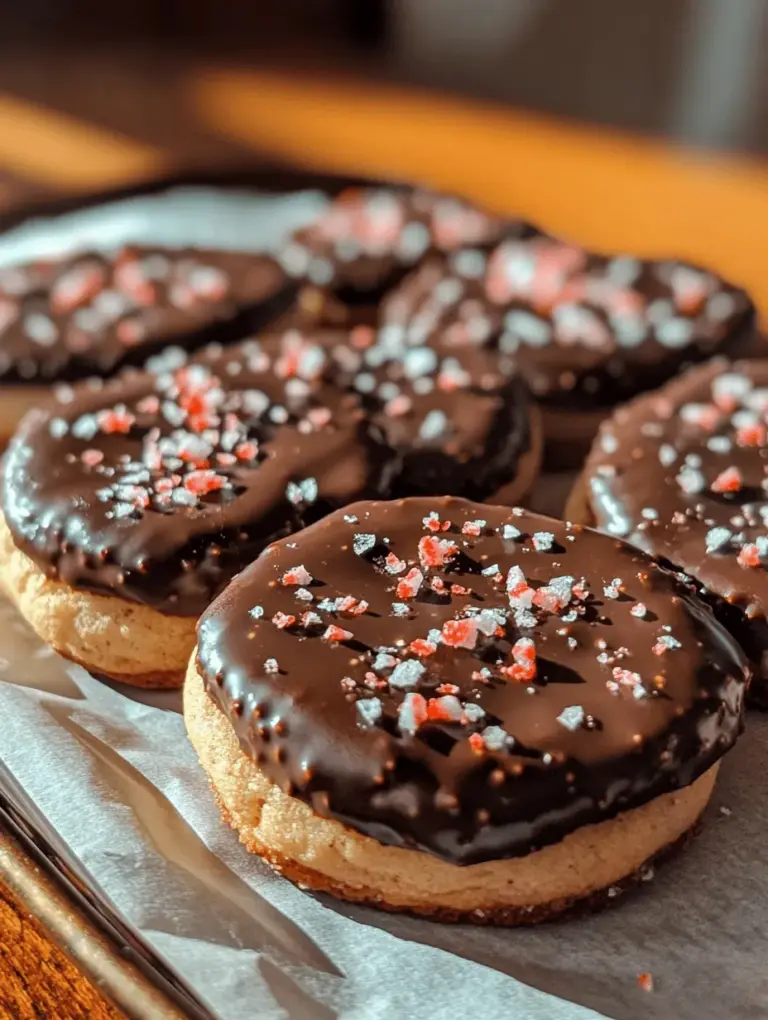
4. Decorate Immediately: While the chocolate is still wet, sprinkle crushed peppermint candy on top for that festive touch. If you want to get creative, consider experimenting with different toppings such as crushed nuts, sprinkles, or even a drizzle of white chocolate for a contrast.
5. Place on Baking Sheet: Transfer the dipped cookie to the prepared baking sheet. Repeat the process for the remaining cookies.
Presentation matters! Aesthetically pleasing arrangements can enhance the overall eating experience. Consider using a beautiful platter for serving, or stack the cookies in a clear jar for a charming gift presentation. Adding a few sprigs of fresh mint or a dusting of powdered sugar can elevate the visual appeal even further.
Storage and Serving Suggestions
To keep your chocolate dipped peppermint cookies fresh, store them in an airtight container at room temperature. Avoid refrigerating them, as this can cause the chocolate to become dull and lose its sheen. If you want to keep them for an extended period, you can freeze them for up to three months. Just ensure they are well-wrapped to prevent freezer burn.
When it comes to serving, these cookies can be enjoyed in a variety of delightful ways. Pair your cookies with a warm cup of hot cocoa or a festive peppermint mocha for a comforting treat. They also make a fantastic addition to dessert platters alongside brownies, mini cheesecakes, or fruit tarts, creating a visually appealing spread for holiday gatherings.
Gifting cookies during the holiday season is a cherished tradition, and chocolate dipped peppermint cookies make for a lovely homemade gift. Consider packaging them in decorative tins or boxes and adding a personal touch with a handwritten note. This thoughtful gesture is sure to delight friends and family alike.
Nutritional Information and Dietary Considerations
Understanding the nutritional aspects of your chocolate dipped peppermint cookies can help you enjoy them in moderation. A typical cookie contains approximately 150 calories, primarily from sugar and fat. While these cookies are a delightful indulgence, it’s essential to balance treats with healthy choices, especially during the holiday season.
If you or your loved ones have dietary restrictions, there are several substitutions you can make. For gluten-free options, simply replace all-purpose flour with a gluten-free blend. If you need dairy-free chocolate, many brands offer high-quality vegan chocolate that works perfectly for dipping. Additionally, consider using coconut oil instead of butter for a dairy-free alternative.
Remember that moderation is key, especially during the holidays. Savoring a few delicious cookies while enjoying the company of loved ones can create lasting memories without overindulging.
Conclusion
Making and sharing chocolate dipped peppermint cookies encapsulates the joy and spirit of the holiday season. The combination of rich chocolate, refreshing peppermint, and the warm aroma of baking creates a delightful experience for both the baker and those lucky enough to enjoy the treats. Whether you’re gathering with family, entertaining friends, or gifting your creations, these cookies offer a timeless appeal that resonates with holiday traditions.
Embrace the holiday spirit by indulging in the art of baking. Each batch of cookies you make is an opportunity to create lasting memories with loved ones, fostering connections that go beyond just the delicious treats. So, roll up your sleeves, gather your ingredients, and embark on this delightful baking adventure. Your chocolate dipped peppermint cookies are sure to become a cherished part of your holiday festivities for years to come.