
Introduction
The Patty Melt is arguably one of the most beloved comfort foods in American cuisine, a delicious hybrid that combines the best elements of a burger and a grilled cheese sandwich. This delightful dish features a juicy beef patty, melted cheese, and caramelized onions, all sandwiched between two slices of buttery, toasted rye bread. The Patty Melt is not just a meal; it’s a nostalgic experience that evokes memories of diners and classic American fare. Whether enjoyed at a bustling café or made at home, the Patty Melt is a satisfying treat that warms the heart and fills the belly.
In this article, we will dive into the world of Patty Melts, exploring their rich history and the unique qualities that set them apart from other sandwiches. We will also break down the essential ingredients that make this dish so irresistible and provide a step-by-step guide for preparing a perfect Patty Melt. From selecting the right beef to mastering the art of caramelizing onions, this guide will ensure you create a Patty Melt that’s bursting with flavor.
Understanding the Patty Melt
The origins of the Patty Melt can be traced back to the 1940s in the United States, where it quickly became a staple on diner menus. While its exact origin is somewhat murky, it is widely believed that the Patty Melt was created as a way to combine the flavors of a classic cheeseburger with the comforting textures of grilled cheese. This ingenious blend has made the Patty Melt a timeless favorite among food enthusiasts.
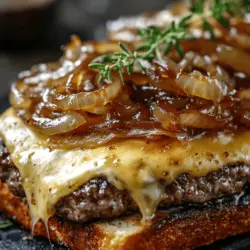
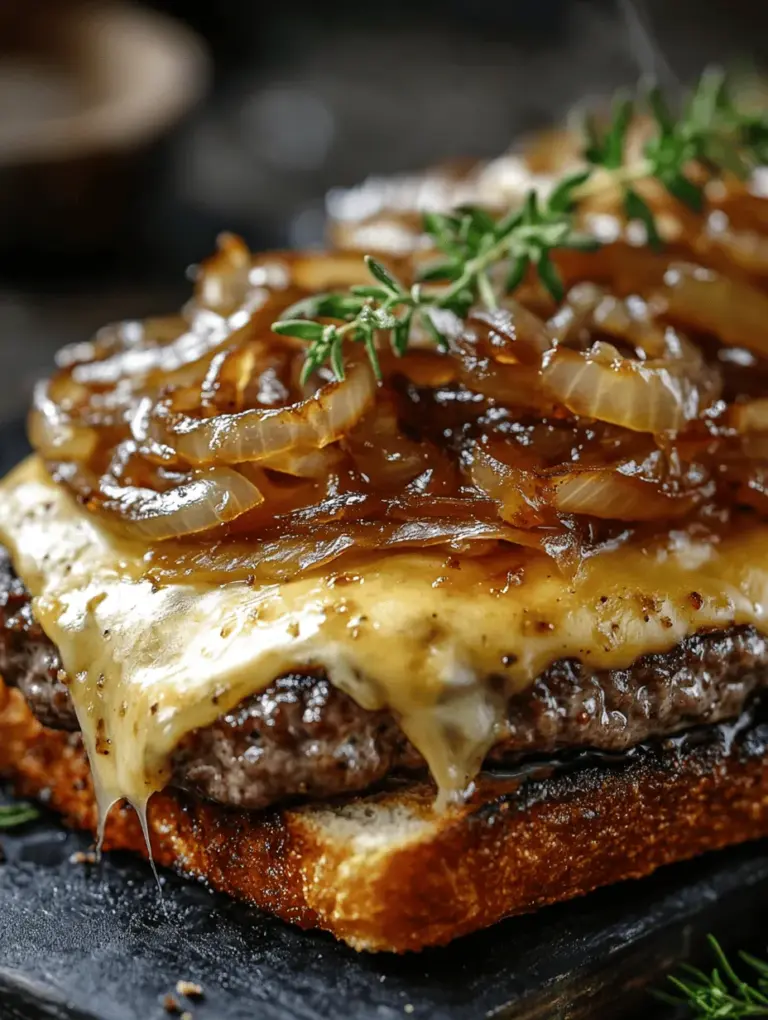
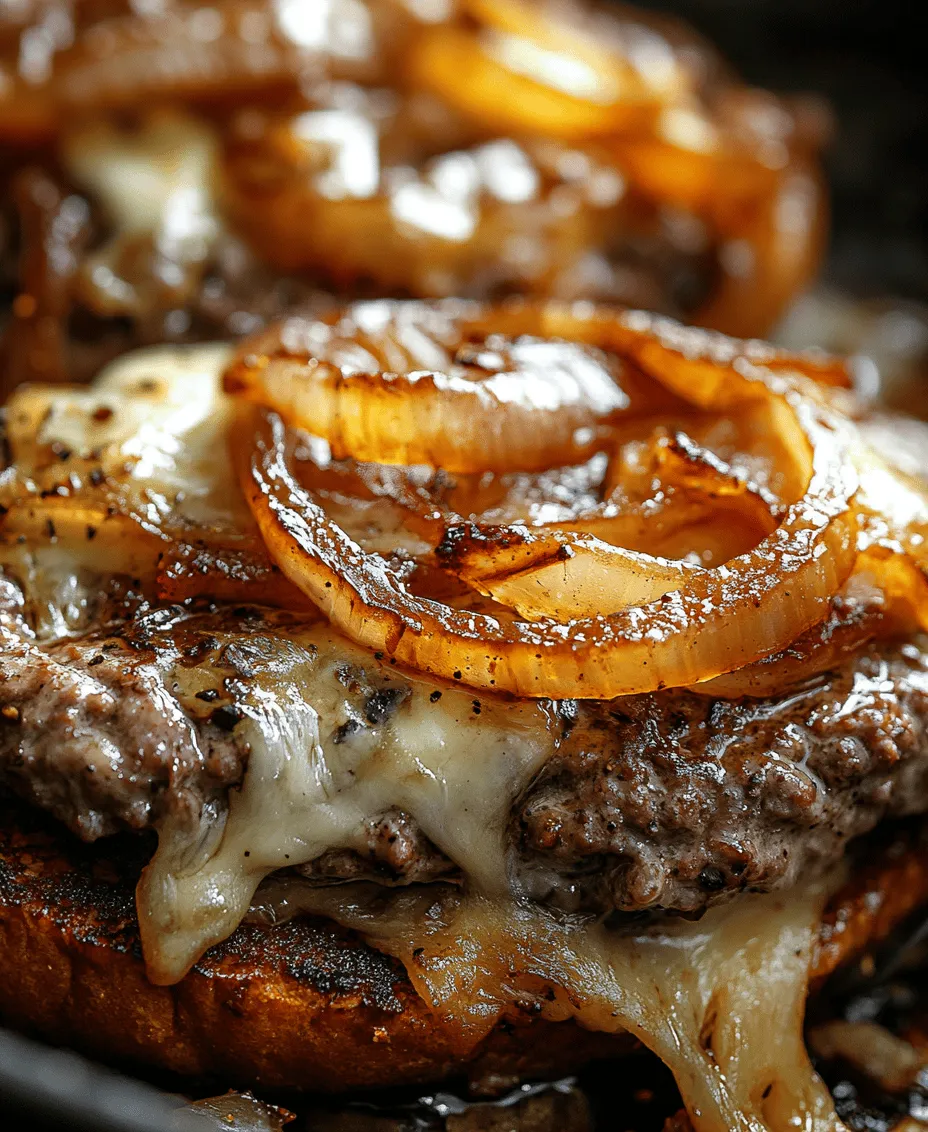
What distinguishes a Patty Melt from a traditional hamburger or grilled cheese sandwich is its unique combination of ingredients and method of preparation. Unlike a burger, which is typically served on a bun, the Patty Melt is served on rye bread, adding a distinct flavor profile and texture. Additionally, the use of Swiss cheese and caramelized onions elevates the taste experience, providing a savory depth that you won’t find in standard burgers. This sandwich is also grilled to perfection, giving it a crispy exterior while keeping the inside gooey and warm.
Regional adaptations of the Patty Melt can also be observed, with variations that include different types of cheese or bread. For instance, some versions may use cheddar cheese instead of Swiss or even incorporate different sauces for added flavor. Regardless of these variations, the core components of a Patty Melt remain the same, making it a versatile dish that can be customized to suit personal preferences.
Ingredients Breakdown
To create a truly exceptional Patty Melt, the importance of quality ingredients cannot be overstated. Each component plays a crucial role in delivering the rich, savory flavor and satisfying texture that this dish is known for. Below, we break down each ingredient, explaining its significance and how it contributes to the overall experience.
Ground Beef
The foundation of a Patty Melt rests on the beef patty, and selecting the right ground beef is essential for achieving the best flavor and juiciness. For this recipe, an 80/20 blend of ground beef is ideal. This ratio means that the meat contains 80% lean meat and 20% fat, providing just the right amount of moisture and flavor without being overly greasy. The fat content helps to keep the patty juicy during cooking while also enhancing the overall taste.
Rye Bread
Rye bread is a hallmark of the classic Patty Melt, contributing a unique flavor and textural contrast to the sandwich. Its slightly tangy taste pairs beautifully with the richness of the beef and cheese, while its sturdy structure holds up well during grilling. The density of rye bread also allows it to absorb some of the flavors from the beef and onions, making each bite a delightful experience. Toasting the bread adds an extra layer of crunch, creating a satisfying exterior that complements the gooey interior.
Swiss Cheese
When it comes to cheese, Swiss cheese is the traditional choice for a Patty Melt, thanks to its excellent melting qualities and mild, nutty flavor. The smooth texture of melted Swiss cheese envelops the beef patty and onions, binding the ingredients together and enhancing the overall taste. While Swiss cheese is the classic option, feel free to experiment with other melting cheeses, such as provolone or gouda, for a twist on the traditional recipe.
Onions
Caramelized onions are a key component of a Patty Melt, providing a sweet and savory flavor that elevates the sandwich to new heights. The process of caramelization transforms the sharpness of raw onions into a rich, sweet, and complex flavor profile. Properly caramelized onions add depth and richness to the Patty Melt, making them an indispensable ingredient. The goal is to achieve that beautiful golden-brown color, which signals that the natural sugars in the onions have developed fully.
Worcestershire Sauce
The addition of Worcestershire sauce to the beef mixture is another secret to a great Patty Melt. This condiment adds depth and umami to the meat, enhancing its flavor without overpowering it. A few dashes of Worcestershire sauce can make a significant difference, ensuring that every bite of your Patty Melt is packed with savory goodness. It’s a simple addition that amplifies the overall taste experience.
Optional Ingredients
For those looking to add a little extra zing to their Patty Melt, consider incorporating ingredients like garlic powder or mustard. A sprinkle of garlic powder can enhance the beef’s flavor, while a spread of mustard can add a delightful tang to the sandwich. These optional ingredients allow for personalization and can cater to various taste preferences.
Preparation Steps
Now that we’ve covered the essential ingredients for a perfect Patty Melt, let’s dive into the preparation steps. Each step is designed to ensure that your Patty Melt turns out delicious and satisfying.
Preparing the Onions
The first step in preparing a Patty Melt is to caramelize the onions. Start by selecting fresh yellow or sweet onions, as they have the ideal sweetness for caramelization. Slice the onions thinly to ensure even cooking. Heat a tablespoon of butter or oil in a skillet over medium heat. Once the butter is melted and sizzling, add the sliced onions and a pinch of salt to the pan.
Cook the onions slowly, stirring occasionally, to prevent them from burning. The goal is to allow the natural sugars in the onions to caramelize gradually, resulting in a beautiful golden-brown color and a sweet flavor. This process can take anywhere from 20 to 30 minutes, so patience is key. If the onions start to stick to the pan, you can add a splash of water or broth to deglaze the skillet, scraping up any flavorful bits stuck to the bottom.
Techniques for Caramelizing Onions Perfectly
To achieve perfectly caramelized onions, consider the following tips:
– Low and Slow: Cooking the onions over low to medium heat allows them to caramelize without burning. Avoid cranking up the heat, as this can cause uneven cooking.
– Patience: Give the onions time to develop their flavor. Rushing the process will yield less-than-ideal results.
– Use the Right Pan: A heavy-bottomed skillet or cast-iron pan is ideal for caramelizing onions, as it retains heat well and promotes even cooking.
– Season as You Go: Adding a pinch of salt at the beginning helps draw out moisture from the onions, aiding in the caramelization process.
Shaping and Seasoning the Beef Patties
While the onions are caramelizing, it’s time to prepare the beef patties. Start with the ground beef and place it in a mixing bowl. For the best results, avoid overworking the meat; gently shape the patties with your hands. Aim for patties that are about ¾-inch thick, as they will shrink slightly during cooking.
Before shaping the patties, consider seasoning the beef with salt, pepper, and a dash of Worcestershire sauce. This will impart flavor directly into the meat. Once seasoned, form the patties carefully, making a slight indent in the center of each patty. This indentation helps the patty cook evenly and prevents it from puffing up during grilling.
Importance of Seasoning and Patty Size
Seasoning is a crucial step in achieving flavorful patties. Don’t be shy with the salt and pepper; a well-seasoned patty is the foundation of a delicious Patty Melt. As for patty size, remember that the patties will shrink slightly as they cook due to the fat rendering. A ¾-inch thickness is ideal for ensuring a juicy burger that cooks through without drying out.
With the onions caramelized to perfection and the patties shaped and seasoned, you are well on your way to creating a mouthwatering Sizzling Classic Patty Melt. In the next section, we will explore the final steps of assembling and cooking this iconic sandwich, ensuring that each bite is a satisfying blend of flavors and textures. Stay tuned as we continue to unravel the secrets behind this American classic!
Cooking the Patties: Tips for Achieving the Right Doneness
When crafting the perfect patty melt, the first step is to cook the beef patties to the right doneness. Achieving this balance of flavor and texture is crucial for a satisfying meal. For a classic patty melt, medium-rare to medium is often recommended, which is around 130°F to 145°F (54°C to 63°C). This temperature range allows the meat to remain juicy while ensuring a rich flavor profile.
To gauge doneness without a thermometer, you can use the touch method. Press the center of the patty with your finger; a medium-rare patty will feel soft yet spring back slightly, while a medium patty will feel firmer. Another useful tip is to let the patties rest for a few minutes after cooking. This allows the juices to redistribute throughout the meat, enhancing flavor and moisture.
Discussing Different Cooking Methods: Skillet vs. Grill
There are two popular cooking methods for patties: skillet and grill, and each offers a unique flavor and texture.
Skillet Cooking: Cooking patties on a skillet allows for precise temperature control and the ability to sear the meat perfectly. A cast-iron skillet is ideal for this method, as it retains heat well, providing a nice crust on the patties. Preheat the skillet over medium-high heat, adding a little oil to prevent sticking.
Grilling: Grilling offers a smoky flavor that many enjoy with their patties. The key to grilling is ensuring the grill is preheated to high heat before adding the patties. This will help achieve those coveted grill marks and a crispy exterior. However, be mindful of flare-ups and cook with the lid closed to maintain even cooking.
Regardless of the method you choose, both result in deliciously cooked patties that will serve as the foundation for your patty melt.
Melting the Cheese: The Science of Gooeyness
The cheese is essential in a patty melt, contributing to its gooeyness and rich flavor. The best cheeses for melting include American, Swiss, or cheddar, each providing a unique taste.
When melting cheese, the goal is to achieve that delightful, stretchy consistency. To accomplish this, resist the urge to add the cheese too early. Instead, add it to the patties during the last minute of cooking. Covering the skillet or grill with a lid will trap steam and help the cheese melt evenly without burning.
The choice of cheese also impacts the overall texture. American cheese, for instance, melts smoothly and evenly, while aged cheddar offers a sharper flavor profile. Experiment with different types to find your perfect blend.
Assembling the Patty Melt
Once the patties are cooked to perfection and the cheese is melted, it’s time to assemble your patty melt. Follow these step-by-step instructions to ensure every bite is packed with flavor.
1. Start with Bread: Begin with two slices of rye bread, a classic choice that adds a distinct flavor. You can also opt for sourdough or whole grain for a different twist.
2. Layering Order: Place one slice of bread on a clean surface. Layer the bottom slice with a cooked patty topped with melted cheese. The cheese should be placed directly on the patty while it’s still hot, allowing it to adhere better.
3. Add Toppings: Next, add your preferred toppings. Sautéed onions are traditional and add sweetness and depth. You can also include pickles, tomatoes, or even jalapeños for an extra kick.
4. Complete the Sandwich: Finally, top with the second slice of rye bread.
Toasting the Rye Bread: Achieving the Perfect Crunch
Toasting the bread is crucial for a satisfying patty melt. The bread should be golden brown and crisp, providing a lovely contrast to the juicy meat and melted cheese.
Toasting Methods:
1. Skillet Toasting: Place the assembled sandwich on a preheated skillet over medium heat. Add a pat of butter to the skillet before placing the sandwich in. Cook until the bread is golden brown, then flip to toast the other side.
2. Grilling: For a more robust flavor, you can grill the sandwich. Preheat the grill and place the sandwich directly on it, using a press or heavy pan to help the sandwich cook evenly.
Both methods create a crunchy exterior that holds all the delicious fillings together, ensuring an enjoyable eating experience.
Cooking the Patty Melt to Perfection
Achieving the perfect patty melt goes beyond assembly; cooking it correctly is essential for a crispy, golden finish.
Grilling Techniques: If grilling, ensure the temperature is medium to high. Avoid pressing down on the sandwich as it cooks; this will squeeze out all the delicious juices and make the sandwich soggy. Instead, let it cook naturally, allowing the heat to do its job.
Flipping the Sandwich: When it’s time to flip the sandwich, use a spatula and a second spatula or your hand to support the sandwich gently. This method minimizes the risk of losing fillings. Aim for a quick, fluid motion to maintain the sandwich’s integrity.
Visual Cues for Doneness: Keep an eye on the color of the bread. It should be a rich golden brown, and the cheese should be visibly melted and oozing slightly from the sides. This visual cue indicates that your sandwich is ready to be served.
Serving Suggestions
A delicious patty melt deserves equally delightful accompaniments. Here are some ideas for side dishes that pair perfectly with your sandwich:
– French Fries: Classic and crunchy, fries are the perfect companion. You can go for traditional, sweet potato, or even loaded fries for a twist.
– Coleslaw: A refreshing side of coleslaw adds a nice crunch and balances the richness of the patty melt.
– Onion Rings: Crispy onion rings add another layer of flavor and texture and are a fun alternative to fries.
Condiments and Dipping Sauces: Consider serving your patty melt with various condiments. Classic choices include ketchup or mustard, but you can also try spicy mayo, ranch dressing, or even a tangy barbecue sauce.
Presentation Tips: To enhance the dining experience, consider cutting the sandwich diagonally and serving it on a wooden board or a nice plate. Garnish with fresh herbs or a small side salad to add a pop of color.
Nutritional Information
While the patty melt is undeniably a comfort food, balancing indulgence with nutrition is essential. Here’s an overview of the nutritional content per serving:
– Calories: Approximately 600-700 calories, depending on the ingredients used.
– Protein: Around 30 grams from the beef and cheese.
– Fat: Roughly 40 grams, with a mix of saturated and unsaturated fats.
– Carbohydrates: Approximately 35 grams, primarily from the bread.
For a healthier version, consider using lean ground beef or turkey, opting for whole-grain bread, and reducing the amount of cheese. You can also add more veggies, like tomatoes and lettuce, to enhance the nutritional profile without sacrificing flavor.
Conclusion
The patty melt is more than just a sandwich; it’s a delightful comfort food that brings together the rich flavors of juicy beef, melted cheese, and toasted bread. The process of crafting this dish is as enjoyable as savoring the final product, allowing you to immerse yourself in the joy of cooking.
We encourage you to try this recipe at home for a satisfying meal that is perfect for any occasion. Whether it’s a casual weeknight dinner or a gathering with friends, the patty melt is sure to impress.
In the world of cooking, sharing food with loved ones is one of the greatest joys. With this classic patty melt recipe in your repertoire, you’ll create lasting memories around the dinner table, one delicious bite at a time. Enjoy the process, share your creations, and celebrate the simple pleasure of good food.