Introduction
In recent years, salted caramel cookies have surged in popularity, captivating the hearts and taste buds of dessert lovers everywhere. The irresistible combination of sweet and salty flavors creates a delicious contrast that tantalizes the palate and leaves you craving just one more bite. Whether you’re a casual snacker indulging in a sweet treat after dinner or a dedicated dessert connoisseur seeking the next best thing, salted caramel cookies deliver satisfaction on all fronts.
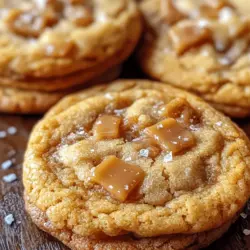
What sets these cookies apart is their delightful texture—crispy edges that give way to a chewy center, all while being studded with luscious caramel bits that melt in your mouth. The addition of sea salt elevates the sweetness, enhancing each bite and providing a flavor experience that is both complex and comforting.
One of the best aspects of these salted caramel cookies is their simplicity; they are incredibly easy to make, making them accessible for bakers of all skill levels. Whether you’re a seasoned pro or a novice in the kitchen, this recipe will guide you through the process of creating these delectable cookies with ease. Get ready to impress your friends and family with a batch of freshly baked salted caramel cookies that are sure to become a new favorite!
Understanding Salted Caramel Cookies
The flavor profile of salted caramel has an interesting origin that dates back to the culinary traditions of Brittany, a region in northwestern France known for its sea salt and salted butter. The combination of sweet caramel and a sprinkle of salt is said to have originated in this region, where the balance of flavors was celebrated for its ability to enhance the richness of the caramel.
Over the years, salted caramel has transcended its regional roots, blossoming into a global phenomenon. From artisanal chocolates to gourmet desserts, the sweet-salty duo has earned its place in the hearts of food lovers worldwide. The rise of salted caramel cookies is a natural extension of this beloved flavor combination, allowing home bakers to enjoy the taste of gourmet treats from the comfort of their own kitchens.
The magic of salted caramel cookies lies in their balanced flavor profile. The sweetness of the caramel, paired with the slight saltiness from the added sea salt, creates a unique and satisfying experience that appeals to a wide audience. Each bite is a delightful dance of flavors, where the sweetness is perfectly offset by just the right amount of salt, making them truly addictive.
Ingredients Breakdown
To create the perfect batch of salted caramel cookies, understanding the purpose and significance of each ingredient is crucial. Here’s a detailed breakdown of the key components that come together to make these cookies a delightful treat:
Unsalted Butter
Unsalted butter is the foundation of most cookie recipes, and for good reason. It contributes to the rich flavor and tender texture of the cookies. By using unsalted butter, you have control over the salt content, allowing you to adjust the flavor to your liking. The butter also helps to create that coveted chewy center, ensuring that each cookie has the perfect bite.
Brown Sugar vs. Granulated Sugar
In this recipe, both brown sugar and granulated sugar play important roles. Brown sugar, with its molasses content, adds depth of flavor and moisture to the cookies, resulting in a more tender texture. It also contributes to the caramel notes that pair beautifully with the caramel bits. Granulated sugar, on the other hand, helps the cookies spread during baking, creating a balanced texture and promoting a crisp edge. The combination of these two sugars ensures a delightful interplay of flavors and textures.
Egg
The egg acts as a binder in the cookie dough, holding all the ingredients together. It also adds moisture, contributing to the chewy texture of the cookies. The proteins in the egg help the cookies rise slightly as they bake, creating a perfect balance between chewy and soft.
Vanilla Extract
Vanilla extract is a flavor enhancer that elevates the overall taste of the cookies. Its warm, aromatic notes complement the sweetness of the brown sugar and caramel, adding complexity to each bite. A good-quality vanilla extract can make a noticeable difference in the final flavor of your cookies.
All-Purpose Flour
All-purpose flour provides the structure needed for the cookies to hold their shape. The gluten in the flour develops as the dough is mixed, giving the cookies their chewy texture. It’s essential to measure the flour accurately to avoid overly dense or dry cookies.
Baking Soda
Baking soda is a leavening agent that helps the cookies rise. It reacts with the acidity in the brown sugar and the moisture in the dough, creating carbon dioxide bubbles that contribute to the cookie’s soft texture. Proper measurement of baking soda is crucial, as too much can lead to a soapy flavor.
Salt
While it may seem counterintuitive to add salt to a sweet cookie, it plays a vital role in enhancing the overall sweetness. A small amount of salt brings out the flavors in the caramel and balances the sweetness of the sugars, making each bite more enjoyable.
Caramel Bits
Caramel bits are the star of the show in this recipe, providing that signature gooey texture and rich caramel flavor. They melt beautifully during baking, creating pockets of gooeyness that add to the cookie’s chewy texture. If you can’t find caramel bits, you can chop up soft caramel candies as a substitute.
Sea Salt
The addition of sea salt as a finishing touch elevates the flavor profile of the cookies. A sprinkle of flaky sea salt on top contrasts with the sweetness of the cookie, creating a delightful burst of flavor. It adds a gourmet touch that takes these cookies from ordinary to extraordinary.
Preparation Steps for the Perfect Cookies
Now that we’ve explored the ingredients that make these salted caramel cookies so special, it’s time to dive into the preparation steps. Follow this detailed walkthrough to create a batch of cookies that will impress everyone who tries them:
1. Preheat the Oven: Begin by preheating your oven to 350°F (175°C). This ensures that your cookies bake evenly and achieve that perfect golden-brown color.
2. Prepare Baking Sheets: Line two baking sheets with parchment paper or silicone baking mats. This prevents the cookies from sticking and makes for easy cleanup.
3. Cream the Butter and Sugars: In a large mixing bowl, cream together 1 cup of unsalted butter (softened to room temperature), 3/4 cup of brown sugar, and 1/4 cup of granulated sugar. Use a hand mixer or stand mixer to blend the ingredients until the mixture is light and fluffy, about 2-3 minutes. This step is crucial for incorporating air into the batter, which helps create a light and tender cookie.
4. Add the Egg and Vanilla: Next, add 1 large egg and 1 teaspoon of vanilla extract to the butter-sugar mixture. Mix until fully incorporated. The mixture should be smooth and creamy at this point.
5. Combine Dry Ingredients: In a separate bowl, whisk together 2 cups of all-purpose flour, 1 teaspoon of baking soda, and 1/2 teaspoon of salt. This step ensures that the dry ingredients are evenly distributed before being added to the wet mixture, which helps prevent clumping.
6. Incorporate Dry Ingredients: Gradually add the dry ingredient mixture to the wet ingredients, mixing until just combined. Be careful not to overmix, as this can lead to tough cookies. The dough should be slightly sticky but manageable.
7. Fold in Caramel Bits: Gently fold in 1 cup of caramel bits, ensuring they are evenly distributed throughout the dough. The caramel bits will melt during baking, creating delicious pockets of gooey goodness.
8. Scoop the Dough: Using a cookie scoop or tablespoon, portion out the dough onto the prepared baking sheets, leaving about 2 inches of space between each cookie. This allows for spreading during baking.
9. Sprinkle with Sea Salt: Before placing the cookies in the oven, sprinkle a small pinch of flaky sea salt on top of each dough ball. This step enhances the flavor and gives the cookies a beautiful finish.
10. Bake the Cookies: Bake the cookies in the preheated oven for 10-12 minutes, or until the edges are golden brown and the centers look slightly underbaked. The cookies will continue to firm up as they cool, creating that perfect chewy texture.
11. Cool and Enjoy: Once baked, remove the cookies from the oven and allow them to cool on the baking sheets for about 5 minutes before transferring them to a wire rack to cool completely. This step is essential for achieving the right texture and prevents them from breaking apart.
By following these steps, you will create a batch of delightful salted caramel cookies that are sure to impress anyone who tries them. With their rich flavor, chewy texture, and the perfect balance of sweet and salty, these cookies are bound to become a beloved staple in your dessert repertoire.
{{image_1}}
Prepping the Oven and Baking Sheet
Before diving into the cookie-making process, it’s essential to prepare your oven and baking sheets properly. Preheating your oven to 350°F (175°C) is crucial as it ensures that your cookies bake evenly and achieve that perfect golden-brown color. An adequately preheated oven helps to activate the leavening agents in your cookie dough, resulting in a light and fluffy texture.
While the oven is warming up, take a moment to line your baking sheets with parchment paper. This not only prevents the cookies from sticking but also promotes even baking. If you don’t have parchment paper, lightly greasing the baking sheet with butter or cooking spray can also work. However, parchment paper provides a clean release and is easier to clean up afterward.
Creaming Butter and Sugars
The next step in creating your delectable easy salted caramel cookies is to cream together the butter and sugars. This step is fundamental for achieving that light and fluffy texture that’s characteristic of a great cookie. Start by using room-temperature unsalted butter, which should be soft but not melted.
In a mixing bowl, combine the butter with both granulated and brown sugars. Using an electric mixer on medium speed, beat the mixture until it becomes pale and fluffy, approximately 2-3 minutes. This process incorporates air into the butter, giving your cookies a tender crumb. Be sure to scrape down the sides of the bowl occasionally to ensure everything is well combined.
Incorporating Wet Ingredients
Once your butter and sugars are creamed to perfection, it’s time to incorporate the wet ingredients: the egg and vanilla extract. For the best results, use a large egg at room temperature. This allows for better mixing and emulsification.
Add the egg to the creamed butter and sugars, followed by the vanilla extract. Mix on low speed until just combined. Avoid overmixing at this stage, as too much agitation can lead to tough cookies. You want to ensure everything is well incorporated without losing the lightness you’ve achieved so far.
Mixing Dry Ingredients
In a separate bowl, whisk together your dry ingredients: all-purpose flour, baking soda, and a pinch of salt. Whisking is vital as it helps to evenly distribute the leavening agents throughout the flour. This step ensures that your cookies will rise uniformly and prevents any clumps of baking soda from forming in the dough.
Once well mixed, gradually add the dry ingredients to the wet mixture.
Combining Wet and Dry Ingredients
When combining the wet and dry ingredients, it’s important to mix gently. Use a spatula or a wooden spoon to fold the ingredients together. The goal is to combine everything until you don’t see any dry flour but be cautious not to overmix. Overmixing can lead to dense cookies instead of the soft and chewy texture we desire.
Stop mixing as soon as you achieve a cohesive dough. If you see small streaks of flour remaining, that’s perfectly fine. This will help maintain that tender bite in your cookies.
Folding in Caramel Bits
Now comes the delicious part—folding in the caramel bits. Carefully add your salted caramel bits to the cookie dough. Use a spatula to fold them in gently, ensuring they are evenly distributed without breaking them apart.
If you want an extra touch of flavor, consider using a mix of caramel bits and chocolate chips. This combination will elevate the taste and texture of your cookies, creating delightful bites of gooeyness.
Portioning the Dough
When it comes to portioning the dough, consistency is key. Using a cookie scoop or a tablespoon, drop rounded balls of dough onto your prepared baking sheets, leaving ample space between each cookie. A distance of about 2 inches is ideal, as the cookies will spread as they bake.
For uniformity, try to scoop out the same amount of dough for each cookie, which will help them bake evenly. This attention to detail ensures that every cookie is the same size and has the same bake time.
Baking Time and Temperature
Now it’s time to bake your cookies! Place the baking sheets in the preheated oven and set a timer for 10-12 minutes. Keep an eye on them, as baking times can vary depending on your oven and the size of the cookies.
The cookies are done when the edges are lightly golden, and the centers look slightly underbaked. They will continue to cook on the baking sheet after being removed from the oven, resulting in a perfectly chewy texture.
Finishing Touch with Sea Salt
To enhance the flavor of your salted caramel cookies, sprinkle a pinch of flaky sea salt on top of each cookie while they are still warm. This timing is crucial as the heat from the cookies will help the salt adhere and melt slightly, intensifying the sweet and salty contrast that makes these cookies so irresistible.
Tips for Achieving the Best Results
– Chill the Dough: For even better results, consider chilling the dough for about 30 minutes before baking. This helps to firm it up and can lead to thicker cookies that hold their shape during baking.
– Experiment with Flavors: Feel free to customize your cookies by adding different types of chocolate chips, nuts, or even a hint of cinnamon for added warmth.
– Check for Freshness: Store your cookies in an airtight container at room temperature to keep them fresh. If you want them to last longer, consider freezing the unbaked dough in individual portions. You can bake them straight from the freezer—just add a couple of extra minutes to the baking time.
Storing and Serving Suggestions
To maintain the freshness of your salted caramel cookies, store them in an airtight container at room temperature. They can last for about a week, but you will likely find they disappear much faster than that. For longer storage, you can freeze the baked cookies. Just ensure they are fully cooled before placing them in a freezer-safe bag or container.
When it comes to serving, these cookies pair wonderfully with a glass of cold milk or a warm cup of coffee. They also make a delightful addition to dessert platters at gatherings or as a sweet treat to share with friends and family.
Nutritional Information
Each salted caramel cookie typically contains around 150 calories, with 7 grams of fat and 10 grams of sugar. While these cookies are certainly a delicious treat, it’s important to enjoy them in moderation as part of a balanced diet. Consider pairing them with fruits or nuts for a more nutritious snack option.
Conclusion
In conclusion, these easy salted caramel cookies are a delightful treat that balances sweet and salty flavors perfectly. With their simple preparation and the joy of baking at home, they are sure to become a favorite among family and friends. Whether for a special occasion or just a cozy evening at home, these cookies offer a taste of homemade goodness that can brighten anyone’s day. So roll up your sleeves, gather your ingredients, and indulge in the deliciousness that is homemade salted caramel cookies. Enjoy the process of baking and savor the warmth that comes from sharing these delightful treats with others!