Introduction
Peanut butter cookies have long been a beloved classic in homes and bakeries alike. Their rich, nutty flavor combined with a satisfying crunch makes them a favorite for many, transcending generations and appealing to cookie lovers everywhere. Whether enjoyed with a glass of milk, served at a gathering, or simply savored as a sweet treat during a busy day, peanut butter cookies embody comfort and nostalgia.
In a world where time is often scarce, the appeal of simple and quick recipes cannot be overstated. Busy lifestyles necessitate quick yet delicious solutions, and this is where the Peanut Butter Bliss Cookies shine. With just a handful of ingredients and minimal preparation time, these cookies are not only easy to make but also incredibly satisfying. The blend of creamy peanut butter, sugar, and eggs results in cookies that are both chewy and crispy, offering a delightful bite and an irresistible aroma that fills the kitchen.
In this article, we will explore the delightful recipe for Peanut Butter Bliss Cookies, guiding you through the ingredient selection and preparation steps to create the perfect batch. With a focus on quality ingredients and simple techniques, you’ll soon be on your way to baking cookies that will leave your family and friends begging for more.
Understanding the Ingredients
Creamy Peanut Butter
The star ingredient of Peanut Butter Bliss Cookies is, of course, the creamy peanut butter. When selecting peanut butter for your cookies, you’ll find that there are various types available, from natural to processed brands. Natural peanut butter, with its minimal ingredients—usually just peanuts and salt—offers a pure, robust flavor but often requires stirring due to its separation of oils. On the other hand, processed peanut butters, such as Jif or Skippy, contain added sugars and oils, providing a smoother consistency and a sweeter taste.
Choosing the right peanut butter can significantly impact the flavor and texture of your cookies. Health-wise, peanut butter is a great source of protein, healthy fats, and essential vitamins and minerals, including Vitamin E, magnesium, and potassium. It’s a powerhouse of nutrition that adds not only flavor but also sustenance to your sweet treat.
Granulated Sugar
Sugar, particularly granulated sugar, plays a crucial role in baking. It not only sweetens the cookies but also contributes to their texture and color. When sugar is creamed with butter (or peanut butter, in this case), it helps to incorporate air into the mixture, leading to a lighter, fluffier cookie. Moreover, sugar aids in browning during baking through caramelization, adding a delightful golden hue to your cookies.
For those looking to reduce sugar intake, there are plenty of alternatives available, such as coconut sugar, agave nectar, or even sugar substitutes like stevia or erythritol. However, it’s essential to note that replacing granulated sugar may alter the texture and flavor of the final product, so adjustments in the recipe may be necessary.
Egg
The egg serves as a binding agent in the Peanut Butter Bliss Cookies recipe, providing structure and stability to the dough. Eggs are critical in achieving the desired texture, as they contribute moisture and help the cookies rise. When beaten, eggs also add air to the mixture, which can make for a lighter cookie.
In terms of nutrition, eggs are an excellent source of protein and contain beneficial nutrients such as choline and vitamin D. For those who prefer eggless baking, alternatives like flaxseed meal mixed with water or applesauce can be used, though this may slightly alter the texture of the cookies.
Nutritional Benefits of the Ingredients Used
When combined, these ingredients create a cookie that is not just a guilty pleasure but also offers some nutritional benefits. For instance, peanut butter is rich in protein, making these cookies a more filling option than traditional cookies. Additionally, the healthy fats in peanut butter can help keep hunger at bay, providing sustained energy throughout the day.
In moderation, these Peanut Butter Bliss Cookies can be enjoyed as part of a balanced diet, offering a taste of indulgence without completely sacrificing nutritional value.
Preparation Steps Explained
Preheating the Oven
Before diving into mixing ingredients, preheating your oven is a vital step in the baking process. The importance of temperature in baking cannot be overstated. Preheating ensures that your cookies start baking at the right temperature, allowing for proper rise and even cooking. For Peanut Butter Bliss Cookies, you’ll want to preheat your oven to 350°F (175°C) before you begin preparing your dough. This allows the oven to be ready once the cookie dough is prepared, ensuring that they bake evenly and yield the best texture.
Mixing Ingredients
Once your oven is preheated, it’s time to mix your ingredients. Start by combining the creamy peanut butter and granulated sugar in a large mixing bowl. Using a hand mixer or a sturdy wooden spoon, blend the two ingredients until they are well incorporated and smooth. Mixing techniques matter; be sure to mix thoroughly to avoid any pockets of sugar that may not dissolve during baking.
Next, add in the egg, continuing to mix until it’s fully integrated into the dough. This step is crucial as it helps to create the right texture—too little mixing can lead to unevenness, while overmixing can make your cookies tough. The goal is to achieve a creamy, cohesive dough that holds together well.
Shaping the Cookies
With your cookie dough ready, it’s time to shape the cookies. Using a cookie scoop or two tablespoons, portion out the dough, rolling each piece into a ball. For uniformity, aim for each cookie to weigh about 1 ounce. Consistent sizes ensure that your cookies bake evenly, preventing some from becoming overdone while others remain undercooked.
Flattening the Cookies
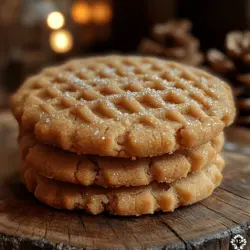
Once shaped, the next step is to flatten the cookies. This can be done using the palm of your hand or the bottom of a glass. A classic method is to create a crisscross pattern using a fork. Not only does this technique make your cookies visually appealing, but it also helps them cook evenly by increasing the surface area exposed to the heat. The fork’s tines create beautiful lines that provide a signature look to your Peanut Butter Bliss Cookies.
Baking Tips
When it comes to baking times, it’s essential to keep an eye on your cookies as they bake. Generally, Peanut Butter Bliss Cookies should bake for about 10 to 12 minutes. The key signs of doneness include a lightly golden edge and a soft center that is just set. Remember that cookies will continue to cook slightly once removed from the oven, so it’s better to err on the side of slightly underbaked for a chewy texture.
Cooling Down
After baking, allow your cookies to cool on the baking sheet for about 5 minutes before transferring them to a wire rack. This initial cooling period helps them firm up, making them easier to move without breaking apart. Once on the rack, let the cookies cool completely. Proper cooling is crucial, as it allows the flavors to meld and the texture to stabilize, resulting in a delightful cookie that is both soft and slightly chewy.
Baking Techniques for Success
To ensure that your Peanut Butter Bliss Cookies turn out perfectly every time, consider these additional baking techniques:
– Use Parchment Paper: Lining your baking sheets with parchment paper prevents sticking and aids in even baking.
– Keep Ingredients at Room Temperature: For a smoother mixture, ensure that your peanut butter and egg are at room temperature before mixing.
– Experiment with Add-ins: While the basic recipe is scrumptious on its own, consider adding chocolate chips, chopped nuts, or a sprinkle of sea salt on top for an extra flavor dimension.
By following these steps and tips, you’ll be well on your way to creating Peanut Butter Bliss Cookies that are not only easy to make but are sure to impress anyone who takes a bite. Stay tuned for the second part of this article, where we will delve deeper into the baking techniques and share additional tips to elevate your cookie game!
{{image_1}}
Common Mistakes to Avoid While Baking Peanut Butter Cookies
Baking peanut butter cookies is an art that requires attention to detail. Here are some common mistakes to steer clear of for perfectly baked cookies:
1. Measuring Ingredients Incorrectly: Precision matters in baking. Always use a kitchen scale for dry ingredients like flour and sugar. When measuring peanut butter, use a liquid measuring cup for accuracy.
2. Overmixing the Dough: While it’s tempting to mix until everything is perfectly smooth, overmixing can lead to tough cookies. Mix until just combined for softer, chewier cookies.
3. Using Cold Ingredients: Cold butter or eggs can hinder the creaming process. Always bring your butter to room temperature and allow eggs to warm slightly before adding them to the mixture.
4. Baking at the Wrong Temperature: An oven that’s too hot can lead to cookies that brown too quickly on the outside while remaining raw inside. Invest in an oven thermometer to ensure accurate baking temperatures.
5. Not Chilling the Dough: While not mandatory, chilling your dough for at least 30 minutes can prevent spreading during baking, leading to thicker, chewier cookies.
6. Ignoring the Cooling Time: Let your cookies cool on the baking sheet for a few minutes before transferring them to a wire rack. This helps them firm up and prevents breakage.
The Science Behind Baking: How Each Ingredient Contributes to the Final Product
Understanding the role of each ingredient in your peanut butter cookies can help you appreciate the baking process:
– Peanut Butter: The star of the recipe, peanut butter adds flavor, moisture, and fat, contributing to the cookie’s texture and richness.
– Sugar: Both granulated and brown sugars play a crucial role. Granulated sugar helps with spreading, while brown sugar adds moisture and a chewy texture thanks to its molasses content.
– Flour: Flour provides structure. The amount of flour can affect the density of your cookies. Too much flour can result in dry cookies, while too little can cause excessive spreading.
– Eggs: Eggs act as a binder and provide moisture. They help the cookies rise and create a tender texture.
– Baking Soda: This leavening agent helps the cookies rise by creating carbon dioxide bubbles when reacting with acids in the dough, giving the cookies a light and fluffy texture.
– Salt: A pinch of salt enhances the flavors of the other ingredients. It balances the sweetness and brings out the nuttiness of the peanut butter.
Adjusting the Recipe for Different Dietary Needs
Baking is for everyone, and adjusting your Peanut Butter Bliss Cookies recipe to meet dietary needs is simple:
– Gluten-Free: Substitute all-purpose flour with a gluten-free flour blend. Ensure that your peanut butter is also labeled gluten-free, as cross-contamination can occur.
– Vegan Options: For a vegan version, replace the egg with a flaxseed egg (1 tablespoon flaxseed meal mixed with 2.5 tablespoons water, let it sit until gelatinous) and use a plant-based butter or coconut oil.
Serving Suggestions and Pairings
Peanut Butter Bliss Cookies are delightful on their own, but there are many ways to elevate your serving experience:
– Classic Pairings: Serve your cookies with a cold glass of milk for a nostalgic treat. The creaminess of milk complements the rich peanut butter flavor perfectly.
– Coffee and Tea: Pairing these cookies with a warm cup of coffee or tea enhances the flavors. The bitterness of coffee balances the sweetness, while tea provides a lighter accompaniment.
– Creative Serving Ideas: For a fun twist, create ice cream sandwiches by placing a scoop of your favorite ice cream between two cookies. You can also stack cookies with fillings like Nutella or whipped cream for a decadent treat.
– Presentation Tips: For special occasions, arrange cookies on a decorative platter. Dust them with powdered sugar or drizzle with melted chocolate for a beautiful finish.
Storage and Shelf Life
Proper storage is key to maintaining the freshness of your Peanut Butter Bliss Cookies:
– Best Methods for Storing Cookies: Store completely cooled cookies in an airtight container at room temperature. They should remain fresh for up to a week.
– Freezing Cookies: To freeze your cookies for later enjoyment, follow these steps:
1. Allow the cookies to cool completely.
2. Place them in a single layer on a baking sheet and freeze for about 1-2 hours until solid.
3. Transfer them to a freezer-safe bag or container, separating layers with parchment paper to prevent sticking.
4. When ready to enjoy, thaw at room temperature or warm them up in the oven for a few minutes.
Exploring Variations of Peanut Butter Cookies
Experimenting with different flavors and ingredients can lead to exciting new cookie variations:
– Flavor Variations: Add chocolate chips, butterscotch chips, or chopped nuts to the dough for added texture and flavor. You can even incorporate swirls of melted chocolate for a decadent touch.
– Themed Cookies: Create festive variations for holidays by adding seasonal spices like cinnamon or pumpkin spice for fall cookies, or a splash of peppermint extract for a winter treat.
– Unique Twists: Consider adding oats for a heartier texture or shredded coconut for a tropical flair. These additions can transform your classic cookie into something uniquely yours.
Conclusion
Peanut Butter Bliss Cookies embody the simplicity and joy of baking. Their rich, nutty flavor combined with a chewy texture makes them a favorite among cookie lovers. With the guidance provided, you can navigate the baking process with confidence, avoiding common pitfalls while understanding the science behind your ingredients.
Feel free to try the original recipe, explore creative variations, or make adjustments for dietary needs. Baking is not just about creating delicious treats; it’s about the joy of sharing homemade goodness with friends and family. So, gather your ingredients, preheat your oven, and indulge in the delightful experience of baking your own Peanut Butter Bliss Cookies. Enjoy the process, savor each bite, and don’t forget to share the love!