Introduction
There’s an undeniable allure to homemade cookies that captures the hearts and taste buds of people around the world. The aroma wafting through the kitchen, the anticipation as they cool on the counter, and the joy of sharing them with loved ones create a sensory experience that transcends generations. Among the myriad of cookie varieties, whipped shortbread cookies stand out for their exquisite texture and flavor. These delicate treats are renowned for their light, crumbly nature and a melt-in-your-mouth quality that leaves you craving more.
What makes whipped shortbread cookies particularly enticing is their simplicity. With just a handful of ingredients, this recipe is perfect for both baking novices and seasoned bakers. Whether you are looking to impress at a gathering, create a comforting treat for yourself, or simply indulge in a delightful baking session, these cookies are your go-to choice. Let’s dive into the magic of whipped shortbread cookies and discover the secrets behind their irresistible charm.
The Magic of Whipped Shortbread Cookies
Whipped shortbread cookies are unique in their preparation and texture. Unlike traditional cookies that often rely on a creaming method or use baking powder for lift, whipped shortbread focuses on aeration through the incorporation of air into the butter. This results in a tender cookie that practically dissolves in your mouth. The secret lies in the careful balance of ingredients and technique, each playing a pivotal role in achieving that coveted lightness.
The key ingredients that contribute to the cookie’s texture are unsalted butter, powdered sugar, cornstarch, and all-purpose flour. Unsalted butter serves as the foundation, not only providing rich flavor but also the necessary fat that binds the cookie together while keeping it tender. Powdered sugar, known for its fine texture, helps create a melt-in-your-mouth sensation and adds just the right amount of sweetness. Cornstarch is another star player in this recipe; it works to create that soft, crumbly texture that makes whipped shortbread cookies so beloved. Finally, all-purpose flour acts as the base, providing structure to the dough without overwhelming the other components.
The technique used in making these cookies is equally important. It’s not just about mixing the ingredients together; it’s about achieving the right consistency and incorporating air into the mixture. This technique ensures that the cookies are not dense but rather light and airy, allowing them to maintain their delicate nature.
Ingredients Breakdown
Before we dive into the baking process, let’s take a closer look at each ingredient used in this delightful whipped shortbread cookie recipe:
Unsalted Butter
The star ingredient of any shortbread cookie is unsalted butter. The type of fat used in baking has a significant impact on the final product. Unsalted butter is preferred because it allows you to control the saltiness of your dough. It contributes to the cookie’s rich flavor and ensures a tender texture. The quality of the butter is crucial; using high-fat, creamy butter will yield the best results.
Powdered Sugar
Powdered sugar plays a dual role in whipped shortbread cookies. Its fine texture helps create a smooth batter without any graininess. Furthermore, powdered sugar, unlike granulated sugar, dissolves quickly and easily, promoting a creamy consistency when creamed with butter. This results in a cookie that is not only sweet but also has a delightful melt-in-your-mouth quality.
Cornstarch
Cornstarch is a key ingredient that elevates the whipped shortbread cookies to a new level of tenderness. Its unique properties help reduce gluten formation in the dough, resulting in a cookie that is delicate and crumbly. By adding cornstarch, you enhance the melt-in-your-mouth experience, making each bite a blissful treat.
All-Purpose Flour
All-purpose flour serves as the structural backbone of the cookie dough. While it provides the necessary bulk, it is essential to use it sparingly to avoid a dense final product. The balance of flour to the other ingredients is crucial in ensuring the cookies maintain their light texture.
Vanilla Extract and Salt
A touch of vanilla extract enhances the flavor of the cookies, adding warmth and depth. It complements the sweetness of the powdered sugar beautifully. Meanwhile, a pinch of salt is necessary to balance the flavors; it amplifies the sweetness while elevating the overall taste profile of the cookies.
Optional Decorations
While whipped shortbread cookies are delightful on their own, you can elevate their visual appeal and texture with optional decorations. Consider adding colored sprinkles, which not only bring a pop of color but also a fun crunch. Crushed nuts, such as pecans or almonds, can add a delightful texture and nutty flavor that pairs beautifully with the buttery cookies.
Step-by-Step Instructions for Perfect Cookies
Now that we’ve explored the ingredients that make whipped shortbread cookies so special, let’s delve into the step-by-step process of creating these delightful treats. Follow these instructions carefully for the best results:
Preheat the Oven
Before you start baking, it’s essential to preheat your oven to 350°F (175°C). Preheating ensures that your cookies bake evenly and achieve the right texture. An adequately heated oven is crucial for all baking, as it affects how the cookies rise and set.
Creaming the Butter
Begin by placing your unsalted butter in a mixing bowl. At room temperature, the butter should be soft but not melted. Using an electric mixer or a sturdy whisk, beat the butter until it becomes light and fluffy. This process typically takes about 2-3 minutes. The goal is to incorporate air into the butter, which will help create that airy texture in the final cookie.
Incorporating Sugars
Once the butter is creamed, gradually add the powdered sugar to the bowl. Mix on low speed until the sugar is well incorporated, then increase to medium speed. Continue mixing until the mixture is smooth and creamy. Proper mixing is crucial at this stage, as it ensures that the sugar dissolves completely, contributing to the cookie’s melt-in-your-mouth quality.
Adding Cornstarch and Flour
With the sugar mixture ready, it’s time to incorporate the cornstarch and all-purpose flour. Start by sifting the cornstarch and flour together into the mixing bowl. This not only combines the ingredients but also helps aerate them, which is essential for maintaining the lightness of the dough.
Gently mix the dry ingredients into the wet mixture, using a spatula or wooden spoon. Be careful not to overmix; you want to combine everything until just incorporated. Overmixing can lead to gluten development, which will result in denser cookies.
Flavoring the Dough
Finally, add the vanilla extract and a pinch of salt to the dough. Again, mix gently until everything is well combined. The goal is to enhance the flavor without overworking the dough.
With these steps completed, you’ll have a beautifully creamy, airy cookie dough ready for baking.
Stay tuned for the next part, where we’ll explore further steps in shaping and baking these delightful whipped shortbread cookies, ensuring they turn out perfect every time.
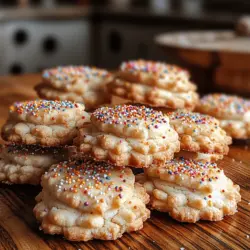
{{image_1}}
Shaping the Cookies
Achieving uniformity in your whipped shortbread cookies not only enhances their visual appeal but also ensures consistent baking. To shape your cookies effectively, begin by using a cookie scoop, which can help you portion out equal amounts of dough. This tool is invaluable for maintaining size consistency across all your cookies, ensuring they bake evenly.
When placing the cookie dough on the baking sheet, leave ample space between each dollop. A good rule of thumb is to allow at least 2 inches between each cookie. This spacing is crucial as the cookies will spread slightly during baking. If you prefer a more decorative touch, you can gently flatten each cookie with the back of a fork or your fingers for a more traditional look. Just be careful not to press too hard, as you want to maintain the light, airy texture that is characteristic of whipped shortbread.
Optional Decoration Techniques
Personalizing your cookies can make them even more special. Here are some creative decoration techniques to consider:
1. Sprinkles: Before baking, sprinkle colored sugar or nonpareils on top of each cookie. This adds a pop of color and a delightful crunch.
2. Chocolate Drizzle: Once the cookies have cooled, melt some chocolate and drizzle it over the cookies for an elegant touch. This is especially lovely with dark chocolate, which pairs wonderfully with the buttery flavor of the shortbread.
3. Nuts: Press whole nuts or chopped nuts (like pecans or almonds) into the tops of the cookies before baking. This adds texture and a nutty flavor that complements the buttery richness.
4. Icing: For a sweeter finish, consider making a simple glaze with powdered sugar and milk. Drizzle it over the cooled cookies for a glossy finish.
5. Flavor Infusions: Experiment with adding a drop of food coloring or a dash of flavored extracts (like almond or lemon) to the dough before baking. This not only enhances the flavor but can also give your cookies a unique appearance.
Baking Tips
Understanding when your cookies are done baking is key to achieving that perfect melt-in-your-mouth texture. Here are some indicators to help you determine doneness:
– Visual Cues: The edges of your cookies should be lightly golden, while the centers will remain pale. If the whole cookie is turning golden brown, they may be overbaked.
– Touch Test: Gently touch the top of a cookie. If it springs back, it’s done; if your finger leaves an impression, give them a couple more minutes in the oven.
– Smell: The aroma released while baking will be a good indicator. When you begin to smell the buttery scent wafting through your kitchen, your cookies are likely close to being ready.
Baking time can vary depending on your oven, so keep a close eye on your cookies in the last few minutes of baking.
Cooling Process
Allowing your whipped shortbread cookies to cool properly is crucial for achieving the desired texture. Once you remove the cookies from the oven, let them rest on the baking sheet for about 5 minutes. This short cooling time allows them to firm up slightly, making it easier to transfer them without breaking.
After the initial cooldown, carefully transfer the cookies to a wire rack using a spatula. Cooling on a wire rack promotes air circulation around the cookies, preventing them from becoming soggy from steam. This step is pivotal; the cooling process helps to solidify the structure of the cookie while preserving its melt-in-your-mouth quality.
Baking Essentials: Tools and Equipment
To make your baking experience as seamless as possible, having the right tools is essential. Here’s a list of essential equipment you’ll need:
– Electric Mixer: A stand or hand mixer is crucial for achieving the light and airy texture of whipped shortbread. This appliance saves time and ensures even mixing of the ingredients.
– Mixing Bowls: Use medium to large mixing bowls for ease of combining ingredients. Opt for glass or stainless steel bowls as they are easy to clean and won’t retain odors.
– Baking Sheets and Parchment Paper: Non-stick baking sheets lined with parchment paper are necessary for easy cookie removal and to prevent sticking. Parchment paper also helps with even baking.
– Cookie Scoop: This tool allows you to portion out uniform amounts of dough, ensuring that all cookies are the same size for consistent baking.
– Wire Rack: A cooling rack is essential for cooling cookies properly. It allows air to circulate around the cookies, which helps them maintain their texture.
Serving Suggestions and Pairings
Whipped shortbread cookies are versatile and can be enjoyed in various ways. Here are some ideas for serving and pairing:
– Beverages: These cookies pair beautifully with a variety of drinks. Enjoy them with a cup of hot tea, rich coffee, or even a glass of cold milk. The buttery flavor complements the warmth of tea and the richness of coffee perfectly.
– Festive Occasions: Shortbread cookies are ideal for holiday gatherings or special occasions. Consider serving them on a dessert platter alongside other treats like brownies or fruit tarts for a delightful variety.
– Dessert Platters: Create a stunning dessert table by including whipped shortbread cookies in a mix of other baked goods. Their elegant simplicity makes them a great addition to any spread.
– Gifting: Package your cookies in decorative tins or gift boxes. Add a personal touch by including a handwritten note or recipe card, making them a thoughtful gift for friends and family.
Storing and Preserving Cookies
To maintain the freshness of your whipped shortbread cookies, follow these best practices for storage:
– Room Temperature Storage: Store the cookies in an airtight container at room temperature. This will keep them fresh for up to a week. Make sure the cookies are completely cool before sealing them to prevent moisture accumulation.
– Freezing Cookies: If you want to make cookies in advance or save some for later, freezing is a great option. Place the cooled cookies in a single layer on a baking sheet and freeze them until solid. Then transfer them to a freezer-safe container or bag, separating layers with parchment paper. They can be stored this way for up to three months.
– Thawing Properly: When you’re ready to enjoy your frozen cookies, remove them from the freezer and allow them to thaw at room temperature for about 30 minutes. This will help preserve their texture and flavor.
Conclusion
Baking whipped shortbread cookies is a delightful experience that brings both joy and satisfaction. This recipe not only yields deliciously tender cookies but also opens the door to creativity through various decoration techniques. Whether you are serving them at a gathering, enjoying them with a warm drink, or gifting them to loved ones, these cookies are sure to bring smiles.
Feel free to experiment with different flavors and decorations, making each batch uniquely yours. The joy of baking lies in the ability to create something special from simple ingredients, and each cookie you make is a testament to your creativity and love for baking. So roll up your sleeves, gather your ingredients, and indulge in the pleasure of making these melt-in-your-mouth whipped shortbread cookies!