Introduction
Garlic knots have gained immense popularity in recent years, often found on the menus of pizzerias and Italian restaurants across the globe. These delightful little bites, typically made from pizza dough, are tied into knots, baked to perfection, and generously brushed with a buttery garlic sauce. Their warm, fragrant aroma and irresistible flavor make them a favorite appetizer or side dish. The comforting and indulgent nature of buttery garlic knots brings a sense of nostalgia and warmth, evoking memories of family dinners and cozy gatherings.
In this article, you will learn how to make buttery garlic knots from scratch, transforming simple ingredients into a delicious treat that will impress your family and friends. Not only will we cover the essential ingredients needed for this recipe, but we will also provide a step-by-step guide to ensure your garlic knots turn out perfectly every time. Whether you’re a seasoned baker or a novice in the kitchen, this recipe is designed to be accessible and rewarding.
Understanding the Ingredients
To create the perfect buttery garlic knots, understanding the role of each ingredient is crucial. Let’s take a closer look at the essential components that come together to make this delightful treat.
All-Purpose Flour: The Backbone of the Dough
All-purpose flour is the primary ingredient in the dough, providing structure and stability. It contains a moderate amount of protein, which is essential for gluten development. Gluten is what gives the dough its elasticity and chewiness, allowing it to rise and hold its shape. When making garlic knots, it’s important to use high-quality all-purpose flour to achieve the best texture.
Active Dry Yeast: Importance in Creating the Perfect Rise
Active dry yeast is a key player in the leavening process. It ferments the sugars in the dough, producing carbon dioxide gas that causes the dough to rise. This fermentation process not only helps the dough to expand but also contributes to the flavor profile of the garlic knots. When activated properly, yeast creates a light and airy texture, making your knots fluffy and delightful to eat.
Warm Water and Sugar: Activating Yeast for the Right Texture
Warm water is essential for activating the yeast. The ideal temperature is between 100°F to 110°F (37°C to 43°C), which is warm enough to stimulate the yeast without killing it. Adding a small amount of sugar to the warm water also aids in the activation process. Yeast feeds on sugar, and this initial boost helps create a foamy mixture that indicates the yeast is alive and ready to work its magic on the dough.
Olive Oil: Enhancing Flavor and Texture
Olive oil serves multiple purposes in this recipe. Not only does it add a depth of flavor, but it also contributes to the overall texture of the dough. The fat in olive oil helps to create a softer, more tender bread by coating the flour particles, which inhibits gluten formation. This results in a more tender crumb, making the garlic knots even more enjoyable.
Unsalted Butter: The Key to That Buttery Finish
Unsalted butter is a crucial ingredient when it comes to achieving that signature buttery finish. Brushing the knots with melted unsalted butter after baking enhances their flavor and gives them a glossy, appealing appearance. Butter also adds richness and moisture, making each bite indulgently satisfying.
Garlic and Parsley: Bringing Vibrant Flavor
Garlic and parsley are the stars of the seasoning mix for your buttery garlic knots. Fresh garlic, when roasted or sautéed, becomes sweet and aromatic, adding a punch of flavor. Parsley not only brightens the dish with its vibrant green color but also adds a fresh, herbaceous note that balances the richness of the butter. Together, they create a harmonious blend that elevates the overall taste of the knots.
Italian Seasoning and Red Pepper Flakes: Adding Depth and Optional Heat
For those who enjoy a bit of complexity in their flavors, Italian seasoning and red pepper flakes can be added to the garlic butter mixture. Italian seasoning typically includes a blend of herbs such as oregano, basil, and thyme, which complement the garlic and parsley beautifully. Red pepper flakes introduce a subtle heat that can be adjusted according to your taste preferences, making the knots even more exciting.
Step-by-Step Guide to Making Buttery Garlic Knots
Now that you have a good understanding of the ingredients, let’s dive into the step-by-step guide for making buttery garlic knots. This process may seem intimidating at first, but with each step broken down, you’ll find that it’s quite simple and rewarding.
Activating the Yeast
The first step in making buttery garlic knots is to activate the yeast. In a small bowl, combine the warm water and sugar, stirring gently to dissolve the sugar. Next, sprinkle the active dry yeast over the surface of the water. Allow the mixture to sit for about 5-10 minutes. During this time, you should see the yeast begin to foam and bubble, indicating that it is alive and ready to work. This foaming action is crucial for achieving the right rise in your dough, so be sure to monitor it closely.
Making the Dough
Once the yeast is activated, it’s time to make the dough. In a large mixing bowl, combine the all-purpose flour and salt. Create a well in the center of the flour mixture and pour in the activated yeast mixture and the olive oil. Using a wooden spoon or a spatula, gently mix the ingredients together until a shaggy dough forms.
At this point, you can begin to incorporate additional ingredients if you desire, such as Italian seasoning or red pepper flakes. As the dough comes together, you want to ensure that it is not too sticky or too dry. The right consistency should be soft and pliable, yet able to hold its shape. If the dough feels too wet, gradually add a little more flour until you achieve the desired texture.
Kneading the Dough
Kneading is a critical step in developing gluten, which gives the dough its structure. Once the dough has come together, transfer it to a lightly floured surface and begin to knead it by pushing it away with the heels of your hands, folding it back over itself, and repeating the process. Continue kneading for about 8-10 minutes, or until the dough becomes smooth and elastic.
You can test whether the dough is ready by performing the “windowpane test.” Take a small piece of dough and stretch it between your fingers. If it stretches thin enough to let light through without tearing, it’s ready for the next step.
Letting the Dough Rise
After kneading, place the dough in a lightly greased bowl, turning it to coat all sides. Cover the bowl with a clean kitchen towel or plastic wrap and place it in a warm, draft-free area to rise. This process of fermentation is essential, as it allows the dough to develop flavor and texture. Ideally, you want the dough to rise until it has doubled in size, which typically takes about 1 to 1.5 hours.
To create an ideal rising environment, you can preheat your oven to the lowest setting for a minute or two, then turn it off and place the dough inside. The gentle warmth will encourage the yeast to work effectively. Alternatively, placing the bowl near a warm window can also provide the necessary warmth for the dough to rise.
—
This is just the beginning of your journey to creating delicious buttery garlic knots. Stay tuned for the next part, where we will cover shaping the knots, baking them to perfection, and adding the finishing touches that make these treats truly irresistible.
{{image_1}}
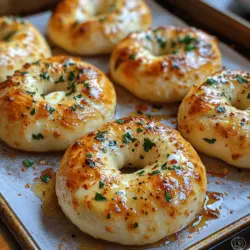
Forming the Knots
Once your dough has risen and is ready to be shaped, it’s time to transform it into the delightful garlic knots that will steal the show at your next meal. The process of forming these knots is both simple and enjoyable, allowing you to unleash your creativity in the kitchen.
Techniques for Shaping the Dough into Knots
Start by gently punching down the risen dough to release any trapped air. On a floured surface, divide the dough into equal-sized pieces, typically about 1 to 2 ounces each, depending on how large you want your knots to be.
Take one piece and roll it into a long rope, approximately 8-10 inches in length. To form a knot, create a loop with the rope, then take the end of the rope and tuck it under the loop, pulling it through to tighten. Adjust the shape as necessary to ensure it resembles a traditional knot. Repeat this process with the remaining pieces of dough.
Visual Cues for the Right Size and Shape
The ideal garlic knot should be slightly plump and well-defined but not overly tight. A good visual cue is to ensure that the knot has a nice, rounded appearance, with the ends of the dough tucked securely. If you’re unsure, practice with a few pieces first; it’s all about finding the right balance between aesthetics and technique.
Second Rise
After shaping all the knots, it’s essential to let them rise again before baking. This second rise is crucial for achieving the desired texture and fluffiness.
Importance of the Second Rise for Texture and Fluffiness
The second rise allows the gluten in the dough to relax further, resulting in a softer and airier final product. This step typically takes about 30 to 45 minutes; during this time, you should cover the knots lightly with a clean kitchen towel to prevent them from drying out. The dough should puff up noticeably, becoming almost double in size, which indicates that it is ready to bake.
How to Prepare the Baking Sheet for Optimal Results
While the knots are rising, prepare your baking sheet. Line it with parchment paper or lightly grease it to prevent sticking. Arranging your knots with enough space between them is crucial, as they will expand during baking. Aim for about 2 inches apart; this ensures that they don’t merge together, allowing for even browning and a delightful crust.
Preparing the Garlic Butter Mixture
Now it’s time to prepare the star of the show: the garlic butter mixture. This is where you develop the flavor that makes buttery garlic knots so irresistible.
Ingredients and Their Roles
For the garlic butter, you will need:
– Unsalted Butter: This is the base of your mixture, providing richness and depth of flavor. Unsalted butter allows you to control the saltiness of the dish.
– Fresh Garlic: Minced garlic provides that bold, pungent flavor that garlic lovers crave.
– Parsley: Chopped fresh parsley adds a burst of color and a mild herbal note that complements the garlic beautifully.
– Salt: Enhances all the flavors and ties the mixture together.
Importance of Using Fresh Garlic Versus Pre-minced Options
While pre-minced garlic can be convenient, using fresh garlic elevates the flavor of your garlic knots significantly. Fresh garlic has a more robust and vibrant flavor profile, adding a distinct zing that pre-minced varieties simply cannot replicate. For best results, use a garlic press or finely mince the cloves with a knife to release their natural oils.
Customizing the Butter Mixture with Herbs and Spices
Feel free to customize your garlic butter mixture! Adding a pinch of red pepper flakes can introduce a subtle heat, while a sprinkle of grated Parmesan cheese can enhance the umami flavor. Experiment with herbs like thyme or oregano for a unique twist that suits your taste.
Baking the Knots
With your knots shaped and your garlic butter prepared, it’s time to bake these beauties.
Preheating the Oven: Why Temperature Matters
Preheat your oven to 400°F (200°C). The right temperature is crucial for achieving that golden-brown exterior while ensuring the inside remains fluffy and light. An oven thermometer can help guarantee that your oven is at the correct temperature, preventing undercooked or overly browned knots.
Techniques for Brushing the Knots with Garlic Butter
Once your knots have finished their second rise, it’s time to brush them generously with the garlic butter mixture. Use a pastry brush for even coverage, ensuring every crease and crevice is coated in that flavorful butter. This step not only adds flavor but also promotes a beautiful golden color during baking.
Indicators of Perfect Baking: Color and Aroma
Bake the knots for approximately 15 to 20 minutes, or until they are golden brown. Keep an eye on them, as baking times may vary based on your oven and the size of the knots. The aroma wafting through your kitchen will be a good indicator that they are nearing perfection. Look for a rich, golden hue on the tops, indicating a crispy exterior and a soft interior.
Final Touches and Serving Suggestions
Once your garlic knots are baked to perfection, there are a few final touches to enhance their flavor and presentation.
How to Enhance Flavor Just After Baking
As soon as the knots come out of the oven, brush them again with the remaining garlic butter mixture. This step ensures they absorb even more flavor while remaining moist. For an extra touch, sprinkle a pinch of sea salt over the top while they are still warm, enhancing the flavor profile further.
Suggestions for Serving: Pairing with Marinara or as a Side to Meals
Garlic knots are incredibly versatile. They can be served as an appetizer, side dish, or even a snack. Pair them with a warm marinara sauce for dipping, which complements the garlic flavor beautifully. They are also a fantastic accompaniment to pasta dishes, salads, or soups, making them an excellent addition to any meal.
Nutritional Insights
Understanding the nutritional content of your homemade garlic knots can help you enjoy them even more.
Breakdown of Calories and Macronutrients per Serving
Each garlic knot is approximately 100 calories, depending on how large you make them. A single serving typically contains about 3g of protein, 4g of fat, and 15g of carbohydrates. This makes them a satisfying treat without being overly heavy, allowing you to enjoy them guilt-free.
Discussion on Dietary Considerations (e.g., Vegetarian-Friendly)
These buttery garlic knots are vegetarian-friendly, making them suitable for various dietary preferences. If you’re looking to make them dairy-free, consider substituting the butter with a plant-based alternative, ensuring everyone can partake in this delicious treat.
The Versatility of Garlic Knots
Garlic knots are not only delicious but also incredibly versatile.
Ideas for Variations: Adding Cheese, Herbs, or Spices
Feel free to get creative! You can incorporate shredded mozzarella or cheddar cheese into the dough before shaping it into knots for a cheesy twist. Adding fresh herbs like basil or rosemary can also impart additional layers of flavor that will delight your taste buds.
Possibilities for Dipping Sauces and Pairings
In addition to marinara, consider serving your garlic knots with a variety of dipping sauces, such as ranch, pesto, or even a spicy aioli. These pairings can elevate your garlic knots to new heights, making them a hit at gatherings and parties.
Conclusion
Making homemade buttery garlic knots is a joyful and rewarding experience. With their delightful aroma and irresistible flavor, these knots are sure to become a staple in your kitchen. They are perfect for sharing with family and friends or enjoying as a comforting treat for yourself.
As you embark on this baking journey, remember that the process is just as important as the outcome. Enjoy every step—from the soft dough to the enticing garlic butter. So grab your apron, roll up your sleeves, and dive into the wonderful world of homemade garlic knots. Embrace the satisfaction of baking from scratch and the joy of sharing these delicious creations at your next gathering or meal.