
Introduction
Italian Nut Roll Cookies, known for their delightful texture and rich flavors, are a cherished treat that resonates deeply within Italian cuisine. Often referred to as “noci” or “noci di pasta,” these cookies are not merely a dessert; they are a symbol of family traditions, celebrations, and the warmth of gatherings. Their unique combination of crispiness on the outside and a chewy, nutty filling on the inside makes them a favorite among cookie enthusiasts, especially during holidays and festive occasions.
The origins of Nut Roll Cookies can be traced back to various regions in Italy, where families have perfected their recipes over generations. These cookies are particularly prominent in Northern Italy, where they often feature in holiday celebrations and family gatherings. As Italian immigrants settled in the United States, they brought along their culinary traditions, and Nut Roll Cookies quickly became a staple in Italian-American households. Each family has its own version, often passed down through generations, reflecting the love and care infused into these homemade delights.
Baking Nut Roll Cookies at home is more than just a cooking endeavor; it is an act of love and a way to keep cultural traditions alive. The process of baking cookies can evoke fond memories of family gatherings, where the kitchen fills with laughter, stories, and, of course, the irresistible aroma of freshly baked goods. In this article, we will explore the essential ingredients, the step-by-step process of making these delectable cookies, and tips for achieving the perfect batch.
Understanding the Ingredients
Essential Baking Elements
To create the perfect Italian Nut Roll Cookies, it is crucial to understand the role of each ingredient in the recipe. Here’s a breakdown of the essential baking elements that contribute to the texture and flavor of the cookies.
1. All-Purpose Flour: This versatile ingredient forms the base of the cookie dough. All-purpose flour is known for its moderate protein content, which allows for a balanced texture. It provides structure while still keeping the cookies tender, making it an essential component in achieving that perfect bite.
2. Granulated Sugar: Sugar is a key ingredient that not only adds sweetness but also aids in browning the cookies during baking. The caramelization of sugar contributes to the cookies’ rich flavor and golden color, enhancing their overall appeal.
3. Baking Powder: This leavening agent is responsible for creating lightness in the cookies. When combined with moisture and heat, baking powder releases carbon dioxide gas, causing the dough to rise slightly. This results in a softer, less dense cookie that still holds its shape.
4. Salt: Often overlooked, salt plays a vital role in baking. It enhances the flavors of the other ingredients, balancing sweetness and bringing out the richness of the butter and nuts. A small amount of salt can elevate the overall flavor profile of the cookies.
Key Flavor Contributors
Beyond the essential baking elements, several key ingredients contribute to the unique flavor of Italian Nut Roll Cookies.
1. Unsalted Butter: The richness of unsalted butter is paramount in baking. It adds moisture and flavor to the cookie dough, ensuring a tender texture. Using unsalted butter allows you to control the amount of salt in your recipe, leading to a more balanced flavor.
2. Fresh Eggs: Eggs are another crucial ingredient that provides structure and moisture to the dough. They help bind the ingredients together, resulting in a cohesive mixture. Fresh eggs also enhance the richness of the cookies, imparting a delicious flavor.
3. Vanilla and Almond Extracts: The combination of vanilla and almond extracts brings a delightful aroma and flavor to the cookies. Vanilla adds warmth and sweetness, while almond extract imparts a distinct nutty essence that complements the flavor of the nuts used in the filling.
Crunch Factor: Nuts in the Dough
The inclusion of nuts is what truly sets Italian Nut Roll Cookies apart. The choice of nuts not only impacts the texture but also adds a depth of flavor.
1. Walnuts vs. Pecans: While walnuts are the traditional choice for Nut Roll Cookies, pecans can be used for a slightly sweeter and milder flavor. Walnuts have a robust, earthy taste that pairs beautifully with the other ingredients, while pecans offer a buttery richness. The choice between the two often comes down to personal preference.
2. Health Benefits: Nuts are not only delicious but also packed with health benefits. They are a good source of healthy fats, protein, and essential vitamins and minerals. Incorporating nuts into your cookies not only enhances the flavor but also adds nutritional value, making your treats a bit more wholesome.
Step-by-Step Guide to Making Italian Nut Roll Cookies
Now that we’ve explored the essential ingredients, let’s dive into the step-by-step process of making these delightful cookies. The preparation of the dough is the foundation of the recipe and requires attention to detail for the best results.
Preparation of the Dough
1. Whisking Dry Ingredients: Begin by measuring out your dry ingredients accurately. In a large mixing bowl, combine the all-purpose flour, baking powder, and salt. Whisk the ingredients together until they are evenly mixed. This step is crucial as it ensures that the leavening agent is evenly distributed throughout the flour, preventing any pockets of baking powder in your dough.
2. Creaming Butter: In a separate bowl, use a hand mixer or stand mixer to cream the unsalted butter until it becomes light and fluffy. This process usually takes about 2-3 minutes and is essential for incorporating air into the dough, resulting in a lighter texture.
3. Integrating Wet Ingredients: Once the butter is creamed, gradually add the granulated sugar to the bowl, continuing to beat until the mixture is light and airy. Next, add the fresh eggs, one at a time, mixing well after each addition. Finally, incorporate the vanilla and almond extracts, blending until fully combined. The mixture should be smooth and creamy, with a lovely aroma filling your kitchen.
With this foundational step completed, you are well on your way to creating these delightful Italian Nut Roll Cookies. The next part of the recipe will guide you through the assembly and baking process, ensuring that your cookies turn out perfectly every time. Stay tuned as we continue to explore the magic of this timeless Italian treat.
Tips for Achieving the Right Dough Consistency
When preparing Italian Nut Roll Cookies, one of the most crucial steps is achieving the right dough consistency. The dough should be soft yet manageable, allowing for easy rolling without being overly sticky or crumbly. Here are some tips to ensure your dough is just right:
1. Measure Accurately: Use a kitchen scale for precision. Too much flour can lead to dry dough, while too little can make it sticky. Always spoon flour into your measuring cup and level it off with a knife for accurate measurement.
2. Room Temperature Ingredients: Ensure your butter and eggs are at room temperature. This helps them combine more thoroughly, creating a smooth and cohesive dough.
3. Gradual Mixing: When combining the wet and dry ingredients, add the flour mixture gradually. This allows you to monitor the dough’s consistency and avoid overworking it, which can lead to tough cookies.
4. Kneading: Knead the dough gently until it comes together. Avoid excessive kneading, as this can develop gluten and make the cookies dense rather than light and fluffy.
Forming the Cookie Logs
Once you have the perfect dough consistency, it’s time to form your cookie logs. This step is essential for creating the classic shape of Italian Nut Roll Cookies.
Techniques for Rolling Dough into Logs
1. Divide the Dough: Start by dividing the dough into manageable portions, usually quarters. This makes it easier to roll out without overwhelming yourself.
2. Flour the Surface: Lightly flour your work surface to prevent sticking. Roll out one portion of dough into a rectangle, about 1/4 inch thick. Ensure the edges are even for a consistent roll.
3. Adding the Filling: Spread your nut filling evenly over the dough, leaving a small border around the edges. Use a spatula for an even layer.
4. Rolling the Dough: Starting from one long edge, carefully roll the dough away from you, keeping it tight but not too tight to avoid squeezing out the filling. Use the parchment paper or a silicone baking mat to help lift the dough and guide the roll.
5. Create a Log Shape: Once rolled, gently pinch the seams to seal the log. Roll it back and forth on the surface to smooth it out and ensure it’s uniform.
Importance of Chilling the Dough for Optimal Baking Results
Chilling the dough is a vital step that should not be overlooked. After shaping the logs, wrap them in plastic wrap and refrigerate for at least one hour. Chilling the dough helps it firm up, making it easier to slice into cookies without losing shape. Additionally, it enhances the flavors, allowing the ingredients to meld beautifully.
Baking Process
Now that your dough is chilled and ready, it’s time to bake those delicious Italian Nut Roll Cookies!
Preheating and Preparing the Baking Sheet
Preheat your oven to 350°F (175°C). This temperature ensures that the cookies bake evenly. While the oven heats, line your baking sheets with parchment paper, which prevents sticking and makes for easy cleanup.
Slicing Techniques for Uniform Cookie Size
Remove the chilled logs from the refrigerator. Using a sharp knife, slice the logs into 1/2-inch thick pieces. For even slices, you can use a ruler or a guide. If the log is too firm, let it sit at room temperature for a few minutes to soften slightly, which will allow for easier slicing.
Baking Time and Temperature Guidelines for Perfect Cookies
Place the sliced cookies on the prepared baking sheet, leaving some space between each piece to allow for spreading. Bake in the preheated oven for 12 to 15 minutes, or until the edges are lightly golden. Keep a close eye on them, as baking time may vary depending on your oven.
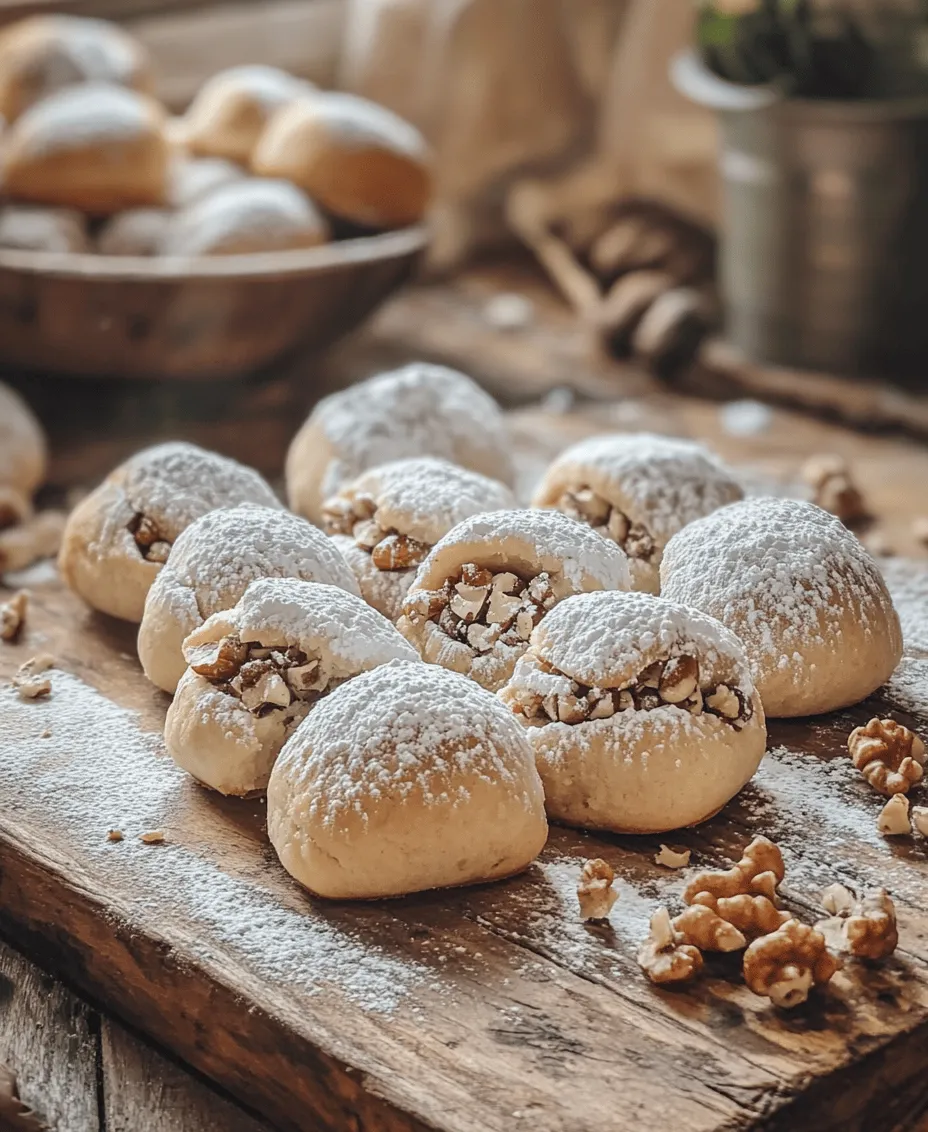
Finishing Touch: The Powdered Sugar Coating
Once your cookies are baked and cooled, it’s time to add the final touch that makes them irresistible: the powdered sugar coating.
Explanation of the Final Coating Process
To coat the cookies, place a generous amount of powdered sugar in a shallow bowl. After the cookies have cooled completely, gently roll each cookie in the powdered sugar until well coated. The sugar not only adds sweetness but also creates a beautiful snowy appearance that enhances their visual appeal.
Visual Appeal and Flavor Enhancement of Powdered Sugar
The powdered sugar coating contrasts beautifully with the nutty filling, making your Italian Nut Roll Cookies look as delightful as they taste. It adds a subtle sweetness that complements the rich flavors of the nuts, creating a perfect balance.
Storage and Serving Suggestions
Once your cookies are finished, proper storage will help maintain their freshness and flavor.
Best Practices for Storing Italian Nut Roll Cookies
Store your Italian Nut Roll Cookies in an airtight container at room temperature. They can last up to one week if properly stored. If you want to keep them longer, consider freezing them. Place the cookies in a single layer in a freezer-safe container with parchment paper between layers, and they can last for up to three months.
Ideal Serving Suggestions for Various Occasions
Italian Nut Roll Cookies are versatile and perfect for any occasion. They make an excellent addition to holiday cookie platters, family gatherings, or a delightful treat alongside afternoon tea. Their unique shape and festive appearance make them a crowd-pleaser during celebrations.
Pairing Ideas with Beverages
To enhance the experience, consider pairing these cookies with beverages. A robust cup of coffee complements the nutty flavors, while a delicate cup of tea offers a soothing balance. For a more festive touch, serve them alongside sweet dessert wines like Vin Santo, which beautifully pairs with the rich filling.
Cultural Variations of Nut Roll Cookies
Italian Nut Roll Cookies are beloved in various regions across Italy, each with its unique twist on the classic recipe.
Overview of Regional Differences in Nut Roll Recipes Across Italy
In Italy, the nut roll cookie varies from region to region. For instance, in the northern regions, you may find variations that include chocolate or dried fruits mixed into the nut filling. Conversely, southern regions might incorporate citrus zest for a refreshing twist.
An Exploration of Variations in Filling and Flavorings
While walnuts are the traditional choice for the filling, many recipes experiment with hazelnuts or almonds. Some families even add spices like cinnamon or vanilla to enhance the flavor. Each variation tells a story, reflecting family traditions and regional ingredients.
Connection to Other Similar Baked Goods Within Italian Culture
Nut roll cookies share similarities with other Italian baked goods, such as struffoli or biscotti. Each of these treats has its unique preparation and flavor profile but echoes the communal joy of baking and sharing with loved ones.
Conclusion
Baking Italian Nut Roll Cookies is more than just a culinary task; it’s a journey of flavors and memories. The process of mixing, rolling, and baking brings families together, creating a nostalgic experience that transcends generations. The joy of sharing these cookies with friends and family during special occasions fosters connections and creates lasting memories.
As you embark on this delightful baking adventure, remember that the satisfaction of making these cookies extends beyond the final product. It lies in the laughter shared, the stories told, and the cherished moments spent with those you love. We encourage you to try making Italian Nut Roll Cookies at home, embracing the joy of baking and the sweet rewards that follow.