Introduction
Chocolate and peanut butter—a pairing that has captured the hearts and taste buds of dessert lovers around the world. The creamy, nutty flavor of peanut butter melds seamlessly with the rich sweetness of chocolate, creating a flavor profile that’s almost universally adored. Whether it’s in the form of cookies, brownies, or the classic candy bar, this combination has become a staple in many kitchens. In today’s fast-paced lifestyle, where simplicity and convenience are key, having a deliciously quick recipe at hand is invaluable. Enter the Irresistible 5-Ingredient Chocolate Peanut Butter Cups—an incredibly easy and satisfying treat that anyone can make at home, regardless of culinary skill level.
These homemade chocolate peanut butter cups require minimal ingredients and are perfect for any occasion, be it a casual family gathering, a festive celebration, or simply a sweet indulgence after a long day. With just five simple ingredients, you can whip up a batch that rivals store-bought versions, while also customizing them to your taste. Let’s dive into understanding the ingredients and the step-by-step process that will lead you to these delightful treats.
Understanding the Ingredients
Before we embark on the journey of making these delectable chocolate peanut butter cups, it’s essential to familiarize ourselves with the key ingredients. Each element plays a unique role in achieving that perfect balance of taste and texture.
Milk Chocolate Chips
First on our list are milk chocolate chips. When it comes to chocolate, the choice can greatly influence the final product. Milk chocolate is preferred for its creamy texture and sweetness, which complements the savory notes of peanut butter. The melting properties of milk chocolate are also ideal for this recipe, as they create a smooth, pourable consistency that coats the peanut butter filling beautifully. For those who prefer a darker chocolate experience, semi-sweet chocolate chips can be an excellent substitute, offering a richer flavor profile.
Creamy Peanut Butter
Next, we have creamy peanut butter, the star ingredient of these delicious cups. While chunky peanut butter has its merits, creamy peanut butter is preferred in this recipe for a few reasons. Its smooth consistency allows for easy spreading and mixing, ensuring that each bite delivers a uniform taste. Additionally, the rich and velvety texture of creamy peanut butter pairs perfectly with the melted chocolate, creating a harmonious blend that delights the palate.
Powdered Sugar
To achieve the right level of sweetness, we incorporate powdered sugar into our peanut butter filling. Unlike granulated sugar, powdered sugar dissolves easily, helping to create a creamy, smooth texture without any graininess. It also adds a touch of sweetness that balances the flavors without overwhelming the natural nuttiness of the peanut butter.
Vanilla Extract
A splash of vanilla extract elevates the flavor profile of our peanut butter cups. This aromatic ingredient adds depth and complexity, enhancing the overall taste experience. It’s a simple yet effective way to make your homemade treats stand out, giving that delightful hint of warmth that lingers on the palate.
Mini Muffin Liners
Lastly, we can’t forget the importance of mini muffin liners. These little paper cups not only help shape the chocolate peanut butter cups but also make for easy serving and clean-up. They prevent the chocolate from sticking to the muffin tin, allowing for a hassle-free removal process. Plus, they provide an attractive presentation, making your homemade treats look just as appealing as they taste.
Step-by-Step Instructions for Perfect Peanut Butter Cups
Now that we’ve covered the essential ingredients, it’s time to dive into the step-by-step process of making these irresistible chocolate peanut butter cups. Follow these instructions carefully to ensure that each cup turns out perfectly delicious.
Step 1: Prepare Your Workspace
Start by gathering all your ingredients and tools. You’ll need a microwave-safe bowl, a spatula for stirring, a mini muffin tin, and mini muffin liners. Ensure that your workspace is clean and organized to streamline the process.
Step 2: Melt the Chocolate
Begin by measuring out your milk chocolate chips. Place them in the microwave-safe bowl. To melt the chocolate without seizing, it’s crucial to use short bursts of heat. Microwave the chocolate chips in 30-second intervals, stirring in between until smooth and fully melted. This method prevents the chocolate from overheating, which can lead to a gritty texture.
Step 3: Create the Chocolate Base
Once your chocolate is melted, it’s time to create the base layer for your peanut butter cups. Using a spoon or a small ladle, pour a thin layer of melted chocolate into the bottom of each mini muffin liner, covering the bottom completely. This layer should be thick enough to hold the filling but not so thick that it overshadows the peanut butter flavor. Place the muffin tin in the freezer for about 10-15 minutes to set the chocolate.
Step 4: Prepare the Peanut Butter Filling
While the chocolate base is setting, it’s time to prepare the peanut butter filling. In a separate mixing bowl, combine the creamy peanut butter, powdered sugar, and vanilla extract. Use a spatula to mix until the ingredients are fully combined and the mixture is smooth. The goal is to create a thick, spreadable filling that will hold its shape when layered on top of the chocolate.
Step 5: Assemble the Cups
Once the chocolate base has hardened, remove the muffin tin from the freezer. Using a spoon, scoop a small amount of the peanut butter filling and place it on top of the chocolate layer in each muffin liner. Gently press down to flatten the filling, ensuring it remains contained within the chocolate base. You want a nice, even layer that will allow for another layer of chocolate on top.
Step 6: Top with More Chocolate
After adding the peanut butter filling, it’s time for the final layer of chocolate. Reheat any remaining melted chocolate if necessary, and pour a layer over the peanut butter filling in each muffin liner. Ensure that the peanut butter is completely covered, creating a seal that holds everything together. Smooth the top with a spatula to achieve a polished finish.
Step 7: Freeze Again
Return the muffin tin to the freezer once more, allowing the chocolate to set completely. This usually takes about 30 minutes. Freezing not only helps the chocolate firm up but also enhances the texture of the peanut butter cups, making them easier to bite into later.
Step 8: Serve and Enjoy
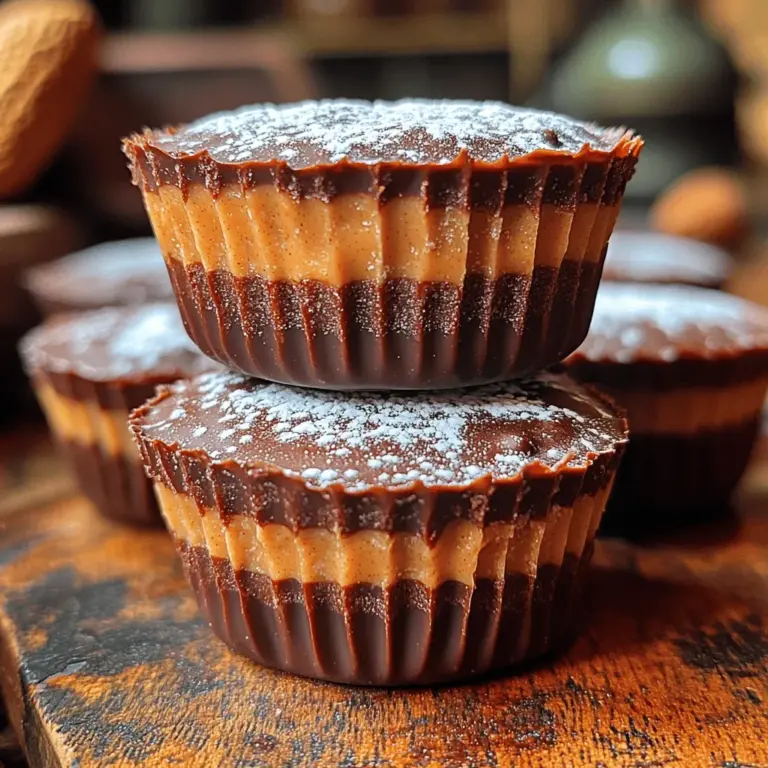
Once the chocolate has fully set, remove the muffin tin from the freezer. Carefully peel away the mini muffin liners to reveal your beautifully crafted chocolate peanut butter cups. Arrange them on a serving plate or store them in an airtight container in the fridge for a cool treat whenever cravings strike.
Creative Variations and Enhancements
While the classic chocolate peanut butter cup is undeniably delicious, there’s always room for creativity. Consider these fun variations and enhancements to customize your treats:
– Dark Chocolate: Swap out the milk chocolate for dark chocolate for a richer, more intense flavor.
– Nut Butters: Experiment with different nut butters, such as almond or cashew, for a unique twist.
– Add-ins: Incorporate crushed pretzels, toffee bits, or even a sprinkle of sea salt on top for added texture and flavor.
– Dairy-Free Options: Use dairy-free chocolate chips and natural peanut butter to create a vegan-friendly treat.
With these simple steps and variations, you’re well on your way to creating the ultimate chocolate peanut butter cups that are sure to impress friends and family alike. Stay tuned for more insights and tips that will elevate your baking game even further!
{{image_1}}
Dark Chocolate vs. Milk Chocolate: Flavor Differences and Health Benefits
When it comes to crafting the perfect chocolate peanut butter cup, the choice between dark and milk chocolate plays a crucial role in both flavor and health benefits. Dark chocolate is known for its rich, intense flavor and slightly bitter notes, which can beautifully complement the sweetness of the peanut butter filling. It often contains a higher cocoa content, typically ranging from 70% or more, which means it is packed with antioxidants. These antioxidants can help reduce inflammation and lower blood pressure, making dark chocolate a healthier option when enjoyed in moderation.
On the other hand, milk chocolate offers a creamier texture and a sweeter taste, thanks to the addition of milk solids and sugar. This type of chocolate can make the peanut butter cups taste more indulgent and dessert-like, appealing to those with a sweet tooth. However, milk chocolate generally contains more sugar and fewer health benefits compared to its darker counterpart. Ultimately, the choice between dark and milk chocolate boils down to personal preference. You might even consider a blend of both to strike a balance between sweetness and richness.
Nut Butter Alternatives for Different Flavor Profiles
While peanut butter is the classic choice for these delightful treats, there’s no rule that says you can’t experiment with other nut butters. Almond butter, for instance, has a slightly sweet and nutty flavor that pairs wonderfully with chocolate. It is also a great source of vitamin E and magnesium. Cashew butter offers a creamy texture with a subtle sweetness, making it a fantastic alternative for those who prefer a milder taste. For a more exotic twist, you can try sunflower seed butter, which is nut-free and ideal for those with nut allergies.
Each nut butter not only brings its unique flavor but also varies in nutritional content. When substituting, keep in mind that the consistency may affect how the filling sets within the chocolate cups, so you may need to adjust the ratios slightly. This flexibility allows you to personalize your chocolate peanut butter cups to match your taste preferences and dietary needs.
Add-ins: Sea Salt, Crushed Nuts, or Crispy Rice for Texture Variations
To elevate your chocolate peanut butter cups beyond the standard recipe, consider adding some extra ingredients for flavor and texture. A sprinkle of sea salt on top can enhance the sweetness of the chocolate and peanut butter, creating a satisfying contrast. This simple addition can take your treats from delicious to extraordinary.
For those who enjoy a bit of crunch, crushed nuts can be mixed into the peanut butter filling or sprinkled on top before the chocolate sets. Chopped hazelnuts or pecans can add a delightful texture and complexity to the flavor profile. If you’re a fan of crispy textures, try incorporating crispy rice cereal into the chocolate mixture or as a topping. This will provide a delightful crunch that contrasts beautifully with the creamy filling.
Nutritional Insight: Understanding the Treat
Before indulging in these chocolate peanut butter cups, it’s essential to understand their nutritional values. Each cup contains approximately 100-120 calories, depending on the specific ingredients used, such as the type of chocolate and nut butter. The cups are primarily composed of healthy fats from the nut butter and dark chocolate, along with a moderate amount of sugar.
For anyone concerned about allergens, it’s important to note that this recipe contains peanuts and may include dairy if using milk chocolate. If you need to modify the recipe for dietary restrictions, consider using a nut butter that meets your needs, such as sunflower seed butter for nut allergies, and opt for dairy-free chocolate to accommodate lactose intolerance or vegan diets.
Serving Suggestions and Pairings
Once your chocolate peanut butter cups are made, think about how to serve them for maximum enjoyment. They are perfect for a sweet treat after dinner or as a midday snack. Pair them with a cup of coffee to enhance the chocolate flavor or enjoy them with a soothing cup of herbal tea for a relaxing afternoon break.
These chocolate peanut butter cups are also excellent for festive occasions. They make a wonderful addition to dessert tables at birthdays and holiday parties and can even serve as thoughtful homemade gifts wrapped in decorative paper. For casual gatherings, you can present them on a platter alongside other treats to create a delightful dessert spread.
Storing and Preserving Your Chocolate Peanut Butter Cups
To maintain the freshness and quality of your chocolate peanut butter cups, proper storage is key. Place them in an airtight container to avoid exposure to air, which can cause them to dry out or lose flavor. When stored in the refrigerator, they can last up to two weeks, though they are likely to be eaten well before that!
If you want to extend their shelf life, consider freezing them. Freeze the cups in a single layer on a baking sheet until solid, then transfer them to a freezer-safe container or bag. They can be stored in the freezer for up to three months. When you’re ready to enjoy one, simply remove it from the freezer and let it thaw at room temperature for about 10-15 minutes before indulging. This will ensure that the chocolate is perfectly smooth and the filling remains creamy.
Conclusion
Creating homemade chocolate peanut butter cups is not only simple but also a joyful culinary experience. With just five ingredients, you can whip up a batch of these delightful treats that are sure to impress friends and family. The beauty of this recipe lies in its versatility; from experimenting with different types of chocolate and nut butters to adding unique flavors and textures, the possibilities are endless.
So, gather your ingredients and get creative in the kitchen. Whether you stick to the classic recipe or venture into new flavor territories, you will find satisfaction in crafting your own chocolate peanut butter cups. There’s nothing quite like the joy of enjoying a treat made from scratch, knowing that you have created a delicious dessert that can be shared and savored. Happy baking!
