Introduction
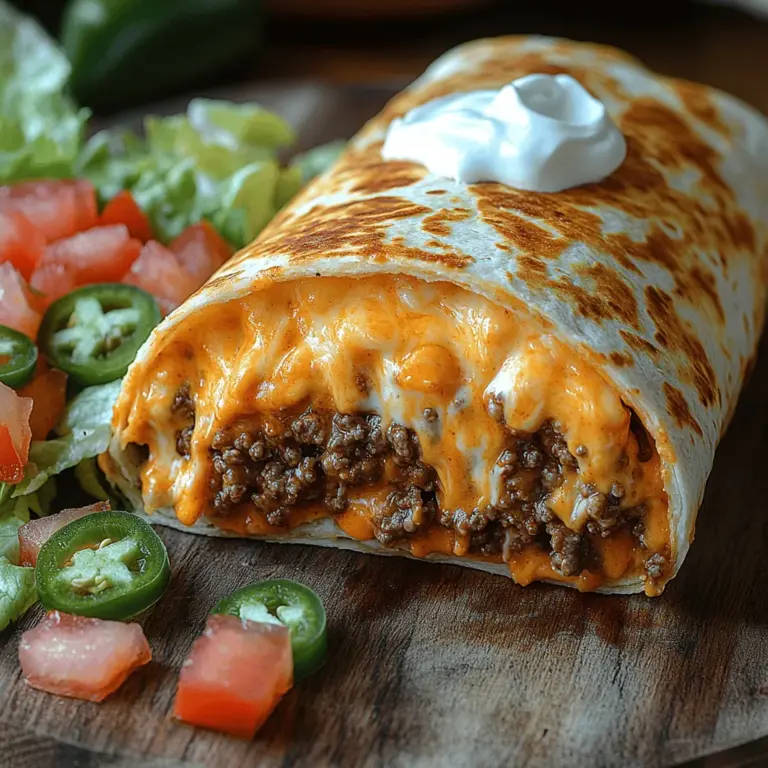
If you’re a fan of bold flavors wrapped in a warm, fulfilling package, the Cheesy Crunchy Beefy Melt Burrito is a dish you won’t want to miss. This hearty burrito combines the savory richness of seasoned ground beef, the gooey indulgence of nacho cheese, and a delightful crunch that elevates it to a whole new level of deliciousness. Perfect for a casual family dinner, game day gatherings, or a quick weeknight meal, this burrito is not just food; it’s an experience that embraces the essence of comfort food.
The appeal of the Cheesy Crunchy Beefy Melt Burrito lies not only in its robust flavor profile but also in its versatility. Whether you’re feeding a crowd or enjoying a cozy evening in, this dish fits seamlessly into any occasion. The combination of textures—creamy, crunchy, and meaty—makes each bite satisfying, while the vibrant toppings add freshness that can brighten any meal.
In the following sections, we’ll delve into the ingredients that make this burrito a standout, as well as provide a step-by-step guide on how to prepare it. By the end, you’ll have all the tools needed to impress your family and friends with this delicious creation.
Understanding the Ingredients
To create the perfect Cheesy Crunchy Beefy Melt Burrito, it’s essential to understand the core ingredients that contribute to its flavor and texture. Each element plays a crucial role in crafting this mouthwatering dish.
Ground Beef
Ground beef is the star of this burrito, providing a rich source of protein that contributes to its heartiness. Not only is ground beef versatile and easy to cook, but it also packs a nutritional punch. It’s a great source of essential vitamins and minerals such as iron, zinc, and B vitamins, making it an excellent choice for a well-rounded meal.
When cooking ground beef for your burrito, there are a few tips to keep in mind. First, choose the right fat content; ground beef with 80/20 lean-to-fat ratio is ideal for a juicy and flavorful outcome. Begin by breaking the meat apart in the pan and allowing it to brown evenly, which enhances the depth of flavor. Remember to drain any excess fat after cooking to avoid a greasy burrito.
Taco Seasoning
Flavor is key when it comes to any Mexican-inspired dish, and taco seasoning is what brings that authentic taste to the Cheesy Crunchy Beefy Melt Burrito. This seasoning blend typically includes chili powder, cumin, garlic powder, and paprika, among other spices, all of which work together to create a robust and savory profile.
You can either purchase pre-made taco seasoning or make your own at home, which allows for customization according to your taste preferences. Using homemade seasoning can enhance the freshness of your burrito and provide a unique touch. A good rule of thumb is to season the beef generously, adjusting according to your desired spice level.
Flour Tortillas
The choice of tortilla can significantly affect the overall enjoyment of your burrito. Flour tortillas are the preferred option for the Cheesy Crunchy Beefy Melt Burrito due to their soft texture and pliability. They provide a neutral canvas that allows the flavors of the filling to shine through.
When selecting flour tortillas, consider the size—typically, large tortillas (around 10-12 inches) work best for burritos. Be mindful of the thickness; thicker tortillas can hold up better against moist ingredients without tearing. If you prefer a little extra flavor, you might even opt for flavored tortillas, such as garlic or spinach.
Nacho Cheese Sauce
No Cheesy Crunchy Beefy Melt Burrito would be complete without the creamy goodness of nacho cheese sauce. This indulgent ingredient adds a layer of richness that perfectly complements the seasoned beef.
You have the option to make your own nacho cheese sauce at home, which can be as simple as melting cheddar cheese with a splash of milk and a few spices. Alternatively, store-bought nacho cheese sauce is a quick and convenient choice that can save time. Whichever route you choose, ensure that the cheese is melted and creamy for that ultimate burrito experience.
Additional Toppings
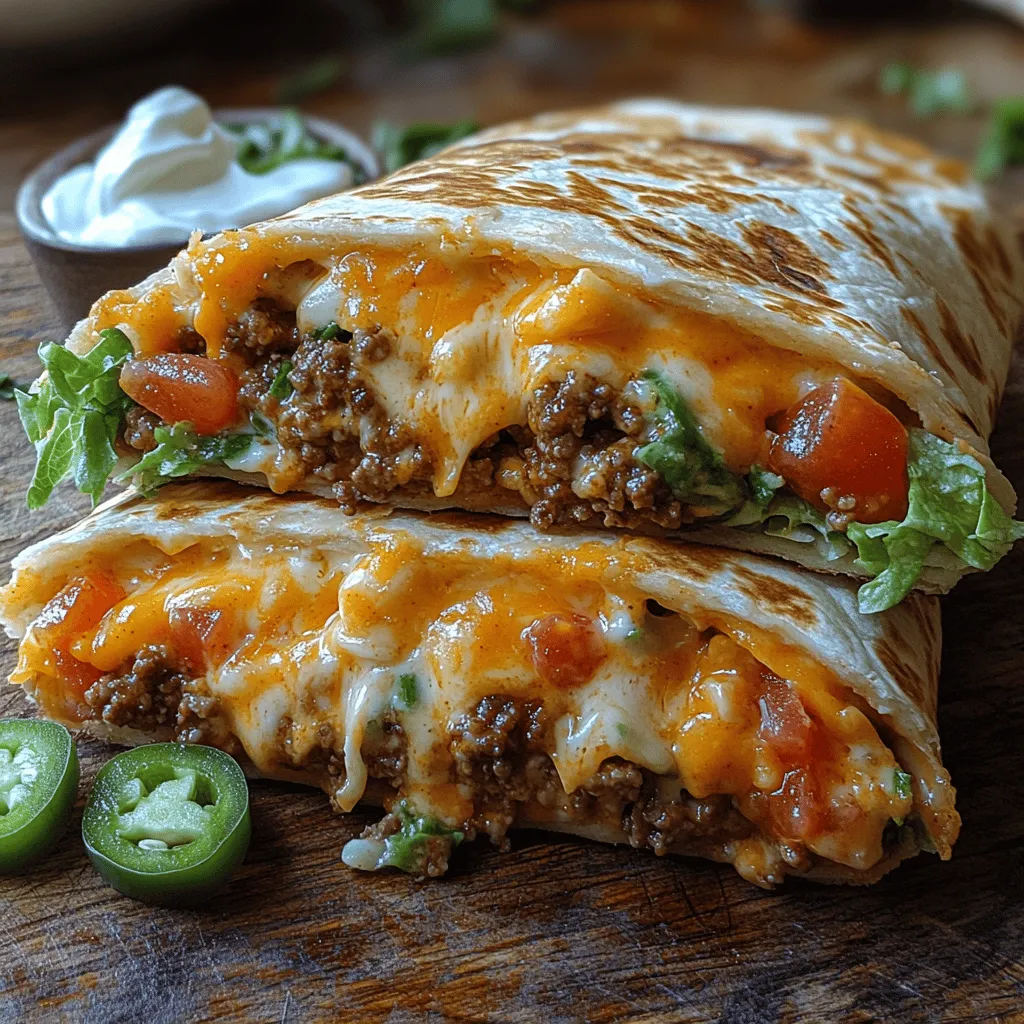
Fresh toppings can elevate your burrito from good to great. Ingredients like crisp lettuce, juicy tomatoes, and tangy sour cream not only add a burst of freshness but also contribute to a balanced dish. Fresh ingredients bring a delightful crunch and a touch of acidity that cuts through the richness of the beef and cheese.
Feel free to customize your toppings according to your preference; sliced jalapeños, avocado, or cilantro can add even more flavor and texture. The beauty of the Cheesy Crunchy Beefy Melt Burrito is its adaptability to suit various palates.
Step-by-Step Cooking Guide
Now that we’ve explored the essential ingredients, let’s dive into the step-by-step process for crafting your very own Cheesy Crunchy Beefy Melt Burrito. Follow these instructions closely to ensure that your burrito turns out perfectly every time.
Cooking the Beef
1. Prepare Your Ingredients: Gather all your ingredients and prep your workspace. Dice any vegetables you plan to include, such as onions or garlic, and measure out your taco seasoning.
2. Sauté the Onions: Begin by heating a tablespoon of oil in a large skillet over medium heat. Add diced onions and sauté until they become translucent, about 3-5 minutes. This step is crucial as it builds a flavor base for your beef.
3. Brown the Ground Beef: Add the ground beef to the skillet with the onions. Use a wooden spoon to break the meat apart, spreading it evenly across the pan. Allow the beef to brown for about 5-7 minutes, stirring occasionally. Browning the meat develops a deeper flavor, so don’t rush this step.
4. Season the Meat: Once the beef is browned, drain any excess fat. Sprinkle your taco seasoning over the meat, mixing thoroughly to ensure even distribution. Follow the seasoning package instructions for the correct amount of water to add (usually around 1/2 cup). This will help the spices adhere to the meat and create a cohesive flavor.
5. Simmer for Flavor Enhancement: Bring the mixture to a simmer. Cover the skillet and let it cook for an additional 5-10 minutes. This simmering process allows the spices to meld beautifully with the beef, enhancing the overall taste of the filling.
Preparing the Tortillas
6. Warm the Tortillas: While the beef is simmering, prepare your tortillas. To make them pliable, wrap them in a damp paper towel and microwave them for about 20-30 seconds. Alternatively, you can warm them in a dry skillet for a few seconds on each side. Warm tortillas are easier to roll and will hold your filling better.
7. Assemble the Burritos: Once your beef is cooked and your tortillas are warm, it’s time to assemble your burritos. Begin by placing a generous scoop of the seasoned beef mixture in the center of each tortilla, followed by a drizzle of nacho cheese sauce. Be careful not to overfill, as this can make rolling difficult.
8. Add Fresh Toppings: Top the beef and cheese with your choice of fresh ingredients. Chopped lettuce, diced tomatoes, and a dollop of sour cream work wonderfully here, adding freshness and crunch.
Follow these steps carefully, and you’ll be well on your way to creating a delicious Cheesy Crunchy Beefy Melt Burrito that’s sure to impress. Stay tuned for the next part, where we’ll explore additional cooking tips and tricks to ensure perfect results every time!
Assembling the Perfect Burrito
Creating the perfect Cheesy Crunchy Beefy Melt Burrito begins with mastering the art of assembly. This is where the magic happens, and the flavors meld beautifully. The right layering and wrapping techniques can elevate your burrito from good to extraordinary.
Visual Guide to Layering Ingredients
To assemble your burrito, start with a large flour tortilla, approximately 10-12 inches in diameter. This size ensures you can fit all your ingredients without overstuffing. Here’s a visual guide to layering:
1. Base Layer: Begin with your cooked beef mixture. Spread about 1/4 to 1/3 cup evenly in the center of the tortilla, leaving about a 2-inch border around the edges.
2. Cheese: Next, add a generous sprinkle of shredded cheese on top of the beef. This could be a blend of cheddar and Monterey Jack for that perfect melt.
3. Beans: Add a spoonful of black or refried beans. They provide additional protein and a creamy texture.
4. Rice: If you’re including rice, add a small portion above the cheese. This helps absorb moisture and keeps the burrito from getting soggy.
5. Veggies: Layer some sautéed bell peppers, onions, or fresh pico de gallo for a burst of freshness and crunch.
6. Sour Cream/Garnishes: Finally, add a dollop of sour cream or guacamole if desired, but use sparingly to avoid a soggy burrito.
Importance of Ingredient Placement for Even Distribution and Flavor
Layering ingredients properly ensures an even distribution of flavors throughout every bite. If all the cheese is at the bottom, you might miss out on its creamy goodness in the first few bites. By interspersing ingredients, you create a harmonious balance that enhances the overall taste experience.
Tips on Portion Sizes for Balanced Bites
When assembling your burrito, it’s crucial to avoid overloading it. Aim for a balanced bite by using about 1/4 to 1/3 cup of each component. Too much filling can lead to a messy burrito that’s difficult to wrap and eat. Remember, the goal is to enjoy a blend of flavors without overwhelming your palate.
Wrapping Techniques for Sealing the Burrito
Once you’ve layered your ingredients, it’s time to wrap your burrito. Follow these steps for a tight seal:
1. Fold the Sides: Start by folding the left and right sides of the tortilla inward over the filling.
2. Tuck and Roll: Grasp the bottom of the tortilla (the side closest to you) and fold it over the filling, tucking it under slightly.
3. Roll Up: Continue rolling away from you, keeping the sides tucked in as you go.
4. Seal the Edge: Once fully rolled, the burrito should be seam-side down to help keep it sealed.
Common Mistakes to Avoid When Wrapping
Avoid these common pitfalls when wrapping your burrito:
– Overstuffing: Adding too much filling can lead to a burst burrito. Stick to recommended portion sizes.
– Weak Sealing: Not tucking in the sides properly can result in spillage. Ensure you secure the edges tightly.
– Using Cold Tortillas: Cold tortillas are less pliable. Warm them slightly in the microwave or on a skillet to make wrapping easier.
Optional Grilling for Added Texture
Grilling your burrito is an optional step that provides an exciting texture contrast between the crunchy exterior and the soft, flavorful interior.
Benefits of Grilling the Burrito
Grilling not only enhances the flavor with a smoky char but also adds a delightful crunch to the outer layer. The heat helps melt the cheese inside, creating a gooey, satisfying center. Plus, the grilled burrito looks visually appealing with enticing grill marks.
Texture Contrast Between Crunchy Exterior and Soft Interior
The combination of a crispy exterior and a soft, cheesy interior is one of the highlights of this burrito. As you take a bite, the crunch gives way to the tender filling, making each mouthful a delightful experience.
Tips for Achieving the Perfect Grill Marks and Crispness
To achieve the ideal grilled burrito:
1. Preheat the Grill: Ensure your grill or skillet is hot before placing the burrito on it. Medium heat works well.
2. Use a Light Coat of Oil: Lightly brush the outside of the burrito with oil to promote browning and prevent sticking.
3. Press Down: Use a spatula to press down firmly on the burrito for even cooking and beautiful grill marks.
4. Flip Carefully: After a few minutes, carefully flip the burrito to grill the other side. Aim for a golden-brown color.
Serving Suggestions and Pairings
Once your Cheesy Crunchy Beefy Melt Burrito is ready, consider serving it with complementary side dishes and dips to enhance the meal experience.
Recommended Side Dishes to Complement the Burrito
Pair your burrito with sides that balance flavors and textures. Here are a few recommendations:
– Mexican Rice: Fluffy rice seasoned with cumin and lime complements the burrito perfectly, providing a mild contrast to the bold flavors.
– Refried Beans: Smooth and savory, refried beans make a great side and add additional protein to your meal.
Ideas for Salsa, Guacamole, or Mexican Rice
Don’t forget to add dips that can elevate your burrito experience:
– Salsa: A fresh pico de gallo or a tangy tomatillo salsa can brighten the meal. The acidity cuts through the richness of the burrito.
– Guacamole: Creamy guacamole adds richness and a delightful texture when smeared on each bite of the burrito.
Beverage Pairings That Enhance the Meal Experience
To round off the meal, consider pairing your burrito with refreshing beverages such as:
– Margaritas: A classic choice, the citrusy notes of a margarita complement the flavors of Mexican cuisine beautifully.
– Horchata: This sweet, cinnamon-spiced rice drink provides a cooling contrast to the spicy burrito.
Nutritional Information
When it comes to enjoying your Cheesy Crunchy Beefy Melt Burrito, it’s essential to understand its nutritional content, especially if you’re keeping track of your dietary intake.
Breakdown of Calories and Nutritional Values per Serving
A typical serving of a Cheesy Crunchy Beefy Melt Burrito contains approximately:
– Calories: 600-800 (depending on ingredients and portion sizes)
– Protein: 30g
– Carbohydrates: 70g
– Fat: 25g
These values can vary based on the specific ingredients you use. Using lean ground beef, low-fat cheese, and whole-grain tortillas can create a healthier version.
Discussion on Customization for Dietary Preferences
This recipe is versatile and can be customized to suit various dietary needs:
– Vegetarian: Substitute ground beef with grilled vegetables, lentils, or black beans for a hearty meatless option.
– Gluten-Free: Use gluten-free tortillas to make this burrito accessible for those with gluten sensitivities.
Conclusion
The Cheesy Crunchy Beefy Melt Burrito is not just a meal; it’s a delightful experience that brings together vibrant flavors and textures. Its versatility makes it perfect for gatherings, parties, or a satisfying weeknight dinner. By mastering the art of assembling, grilling, and serving this burrito, you’ll impress family and friends alike.
Don’t be afraid to experiment with variations—try adding different proteins, vegetables, or sauces to make the recipe your own. This burrito is a canvas for creativity, inviting you to explore flavors that resonate with your palate. So, roll up your sleeves, gather your ingredients, and enjoy crafting this mouthwatering dish!
