Introduction
As the sun shines brighter and temperatures rise, nothing quite satisfies like a delicious homemade popsicle. These delightful frozen treats not only offer a refreshing escape from the heat but also serve as a healthier alternative to their store-bought counterparts. While those store-bought varieties often contain additives and artificial flavors, making your own popsicles allows you to control the ingredients, ensuring a wholesome and delicious experience for the whole family.
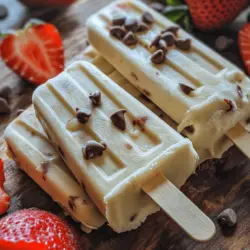
Among the myriad of popsicle recipes, the Creamy Vanilla Bliss Popsicles stand out for their rich, velvety texture and indulgent flavor. This versatile recipe is easy to make, requiring just a few simple ingredients that you likely already have in your pantry. Whether you’re looking to cool down on a hot summer day or want to create a fun treat for a family gathering, these creamy popsicles are sure to become a beloved favorite among both children and adults alike.
In this article, we will explore the ingredient choices that make these popsicles extraordinary, delve into the science behind making the perfect popsicle, and provide a detailed, step-by-step guide to creating your own Creamy Vanilla Bliss Popsicles at home.
Understanding the Ingredients
To create the perfect Creamy Vanilla Bliss Popsicles, it is essential to understand the role of each ingredient and how they contribute to the overall flavor and texture. Let’s take a closer look at the primary components of this delightful recipe:
– Whole Milk: Whole milk is the base of the popsicle mixture, providing a creamy and rich flavor profile. It is an excellent source of calcium, vitamin D, and other essential nutrients, making it a nutritious choice for a frozen treat. The fat content in whole milk also adds to the creaminess of the popsicles, ensuring a smooth texture that melts beautifully in your mouth.
– Heavy Cream: This ingredient is the secret to achieving that indulgent, creamy texture that makes these popsicles so irresistible. Heavy cream contains a higher fat content than regular cream, which helps to create a luscious mouthfeel. The addition of heavy cream not only enhances the popsicle’s richness but also helps to prevent the formation of ice crystals during freezing, resulting in a smoother final product.
– Granulated Sugar: Sugar plays a crucial role in balancing the flavors of the popsicles. It adds sweetness, enhancing the natural flavors of the milk and vanilla. Moreover, sugar helps to lower the freezing point of the mixture, preventing the popsicles from becoming too hard and icy. This results in a soft yet firm texture that is easy to bite into.
– Pure Vanilla Extract: The star of the show, vanilla extract, adds depth and complexity to the flavor profile of these popsicles. Using high-quality, pure vanilla extract is essential, as it imparts a rich aroma and flavor that elevates the entire treat. The warm, sweet notes of vanilla complement the creaminess of the popsicles, making each bite a delightful experience.
– Cornstarch: Often overlooked, cornstarch is a vital ingredient in this recipe. It acts as a thickening agent, helping to stabilize the mixture and create a smooth consistency. When combined with the other ingredients, cornstarch enhances the creaminess while also providing a slight thickness that ensures the popsicles hold their shape during freezing.
– Salt: A small pinch of salt may seem insignificant, but it plays an important role in balancing the sweetness of the popsicles. Salt enhances the flavors and brings out the richness of the vanilla and cream. It also contributes to a more complex flavor profile, ensuring that the sweetness does not overpower the other ingredients.
– Optional Add-ins: One of the best aspects of making popsicles at home is the ability to customize them to your liking. Consider adding crushed fruits, such as strawberries or peaches, for a fruity twist. Chocolate chips or chunks can also be included for those who crave a bit of chocolatey goodness. The possibilities are endless, allowing you to create a popsicle that suits your taste and preferences.
The Science Behind Popsicle Making
Understanding the science behind popsicle making can greatly enhance your ability to create the perfect frozen treat. The key to achieving a creamy popsicle lies in the emulsification process, which occurs when fat and water-based ingredients are combined. In this case, the whole milk and heavy cream contain fat, while the sugar and vanilla extract provide additional flavor and sweetness.
When you mix these ingredients together, the fat molecules from the cream and milk disperse throughout the mixture. This creates a uniform blend that helps to prevent the formation of large ice crystals during the freezing process. Large ice crystals result in a grainy, icy texture, which is not desirable in creamy popsicles. To achieve a smooth consistency, it is crucial to ensure that the mixture is well combined without reaching a boiling point, which can affect the texture and flavor.
Freezing plays a significant role in the final outcome of your popsicles. As the mixture freezes, the water content forms ice crystals. If the mixture is properly emulsified and has enough fat content, these ice crystals will be small and evenly distributed, resulting in a creamy popsicle. Conversely, if the mixture lacks sufficient fat or is not well mixed, you may end up with larger ice crystals, leading to a less enjoyable texture.
Step-by-Step Guide to Making Creamy Vanilla Bliss Popsicles
Now that we’ve explored the ingredients and the science behind popsicle making, it’s time to dive into the step-by-step preparation process for creating your own Creamy Vanilla Bliss Popsicles. This guide aims to make the process as straightforward as possible, ensuring that even novice cooks can succeed in making these delicious treats.
Preparing the Base Mixture
1. Gather Your Ingredients: Before you begin, gather all your ingredients and necessary equipment. You will need whole milk, heavy cream, granulated sugar, pure vanilla extract, cornstarch, salt, and any optional add-ins you desire. Additionally, have your popsicle molds and a mixing bowl ready.
2. Combine the Milk and Cream: In a medium saucepan, combine the whole milk and heavy cream. Stir gently to mix the two liquids thoroughly. This will be the base for your popsicle mixture.
3. Add Sugar and Salt: Next, add the granulated sugar and a pinch of salt to the saucepan. Stir the mixture well until the sugar is fully dissolved. This step is important because it ensures an even distribution of sweetness throughout the popsicles.
4. Incorporate Vanilla Extract: Pour in the pure vanilla extract and mix gently to combine. The aroma of vanilla will begin to fill the air, hinting at the delicious treat to come.
5. Create the Cornstarch Slurry: In a separate small bowl, mix the cornstarch with a few tablespoons of cold milk from the saucepan. Stir until the cornstarch is fully dissolved, creating a smooth slurry. This step is crucial for preventing clumps of cornstarch in your mixture.
6. Combine the Mixtures: Once the sugar is dissolved and the cornstarch slurry is ready, pour the slurry into the saucepan with the milk mixture. Stir continuously over medium heat, ensuring that the mixture does not boil. This gentle heating allows the cornstarch to activate and thicken the mixture without compromising the creamy texture.
7. Cook Until Thickened: Continue stirring the mixture for several minutes or until it begins to thicken slightly. You should notice a change in texture, with the mixture becoming creamier and smoother. Be vigilant to avoid boiling, as this can lead to undesirable results.
Creating the Cornstarch Slurry
The cornstarch slurry is a vital step in achieving the ideal consistency for your Creamy Vanilla Bliss Popsicles. Here’s how to ensure a smooth incorporation:
1. Dissolve the Cornstarch: As mentioned earlier, take a small bowl and combine the cornstarch with a few tablespoons of the milk mixture. It’s essential to use cold milk for this step, as it helps dissolve the cornstarch more effectively and prevents lumps from forming.
2. Stir Until Smooth: Use a whisk or a fork to stir the cornstarch and milk combination until it reaches a smooth, lump-free consistency. This is a crucial step, as any undissolved cornstarch can lead to a gritty texture in your popsicles.
3. Add to the Base Mixture: Once your slurry is well-combined, slowly pour it back into the saucepan with the rest of the milk and cream mixture. Make sure to continue stirring as you add it in to ensure an even distribution.
By understanding the ingredients and following these detailed preparation steps, you are well on your way to creating your own batch of Creamy Vanilla Bliss Popsicles. Stay tuned for the next part, where we will guide you through the freezing process, tips for achieving the best results, and answer some common questions about popsicle making!
{{image_1}}
Cooking and Thickening
To achieve the perfect texture for your Creamy Vanilla Bliss Popsicles, it’s essential to properly cook and thicken the base mixture. Start by heating your cream and milk over medium heat in a saucepan. Stir continuously to prevent the mixture from burning or sticking to the bottom of the pan. Watch for visual and tactile cues to know when the mixture is ready.
As the mixture heats, you will notice it begins to steam, but it should not boil. The ideal temperature for thickening is around 180°F (82°C), which you’ll recognize when the edges start to bubble gently. At this point, you can dip a spoon into the mixture; if it coats the back of the spoon and leaves a distinct line when you swipe your finger across it, you know it has thickened sufficiently.
Once you’ve achieved this consistency, remove the saucepan from the heat and let it cool slightly before moving on to the flavoring step.
Adding Flavor
After thickening your base, it’s time to infuse it with the delightful flavor of vanilla. Timing is critical here; you want to add the vanilla extract while the mixture is still warm, as this helps to enhance its aromatic qualities. A good rule of thumb is to add one to two teaspoons of pure vanilla extract for every two cups of liquid used in your recipe.
If you’d like to experiment with optional ingredients, consider incorporating a dash of salt to balance the sweetness or a tablespoon of honey or maple syrup for additional flavor depth. For those who enjoy a bit of zest, the addition of citrus zest—like lemon or orange—can bring a refreshing twist to the vanilla flavor profile. Stir thoroughly to ensure even distribution of these ingredients throughout the mixture.
Molding and Freezing
Now that your mixture is perfectly flavored, it’s time to mold your popsicles. Make sure to have your popsicle molds ready—silicone molds or disposable plastic molds both work well. Carefully pour the mixture into each mold, leaving about half an inch of space at the top for expansion as the mixture freezes.
To avoid air bubbles, you can gently tap the filled molds against the counter, ensuring that the mixture settles evenly. Insert the sticks into the molds and place them upright in the freezer.
The freezing process requires patience. Allow the popsicles to freeze for at least 4 to 6 hours, or until they are completely solid. For best results, leave them overnight. If you are in a hurry, you might check them after 3 hours, but ensure they are fully frozen before removing them from the molds.
Flavor Variations and Customizations
One of the most enjoyable aspects of making Creamy Vanilla Bliss Popsicles is the opportunity for customization. Here are some delicious variations to suit your personal tastes:
Fruity Variations
Fruits can add both flavor and texture to your popsicles. Berries like strawberries, blueberries, and raspberries are excellent choices due to their bright colors and natural sweetness. To prepare the fruit, simply wash and chop them into small pieces. You can either mix the fruit into the popsicle base before pouring it into the molds or layer it for a beautiful aesthetic.
For example, you could create a strawberry swirl by blending fresh strawberries with a bit of sugar and layering it with the vanilla mixture in the molds. Other fruits like mango, peach, and kiwi also work well, bringing their unique flavor profiles to the mix.
Chocolate Lovers
For chocolate aficionados, incorporating chocolate into your popsicles is a must. You can melt dark, milk, or white chocolate and drizzle it into the popsicle molds before adding the vanilla mixture. This creates a marbled effect and infuses the popsicles with a rich chocolate flavor.
Alternatively, consider adding cocoa powder directly to your mixture, adjusting the sweetness as needed. Chocolate chips or chunks can also be mixed in for added texture, creating a delightful surprise with each bite.
Dairy-Free Alternatives
If you prefer a dairy-free option, you can easily substitute traditional dairy with plant-based alternatives. Coconut milk or almond milk can be used in place of the cream and milk, resulting in a creamy consistency and a subtle nutty or tropical flavor. Full-fat coconut milk will yield the richest texture, whereas almond milk will create a lighter treat.
When using dairy-free options, you may want to add a bit of sweetener since some plant-based milks can be less sweet than regular dairy. Experiment with agave syrup or maple syrup to find the perfect balance for your creamy popsicles.
Serving and Enjoying Your Popsicles
Serving your Creamy Vanilla Bliss Popsicles can be as fun and creative as making them. Here are some tips to enhance your presentation and enjoyment:
Presentation Tips
For a simple yet elegant presentation, consider serving your popsicles on a platter with fresh fruit or edible flowers as garnishes. If you’re hosting a gathering, display the popsicles in a tall glass or bucket filled with ice to keep them cool. For a festive touch, you can dip the ends of the popsicles in melted chocolate and then in crushed nuts or sprinkles before freezing them.
Pairing Options
These creamy popsicles pair beautifully with various beverages. Consider serving them alongside a chilled glass of sparkling water, lemonade, or iced tea for a refreshing summer treat. For a more indulgent pairing, serve them with a scoop of vanilla ice cream or a side of whipped cream for an extra-special dessert experience.
Storage Tips
To maintain freshness, store any leftover popsicles in an airtight container or wrap them individually in plastic wrap. This will prevent freezer burn and keep their flavors intact. Properly stored, they can last up to two months in the freezer, allowing you to enjoy your homemade treats long after you’ve made them.
Nutritional Information
Understanding the nutritional content of your Creamy Vanilla Bliss Popsicles can help you make informed choices. Each popsicle contains approximately 150 calories, depending on the exact ingredients used. The breakdown typically includes around 8 grams of fat, 15 grams of carbohydrates, and 12 grams of sugar.
These popsicles can provide a satisfying treat while fitting into a balanced diet. They contain calcium and vitamin D from the dairy, supporting bone health, and can be a source of antioxidants if you incorporate fruits. If you opt for dairy-free alternatives, you may also benefit from healthy fats found in coconut or almond milk.
Conclusion
Making Creamy Vanilla Bliss Popsicles at home is not just about creating a delicious treat; it’s an opportunity to indulge your creativity in the kitchen. The versatility of this recipe allows you to experiment with various flavors and ingredients, making each batch uniquely your own.
Whether you prefer fruity, chocolaty, or dairy-free variations, the joy of homemade popsicles is in the process and the delightful results. So gather your ingredients, invite some friends over, and enjoy the refreshing experience of crafting your own popsicles. Embrace the fun of experimenting with flavors and ingredients, and savor the sweet rewards of your culinary creativity!