Introduction
If you’re on the hunt for a dessert that combines irresistible flavors and delightful textures, look no further than Crunchy Butterfinger Caramel Delight Bars. This decadent treat merges the rich flavor of Butterfinger candy bars with a luscious layer of caramel, all nestled atop a buttery, oats-based crust. The contrast between the crispy, crunchy top layer and the gooey caramel creates a delightful experience for your taste buds, making these bars a favorite among sweet-tooths everywhere.
What sets these bars apart is their versatility; they are perfect for a variety of occasions. Whether you’re hosting a party, looking to impress at a family gathering, or simply indulging in a sweet craving, these bars are sure to be a hit. The combination of chocolate, caramel, and crunchy textures makes them an appealing choice for both kids and adults alike. As we dive deeper into this recipe, get ready to experience a dessert that is not only delicious but also easy to prepare, ensuring you can whip them up in no time.
This article will guide you through every step of creating Crunchy Butterfinger Caramel Delight Bars, from understanding the key ingredients to detailed instructions for perfecting this dessert. So, let’s get started on this mouthwatering journey!
Understanding the Ingredients
To create the perfect Crunchy Butterfinger Caramel Delight Bars, it’s essential to understand the role each ingredient plays in achieving the desired flavor and texture. Let’s take a closer look at the key components that make these bars irresistible:
Unsalted Butter
Using unsalted butter is crucial in this recipe as it allows you to control the salt content, enabling the other flavors to shine through. Unsalted butter also provides a rich, creamy texture that contributes to the overall mouthfeel of the bars. It’s best to use butter that is at room temperature to ensure it mixes evenly with the other ingredients.
Brown Sugar vs. Granulated Sugar
The recipe calls for both brown sugar and granulated sugar, each serving a unique purpose. Brown sugar is essential for adding moisture and a hint of caramel flavor, thanks to its molasses content. This ingredient helps create that chewy texture that complements the crunchy elements in the bars. Granulated sugar, on the other hand, contributes to the overall sweetness and helps achieve a light, airy texture when creamed with butter. The combination of both types of sugar is key to striking the perfect balance between chewiness and crunch.
Rolled Oats
Rolled oats are a significant ingredient in this recipe, serving as the foundation of the bar’s crust. They not only provide a wholesome, chewy texture but also contribute to the overall flavor profile. Oats add a subtle nuttiness that pairs beautifully with the other sweet components. Be sure to use rolled oats rather than quick oats, as the latter can result in a mushy texture that doesn’t hold up well in the bars.
Butterfinger Candy Bars
At the heart of this recipe are the Butterfinger candy bars, which bring a unique flavor and crunch. The combination of chocolate and peanut butter in the candy bars adds a delightful sweetness that melds perfectly with the caramel layer. When mixed into the batter, they create pockets of crunch that are simply irresistible. For those who want to elevate the flavor even further, consider using mini Butterfinger pieces, which will distribute more evenly throughout the bars.
Caramel Sauce
No dessert is complete without a rich layer of caramel, and this recipe is no exception. The caramel sauce adds a gooey, indulgent element that contrasts beautifully with the crunchy base. You can use store-bought caramel sauce for convenience or make your own for a more personalized touch. When layering the caramel, timing is important—waiting until the base is slightly cooled will help prevent it from melting into the crust.
Chocolate Chips and Optional Toppings
To finish off these delightful bars, chocolate chips are often drizzled or sprinkled on top, adding an extra layer of sweetness and a touch of elegance. You can use semi-sweet, milk, or dark chocolate chips, depending on your preference. Additionally, consider adding optional toppings such as crushed nuts or additional crushed Butterfinger pieces for extra crunch and flavor. The possibilities are endless, allowing you to customize these bars to suit your taste.
Step-by-Step Instructions
With a solid understanding of the ingredients, it’s time to roll up your sleeves and get started on making these delectable Crunchy Butterfinger Caramel Delight Bars. Here’s a detailed guide to help you through the process:
Preparing the Baking Environment
Before diving into the mixing, it’s essential to prepare your baking environment. Begin by preheating your oven to 350°F (175°C). This ensures that your bars will bake evenly. While the oven is heating, prepare your baking dish by lining it with parchment paper or greasing it with cooking spray. This step will make it easier to remove the bars once they’ve cooled, ensuring they maintain their shape.
Mixing the Wet Ingredients
In a large mixing bowl, combine the softened unsalted butter with both the brown sugar and granulated sugar. Using a hand mixer or stand mixer, cream the ingredients together until the mixture is light and fluffy. This process usually takes about 2-3 minutes. Achieving a smooth and creamy texture at this stage is crucial, as it helps to incorporate air into the mixture, leading to a lighter final product.
Once the butter and sugars are well combined, add in the eggs, one at a time, mixing thoroughly after each addition. Finally, stir in the vanilla extract, which adds a warm, inviting aroma to your bars. Make sure the mixture is well blended and smooth, as this will ensure an even distribution of flavors throughout the bars.
Mixing the Dry Ingredients
In a separate bowl, combine the rolled oats, flour, and any additional dry ingredients such as baking soda and salt. Whisk the dry ingredients together until they are evenly mixed. This step is vital for ensuring that the baking soda is evenly distributed, which contributes to the leavening and overall texture of the bars.
Gradually add the dry ingredients to the wet mixture, stirring with a spatula or wooden spoon until just combined. Be careful not to overmix at this stage, as this can lead to dense and chewy bars instead of the desired light and crunchy texture.
Folding in Butterfinger Candy
Once the batter is well mixed, it’s time to fold in the star of the show—the Butterfinger candy bars. Carefully chop the candy bars into small pieces, ensuring they are evenly distributed throughout the mixture. Gently fold in the chopped Butterfinger pieces using a spatula, being careful not to break them down too much. This will ensure that every bite of your bars is packed with that delightful Butterfinger crunch.
Baking the Base
Now that your mixture is ready, pour it into the prepared baking dish. Using a spatula, spread the mixture evenly across the bottom of the dish, pressing down gently to create a firm base. This step is crucial for achieving the right texture. Bake the base in the preheated oven for about 20-25 minutes, or until it turns a light golden brown. Keep an eye on the bars as they bake; you want to ensure they don’t overcook, which can lead to a dry texture.
Layering Caramel Sauce
Once the base is baked and slightly cooled, it’s time to layer on the caramel sauce. Drizzle the caramel evenly over the top of the baked base, using a spatula to spread it out if needed. It’s important to do this while the base is still warm to help the caramel adhere better. After layering the caramel, you can sprinkle any additional toppings, such as chocolate chips or crushed Butterfinger pieces, for an extra touch of indulgence.
With the caramel layer in place, return the dish to the oven for an additional 10-15 minutes. This will allow the caramel to set slightly while the flavors meld together. Once baked, remove the bars from the oven and let them cool completely in the dish before cutting them into squares.
By following these detailed instructions, you’re well on your way to creating your own batch of Crunchy Butterfinger Caramel Delight Bars. The combination of rich flavors and varied textures will surely impress anyone who tries them. Stay tuned for the next part of the article, where we’ll share tips for achieving the best results and answer some common questions about this delicious recipe!
{{image_1}}
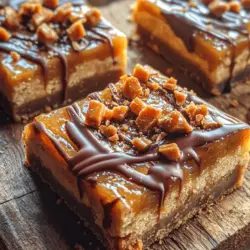
Crumbling the Second Layer: Ensuring Coverage and Texture
Once your first layer is perfectly baked and cooled, it’s time to move on to the second layer of your Crunchy Butterfinger Caramel Delight Bars. This layer is crucial, as it will not only enhance the flavor but also add texture. Start by preparing your Butterfinger candy bars, either by crushing them into small pieces or using a food processor for a finer crumble. The goal here is to achieve a mix of larger chunks and smaller bits, which will provide a delightful crunch when you take a bite.
Spread the caramel mixture evenly over the cooled crust, making sure to reach all corners. This ensures that each bar has the same delicious caramel flavor. Once the caramel is spread, sprinkle the crushed Butterfinger evenly on top. Gently press the Butterfinger bits into the caramel to help them adhere, ensuring that every bite has that signature crunch. This layering technique not only enhances the flavor but also contributes to the overall visual appeal of the bars.
Final Baking Instructions: Signs of Doneness for Perfect Bars
After you’ve crumbled the Butterfinger and layered it with caramel, it’s time for the final baking. Preheat your oven to 350°F (175°C) if you haven’t already. Return the assembled bars to the oven and bake for an additional 20-25 minutes. Keep an eye on the edges; they should start to turn a light golden brown. The center may still appear slightly soft, but it will firm up as it cools.
The key signs of doneness include a bubbly caramel layer and a firm yet slightly soft texture in the center. To ensure you don’t overbake, set a timer and check on the bars a few minutes before the time is up. Once they are done, remove the pan from the oven and allow your bars to cool completely in the pan on a wire rack. This cooling period is essential, as it lets the layers set properly before you move on to the drizzling stage.
Melting and Drizzling Chocolate: Techniques for a Smooth Finish
While your bars cool, it’s time to prepare the chocolate drizzle that will take these treats to the next level. Choose high-quality chocolate for melting, as it significantly enhances the final taste. You can use semi-sweet or dark chocolate, depending on your preference. Break the chocolate into small pieces and place them in a microwave-safe bowl. Heat in the microwave in 30-second intervals, stirring in between until the chocolate is completely melted and smooth.
Alternatively, you can melt the chocolate using a double boiler method, which provides more control and reduces the risk of burning. Once melted, let it cool slightly before drizzling it over the bars. A simple way to drizzle the chocolate is to use a fork or a piping bag. If using a piping bag, snip off a small corner and gently squeeze it to create beautiful chocolate lines across the top of your bars. The chocolate drizzle not only adds richness but also creates a stunning visual contrast against the caramel and Butterfinger.
Cooling and Serving: Tips for Achieving the Best Texture
After drizzling the chocolate, allow the bars to cool completely. This cooling process is critical, as it allows the chocolate to harden and makes the bars easier to cut. For best results, refrigerate the bars for at least an hour before slicing. This step ensures that the caramel, chocolate, and layers hold together beautifully when cut.
When you’re ready to serve, use a sharp knife to cut the bars into squares or rectangles. For an extra touch, consider dusting them with a little sea salt or serving them with a scoop of vanilla ice cream for a decadent dessert. These bars are versatile enough to be enjoyed on their own or as part of a more elaborate dessert platter.
Flavor Profile and Texture
The flavor profile of these Crunchy Butterfinger Caramel Delight Bars is a delightful combination of rich, buttery notes from the crust, balanced by the sweetness of the caramel. Each bite reveals a contrast between the soft, gooey caramel layer and the crunchy Butterfinger bits, which add a unique texture and a nostalgic flavor that many will recognize.
The chocolate drizzle plays a crucial role, enhancing the bars with added richness and creating a luscious finish that ties all the flavors together. The overall texture is a symphony of crunchy, chewy, and creamy elements, making it an irresistible treat for any dessert lover.
Serving Suggestions and Pairings
When it comes to serving your Crunchy Butterfinger Caramel Delight Bars, the possibilities are endless. These bars can be a show-stopping centerpiece on dessert platters for gatherings and parties. For an indulgent treat, serve them warm with a scoop of vanilla ice cream or whipped cream on the side.
Beverage pairings can elevate the experience even further. A rich cup of coffee complements the sweetness beautifully, while a tall glass of cold milk can provide a refreshing contrast. For festive occasions, consider serving them alongside a dessert wine or a creamy liqueur for a more adult twist.
These bars shine at various occasions: birthday parties, potlucks, and holiday gatherings. Their deliciousness makes them a crowd-pleaser, and they are sure to be a hit with both kids and adults alike.
Storage and Shelf Life
To maintain the freshness of your Crunchy Butterfinger Caramel Delight Bars, store them in an airtight container at room temperature. They can last for about 4-5 days this way. If you want to keep them for an extended period, consider freezing them.
To freeze, cut the bars into squares and layer them between sheets of parchment paper in an airtight container. They can last in the freezer for up to 2 months. When you’re ready to enjoy, simply thaw them in the refrigerator overnight. This method preserves their texture and flavor, ensuring they taste just as delightful as the day they were made.
Conclusion
In summary, Crunchy Butterfinger Caramel Delight Bars are a delightful blend of flavors and textures that are sure to impress anyone who tries them. With their rich buttery flavor, sweet caramel, and crunchy Butterfinger bits, these bars are a perfect treat for any occasion.
Encouraging readers to try making these bars for their next gathering not only promotes the joy of baking but also offers a chance to share homemade treats with loved ones. The satisfaction of creating something delicious from scratch and sharing it with others is one of the greatest joys in baking. So gather your ingredients, roll up your sleeves, and enjoy the delightful experience of making and savoring these incredible bars!