Introduction
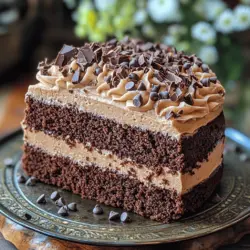
Chocolate cake is more than just a dessert; it is a classic symbol of celebration, comfort, and indulgence. From birthdays to anniversaries, or simply as a weekend treat, chocolate cake has captured the hearts and taste buds of dessert lovers around the world. Among the myriad of chocolate cake recipes, one stands out for its exceptional fudginess, rich chocolate flavor, and surprisingly simple preparation – the decadent homemade fudgy chocolate cake.
This recipe promises a cake that is not only delicious but also incredibly easy to make, allowing home bakers of all skill levels to whip up a dessert that feels truly indulgent. Imagine slicing into a moist cake that offers a dense, fudgy texture, with each bite melting in your mouth. Whether you’re baking for a special occasion or just to enjoy with family and friends, this chocolate cake will surely impress. The joy of baking at home lies not only in the creation of something delicious but also in the shared experience of enjoying these homemade treats with loved ones. Let’s dive into the details of this delectable cake, starting with the ingredients that make it so special.
Understanding the Ingredients
Creating the perfect fudgy chocolate cake starts with understanding the role of each ingredient. Each component contributes to the cake’s overall flavor, texture, and structure. Here is a closer look at the key ingredients you will need to craft this delightful dessert:
All-Purpose Flour: The Backbone of the Cake
All-purpose flour serves as the main structure for your cake. It provides stability and ensures the cake holds its shape while baking. When combined with liquid ingredients, flour absorbs moisture, creating the cake’s texture. For the best results, measure your flour accurately. Too much flour can lead to a dry cake, while too little can result in a cake that lacks structure.
Granulated Sugar: For Sweetness and Moisture
Granulated sugar not only sweetens the cake but also helps retain moisture, making your cake rich and tender. As the sugar dissolves during mixing, it aids in the aeration of the batter, contributing to a light texture. In this recipe, sugar plays a crucial role in balancing the bitterness of the cocoa powder and enhancing the overall flavor profile.
Unsweetened Cocoa Powder: The Source of Rich Chocolate Flavor
Cocoa powder is the heart of any chocolate cake recipe, providing the rich chocolate flavor that we crave. Unsweetened cocoa powder is preferred for this recipe as it allows you to control the sweetness while ensuring a deep, intense chocolate taste. Look for high-quality cocoa powder for the best results; Dutch-processed cocoa will yield a smoother flavor, while natural cocoa offers a more robust chocolate taste.
Baking Powder and Baking Soda: Importance in Leavening
Both baking powder and baking soda act as leavening agents, helping the cake rise and become fluffy. Baking powder is a combination of an acid and a base, which creates carbon dioxide when mixed with moisture and heat, resulting in a light texture. Baking soda, on the other hand, requires an acid (like the cocoa powder) to activate. The use of both ensures a perfectly risen cake with a tender crumb.
Salt: Enhances Flavor Balance
Salt is often overlooked but is an essential ingredient in baking. It enhances the flavors of other ingredients and balances the sweetness of the sugar. A touch of salt in your chocolate cake will intensify the chocolate flavor, providing a well-rounded taste that keeps you coming back for more.
Eggs: Binding Agent and Moisture Provider
Eggs are vital for binding the ingredients together, giving the cake its structure. They also add moisture and richness, contributing to the cake’s fudgy texture. As eggs beat into the batter, they incorporate air, which helps the cake rise and become light and fluffy.
Whole Milk: Adds Richness and Tenderness
Whole milk is used to add moisture and richness to the cake. The fat content in whole milk contributes to a tender crumb, while also enhancing the cake’s overall flavor. If you prefer, you can substitute with buttermilk for an even richer taste and a slight tang that complements the chocolate.
Vegetable Oil: Keeps the Cake Moist
Vegetable oil is a key ingredient that helps maintain the cake’s moisture, ensuring it remains fudgy and soft. Unlike butter, which can create a denser texture, oil allows for a lighter cake. If desired, you can substitute with melted butter for a different flavor profile, but the cake may be slightly less moist.
Vanilla Extract: Flavor Enhancer
Vanilla extract adds a warm, aromatic flavor that complements the chocolate. It enhances the overall taste of the cake, making every bite more delightful. For the best flavor, use pure vanilla extract instead of imitation vanilla.
Boiling Water: Creates a Thin Batter for a Fudgy Texture
One of the unique aspects of this chocolate cake recipe is the addition of boiling water. This may seem unconventional, but it plays a significant role in achieving a fudgy texture. When boiling water is mixed with cocoa powder, it activates the cocoa, resulting in a richer chocolate flavor while creating a thin batter that ultimately leads to a moist cake.
Optional Chocolate Chips: For Added Decadence
For those who crave even more chocolate goodness, adding chocolate chips to the batter is a fantastic option. These chips melt slightly during baking, creating pockets of gooey chocolate throughout the cake, enhancing both the flavor and texture.
Preparing the Cake Batter
Now that we have a solid understanding of the ingredients, it’s time to start preparing the cake batter. The process is straightforward, making this recipe perfect for bakers of all levels. Follow these step-by-step instructions to ensure your fudgy chocolate cake turns out perfectly.
Step 1: Gather Your Ingredients
Before you begin, make sure you have all your ingredients ready and measured out. This will streamline the mixing process and ensure you don’t miss anything. Gather your all-purpose flour, granulated sugar, cocoa powder, baking powder, baking soda, salt, eggs, whole milk, vegetable oil, vanilla extract, and boiling water. If you choose to use chocolate chips, have those on hand as well.
Step 2: Preheat Your Oven
Preheating your oven is crucial for achieving the best results. Set your oven to 350°F (175°C) so that it’s ready when you finish preparing the batter. This ensures that the cake bakes evenly and rises properly.
Step 3: Whisk the Dry Ingredients
In a large mixing bowl, combine the all-purpose flour, granulated sugar, cocoa powder, baking powder, baking soda, and salt. Using a whisk, mix the dry ingredients thoroughly to ensure even distribution. This step is essential, as it helps prevent clumps and ensures that all the leavening agents are evenly incorporated, leading to a uniform rise in the cake.
Step 4: Mix the Wet Ingredients
In another bowl, crack the eggs and whisk them lightly. Then, add the whole milk, vegetable oil, and vanilla extract to the eggs. Whisk these wet ingredients together until well combined. The combination of wet and dry ingredients is crucial for achieving the desired texture of the cake.
Step 5: Combine Wet and Dry Ingredients
Once the wet ingredients are mixed, pour them into the bowl with the dry ingredients. Stir gently with a spatula or wooden spoon until just combined. Be careful not to over-mix, as this can lead to a tougher cake. The batter should be slightly lumpy, which is perfectly fine.
Step 6: Add Boiling Water
Here comes the unique part of this recipe: carefully stir in the boiling water. The batter will be thin, but this is exactly what you want. The hot water activates the cocoa and helps create that fudgy texture. Make sure to mix until fully combined, but again, avoid over-mixing.
Step 7: Fold in Optional Chocolate Chips
If you’re using chocolate chips, gently fold them into the batter now. This step adds extra chocolatey goodness, making your cake even more indulgent.
Once your batter is ready, you’re just steps away from baking a slice of heaven. In the next segment, we will discuss how to prepare your cake pans, pour in the batter, and the baking process to achieve the perfect fudgy chocolate cake. Get ready to impress your family and friends with this delightful homemade treat!
{{image_1}}
Techniques for Folding in Chocolate Chips
Folding in chocolate chips is a crucial step that ensures they are evenly distributed throughout the batter without overmixing. Start by adding your chocolate chips to the batter once it has reached a smooth and homogenous consistency. Using a rubber spatula, scoop down into the center of the bowl, then lift and fold the batter over the chocolate chips. Rotate the bowl as you go, gently incorporating the chips while being careful not to break them or deflate the batter. Aim for about 10-12 folds until the chips are evenly distributed. This technique helps to maintain the fluffiness of the batter while ensuring each bite is rich with chocolate flavor.
Baking the Cake
*Tips for Preparing Cake Pans*
Proper preparation of your cake pans is essential for a successful bake. Start by preheating your oven to 350°F (175°C). For the pans, you can use a non-stick spray or butter to grease the surfaces. If you want to ensure that the cake releases easily, consider flouring the pans after greasing them. Alternatively, lining the bottom of the pans with parchment paper is an excellent option. This method further guarantees that your fudgy chocolate cake comes out intact and maintains its perfect shape.
*Understanding Baking Time and Temperature*
Baking time is critical to achieving that perfect fudgy texture. For a standard 9-inch round cake, you should bake for approximately 30 to 35 minutes. However, every oven is different, so keep an eye on your cake towards the end of the baking time. You want the edges to be set but the center should still have a slight jiggle. This jiggle is an indicator of the fudgy texture you’re aiming for.
*How to Test for Doneness with a Toothpick*
To accurately test for doneness, insert a toothpick into the center of the cake. If it comes out with a few moist crumbs clinging to it, your cake is done. However, if it comes out with wet batter, it needs more time in the oven. Remember, it’s better to underbake slightly than to overbake, as the residual heat will continue to cook the cake as it cools.
*Importance of Cooling in the Pans for Optimal Texture*
After removing the cake from the oven, let it cool in the pans for about 10-15 minutes. This cooling period allows the cake to set, making it easier to remove from the pans without breaking. Use a knife to gently loosen the edges before inverting the cakes onto a wire rack to cool completely. This process helps maintain a moist, fudgy texture, as steam will escape during cooling.
Making the Whipped Cream Frosting
*Ingredients Overview for Frosting*
To create a light and airy whipped cream frosting, you will need:
– 1 cup heavy whipping cream
– 1/4 cup powdered sugar
– 1 teaspoon vanilla extract
These simple ingredients come together to create a luscious frosting that complements the richness of the chocolate cake beautifully.
*Step-by-Step Instructions on Achieving the Perfect Whipped Cream Consistency*
1. Begin by chilling your mixing bowl and beaters in the freezer for about 10 minutes. This helps the cream whip up faster and achieve better volume.
2. Pour the heavy whipping cream into the chilled bowl. Start mixing on a low speed to avoid splattering.
3. As the cream begins to thicken, increase the speed to medium.
4. When the cream forms soft peaks, gradually add the powdered sugar and vanilla extract. Continue to beat until the mixture reaches stiff peaks, being careful not to overwhip, which can turn the cream grainy.
*Importance of Soft Peaks Versus Stiff Peaks*
Understanding the difference between soft and stiff peaks is crucial for the perfect frosting. Soft peaks will gently fall over when you lift the beater, while stiff peaks will stand upright. For frosting, you want to achieve stiff peaks for a stable and spreadable consistency.
*How to Incorporate Powdered Sugar and Vanilla Extract for Flavor*
As you add the powdered sugar and vanilla extract, continue mixing on medium speed until fully incorporated. This addition not only sweetens the frosting but also adds a delightful flavor that enhances the overall cake experience. Taste the frosting and adjust the sugar level according to your preference.
Assembling the Cake
*Techniques for Layering and Frosting the Cake*
Once the cakes have cooled completely, it’s time to assemble. If your cakes have domed tops, use a serrated knife to level them off for even layers. Place one layer on a serving plate and spread a generous layer of whipped cream frosting on top.
Add the second layer and apply a thin coat of frosting over the entire cake, known as a crumb coat. This layer traps loose crumbs and provides a smooth base for the final layer of frosting. Chill the cake for about 30 minutes to set the crumb coat before applying the final thick layer of frosting.
*Tips for Spreading Frosting Evenly*
To achieve an even frosting layer, use an offset spatula or a bench scraper. Start from the top and work your way down the sides, ensuring a smooth finish. For a decorative touch, you can create swirls or peaks with the spatula for added texture.
*Creative Decoration Ideas*
Get creative with your cake decoration! Top your frosted cake with chocolate shavings, additional chocolate chips, or even fresh berries for a pop of color. You can also drizzle melted chocolate over the top for an extra indulgent touch that will leave everyone in awe of your baking skills.
*Importance of Letting the Cake Rest Before Serving*
Once assembled, allow the cake to rest for at least an hour before serving. This resting period helps the flavors meld together and allows the frosting to set properly, making it easier to slice and serve.
Serving Suggestions
This decadent homemade fudgy chocolate cake is perfect for a variety of occasions. Whether it’s a birthday celebration, a holiday gathering, or just a casual family dessert night, this cake will impress your guests and loved ones alike.
*Ideal Occasions for Enjoying the Fudgy Chocolate Cake*
Some ideal occasions for serving this delicious cake include birthdays, anniversaries, or even a cozy get-together with friends. Its rich flavor and fudgy texture make it a crowd favorite, suitable for any celebration.
*Pairing Suggestions*
To enhance your dessert experience, consider pairing your fudgy chocolate cake with a cup of fresh coffee, a glass of cold milk, or a scoop of vanilla ice cream. These pairings complement the chocolate’s richness and elevate the overall tasting experience.
Conclusion
Baking a homemade fudgy chocolate cake is not just about satisfying a sweet tooth; it’s an experience that brings joy and fulfillment. The process of mixing, baking, and decorating allows you to express your creativity and share something special with those you love.
As you create this decadent treat from scratch, you will discover the satisfaction that comes from baking your own desserts. Don’t hesitate to share this delightful recipe with family and friends, encouraging them to join you in the joy of baking. With every slice, you’ll be fostering a love for homemade treats that can be passed down through generations. Enjoy your baking journey, and indulge in every delicious bite of this fudgy chocolate cake!