Introduction
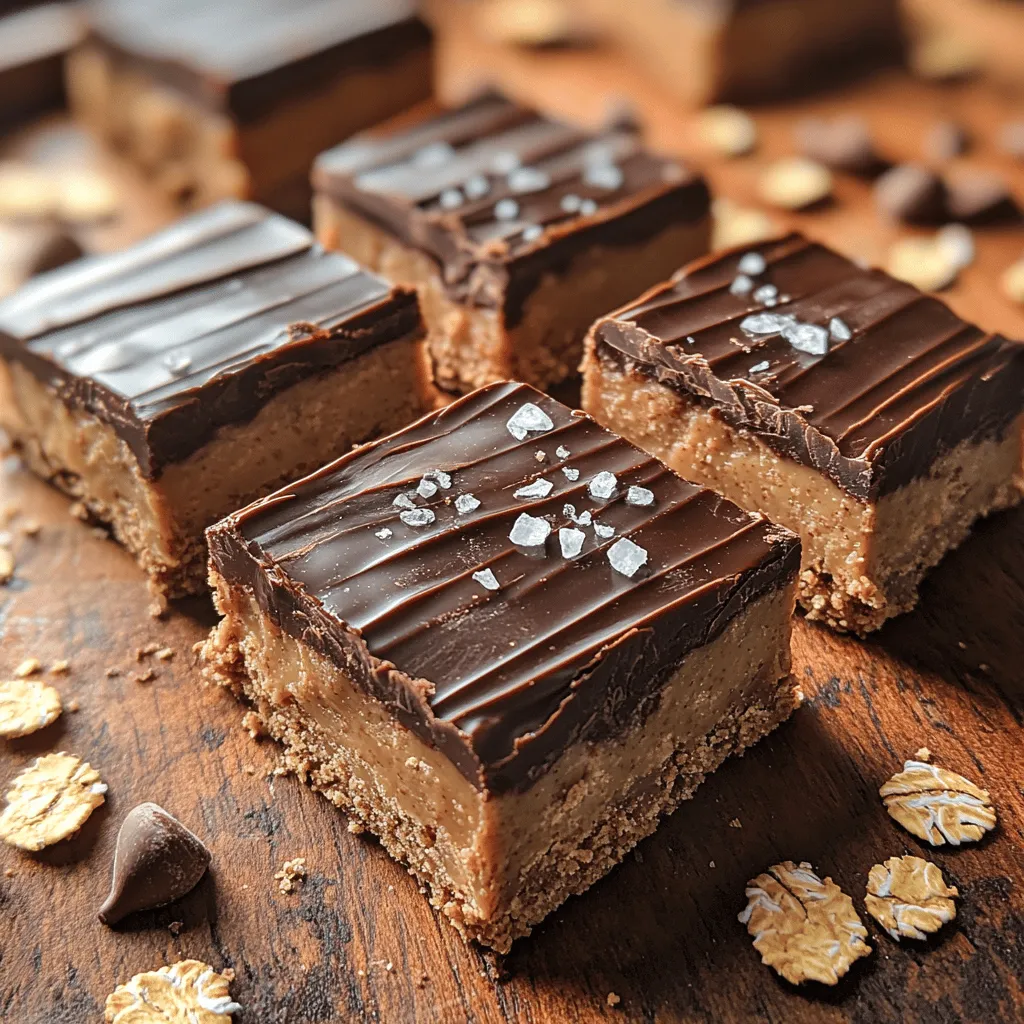
In the world of desserts, the trend of no-bake treats has been capturing hearts and taste buds across the globe. The allure of whipping up a scrumptious dessert without the need for an oven is not just a time-saver; it’s also a game-changer for those who dread the heat of the kitchen. Among these delightful concoctions, Decadent No-Bake Chocolate Peanut Butter Bars stand out as an exceptional choice, effortlessly combining rich chocolate flavors with the creamy, nutty goodness of peanut butter.
The marriage of chocolate and peanut butter is a classic that resonates with many. The velvety smoothness of chocolate, paired with the rich, hearty texture of peanut butter, creates a flavor profile that is both indulgent and satisfying. Whether you’re a seasoned baker or a novice looking to impress, these bars offer a straightforward pathway to a delectable dessert that requires minimal effort and delivers maximum satisfaction.
Moreover, these bars cater to a variety of dietary needs, including vegan and gluten-free options, ensuring that everyone can enjoy this luscious treat without compromise. As we delve deeper into this recipe, you’ll discover how you can enjoy a guilt-free indulgence that doesn’t skimp on flavor or texture.
The Allure of No-Bake Desserts
So, what exactly are no-bake desserts? As the name suggests, these are sweet treats that require no baking in an oven, often simply requiring mixing, chilling, or setting. This method not only saves time but also allows for greater creativity, as you can quickly adapt ingredients based on what you have on hand.
One of the significant advantages of no-bake desserts is their simplicity. With just a few straightforward steps, you can whip up a stunning dessert that is ready to impress. There’s no need to worry about precise baking times or managing different temperatures; no-bake recipes typically involve combining ingredients and letting them set.
Additionally, no-bake desserts can be healthier alternatives to traditional baked goods. By utilizing natural ingredients—such as whole grains, nut butters, and natural sweeteners—you can create treats that are not just delicious but also nourishing. For instance, the use of whole rolled oats and pure nut butters in our Decadent No-Bake Chocolate Peanut Butter Bars ensures that you’re not only enjoying a sweet treat but also benefiting from the wholesome properties of these ingredients.
Key Ingredients Breakdown
To create these delectable bars, we’ll be using a handful of key ingredients that contribute to their rich flavor and satisfying texture. Let’s break them down:
Natural Peanut Butter
At the heart of our Decadent No-Bake Chocolate Peanut Butter Bars is natural peanut butter. Unlike conventional brands that often contain added sugars and hydrogenated oils, natural peanut butter is made from simply ground peanuts with little to no additives. This makes it a healthier choice, rich in protein and healthy fats that can help keep you feeling full and satisfied.
When selecting peanut butter for this recipe, you have the option of using creamy or crunchy varieties. Creamy peanut butter lends a smooth, velvety texture to the bars, while crunchy peanut butter adds delightful little bursts of texture. The choice ultimately depends on your personal preference—both options will yield delicious results.
Honey or Maple Syrup
Sweetening our bars is another vital step, and here, you have a choice between honey and maple syrup. Both are natural sweeteners that offer unique flavor profiles and health benefits. Honey has a rich, floral sweetness that pairs beautifully with peanut butter, while maple syrup brings a warm, earthy flavor that complements the bars as well.
From a nutritional standpoint, both honey and maple syrup contain antioxidants and essential vitamins. Honey is known for its antibacterial properties, while maple syrup is a source of minerals like manganese and zinc. For those following a vegan diet, maple syrup is the clear choice, making it an excellent alternative for sweetening these bars without compromising on taste.
Rolled Oats and Graham Cracker Crumbs
The base of our chocolate peanut butter bars is created using rolled oats and graham cracker crumbs. Rolled oats are a fantastic source of dietary fiber and are known for their heart-healthy benefits, including supporting digestion and helping to maintain stable blood sugar levels. When incorporated into our bars, they provide a hearty texture and nutritional boost.
Graham cracker crumbs, on the other hand, contribute to the structure and crunch of the bars, making them more satisfying to bite into. They also add a subtle sweetness that enhances the overall flavor profile. If you’re looking for a gluten-free option, be sure to choose gluten-free graham crackers or substitute with additional oats.
Dark Chocolate Chips and Coconut Oil
To finish off our Decadent No-Bake Chocolate Peanut Butter Bars, we’ll be using dark chocolate chips combined with a bit of coconut oil. Dark chocolate is not only delicious but also packed with antioxidants, which can help to combat oxidative stress in the body. The richness of dark chocolate complements the peanut butter perfectly, creating a harmonious balance of flavors.
Coconut oil plays a crucial role in the melting process of the chocolate. It helps to create a smooth, glossy coating that hardens beautifully when chilled, ensuring that each bar is perfectly set. Additionally, coconut oil adds its own subtle flavor and healthy fats, making it an excellent choice for this recipe.
Step-by-Step Instructions for Decadent No-Bake Chocolate Peanut Butter Bars
Now that we’ve covered the key ingredients that make up our Decadent No-Bake Chocolate Peanut Butter Bars, let’s move on to the preparation. Follow these simple step-by-step instructions to create your own batch of these mouthwatering treats.
Step 1: Prepare Your Pan
Start by lining an 8×8-inch square baking pan with parchment paper. This will make it easy to lift the bars out of the pan once they’ve set. Leave some overhang on the sides to act as handles, which will help you remove the bars without breaking them.
Step 2: Mix the Base Ingredients
In a large mixing bowl, combine 1 cup of rolled oats, 1 cup of graham cracker crumbs, and a pinch of salt. Stir these dry ingredients together to ensure they are well mixed.
Next, add 1 cup of natural peanut butter and 1/2 cup of honey or maple syrup to the dry mixture. Using a spatula or wooden spoon, mix everything until it forms a thick, cohesive mixture. This may take a bit of elbow grease, but it’s essential to ensure that all ingredients are well combined.
Step 3: Press the Mixture into the Pan
Once your mixture is ready, transfer it to the prepared baking pan. Use your hands or the back of a spatula to press the mixture firmly into an even layer. Ensure that it is tightly packed to help the bars hold together once set.
Step 4: Melt the Chocolate Topping
In a microwave-safe bowl, combine 1 cup of dark chocolate chips and 2 tablespoons of coconut oil. Heat the mixture in the microwave in 30-second intervals, stirring in between, until the chocolate is fully melted and smooth. Be cautious not to overheat the chocolate, as it can become grainy.
Step 5: Pour the Chocolate Over the Base
Once the chocolate is melted, pour it over the pressed peanut butter base in the pan. Use a spatula to spread the chocolate evenly across the surface, ensuring every inch is covered for that rich, chocolatey finish.
Step 6: Chill the Bars
Place the pan in the refrigerator and allow the bars to chill for at least 2 to 3 hours, or until the chocolate is completely set. This step is crucial, as it helps the bars firm up, making them easier to cut and serve.
By following these steps, you’ll be well on your way to enjoying your own batch of Decadent No-Bake Chocolate Peanut Butter Bars. The combination of flavors and textures will undoubtedly be a hit, whether you’re serving them at a gathering or simply indulging yourself at home. Stay tuned for the next part of this article, where we’ll explore additional tips for achieving the best results and answer some common questions about making these delicious bars.