Introduction
Oreo Bliss Balls have taken the dessert world by storm, charming both the young and the young at heart with their irresistible combination of flavors and textures. These delightful treats are a fusion of crushed Oreo cookies and creamy goodness, making them an indulgent snack that is hard to resist. The beauty of Oreo Bliss Balls lies in their simplicity; with just a handful of ingredients, you can create a mouthwatering dessert that feels luxurious.
Whether you’re planning a birthday party, a holiday gathering, or simply looking to satisfy your sweet tooth, Oreo Bliss Balls are the perfect solution. They can be enjoyed as a bite-sized snack, served at a potluck, or even gifted as a homemade treat. Their versatility makes them suitable for various occasions, and their visually appealing presentation ensures that they will steal the spotlight on any dessert table.
In this article, we’ll walk you through the process of making these delectable treats, from understanding the ingredients to step-by-step instructions for creating the perfect Oreo Bliss Balls.
Understanding the Ingredients
Before we dive into the recipe, it’s essential to familiarize yourself with the ingredients that make these Oreo Bliss Balls so special. Each component plays a pivotal role in creating the rich flavor and satisfying texture that we all love.
Oreo Cookies
Oreo cookies are the star of this recipe. With their iconic chocolate wafer cookies and creamy filling, they provide a rich chocolate flavor that serves as the foundation for these bliss balls. Not only do they add sweetness, but their crunchy texture complements the creamy elements of the recipe beautifully. Crushed Oreos create a delightful base that infuses each bite with that classic Oreo taste.
Cream Cheese
Cream cheese is another vital ingredient that adds a luscious creaminess to the mix. It acts as a binder, helping to hold the crushed Oreos together while also imparting a rich, velvety texture. The slight tanginess of cream cheese balances the sweetness of the Oreos, creating a harmonious flavor profile that keeps you coming back for more. For best results, ensure that your cream cheese is at room temperature, as this will make it easier to blend smoothly with the crushed cookies.
White Chocolate Chips
To elevate the Oreo Bliss Balls, we coat them in melted white chocolate chips. This adds an extra layer of sweetness and a beautiful glossy finish that makes these treats truly irresistible. White chocolate’s creamy, buttery flavor pairs excellently with the chocolatey Oreos, creating a delightful contrast that enhances the overall taste experience. Plus, the white chocolate coating allows for a canvas to showcase any toppings you choose to add.
Coconut Oil
While coconut oil is optional, it plays an essential role in achieving the right consistency for the chocolate coating. By adding a little coconut oil to the melted white chocolate, you enhance its meltability and smoothness, making it easier to coat the bliss balls evenly. Additionally, coconut oil adds a subtle richness that complements the flavors of the other ingredients. If you prefer a more rigid coating, you can omit this ingredient; however, it’s highly recommended for a silkier finish.
Crushed Oreos
In addition to being the primary ingredient, crushed Oreos are also used as a topping for the bliss balls. This adds an extra crunch and reinforces the Oreo flavor. You can customize the coarseness of the crushed Oreos based on your preference. A finer crush will blend seamlessly into the coating, while a coarser texture will provide more bite and visual interest.
Sprinkles or Edible Glitter
To add a touch of whimsy and visual appeal, consider using sprinkles or edible glitter for decoration. These optional toppings can turn a simple dessert into a festive treat, perfect for celebrations or special occasions. Choose colors that match your theme or go wild with a rainbow mix—either way, they add an element of fun that is sure to impress your guests.
Step-by-Step Instructions for Making Oreo Bliss Balls
Now that we’ve covered the essential ingredients for our Oreo Bliss Balls, let’s dive into the detailed step-by-step instructions to create these indulgent treats. Follow along carefully, and you’ll be enjoying your homemade bliss balls in no time!
1. Crushing the Oreos
The first step in making Oreo Bliss Balls is to crush the Oreos into fine crumbs. There are a couple of methods to achieve the perfect consistency:
– Food Processor: The easiest way to crush Oreos is by using a food processor. Simply place the Oreos in the bowl and pulse until you achieve a fine crumb texture. This method is quick and yields uniform crumbs.
– Zip-Top Bag Method: If you don’t have a food processor, you can use a zip-top bag. Place the Oreos in the bag, seal it tightly, and use a rolling pin or a heavy object to crush them into fine crumbs. Be sure to apply even pressure to get a consistent texture.
The key is to ensure that there are no large chunks left, as these can affect the texture of the final product.
2. Mixing with Cream Cheese
Once your Oreos are crushed, it’s time to combine them with the cream cheese. In a mixing bowl, add the crushed Oreos and softened cream cheese together. Use a spatula or your hands to mix until thoroughly combined.
Here are some tips for achieving a smooth blend:
– Room Temperature Cream Cheese: Ensure that your cream cheese is at room temperature before mixing. Cold cream cheese can result in a lumpy mixture that doesn’t incorporate well.
– Mixing Technique: If using your hands, make sure to break up any clumps of cream cheese as you mix. The goal is to create a uniform mixture where every crumb is coated with cream cheese.
3. Forming the Balls
Once the Oreo and cream cheese mixture is well combined, it’s time to form the bliss balls. To do this, use a cookie scoop or your hands to portion out the mixture. Aim for approximately 1-inch balls to create bite-sized treats.
– Rolling Technique: Roll each portion between your hands to create a smooth ball. If the mixture feels too sticky, you can lightly dampen your hands with water to make it easier to shape without sticking.
– Uniform Size: Keeping the balls uniform in size ensures even coating and a consistent experience when enjoying the treats.
4. Chilling Process
After rolling the Oreo Bliss Balls, place them on a parchment-lined baking sheet. This step is crucial for setting the balls before coating them in chocolate. Refrigerate the balls for about 30 minutes, or until they are firm to the touch.
– Importance of Chilling: Chilling the bliss balls helps them hold their shape during the coating process. If you skip this step, the balls may become too soft and fall apart when you dip them in chocolate.
5. Melting the Chocolate
While the bliss balls are chilling, it’s the perfect time to melt your white chocolate chips. There are a couple of methods to do this:
– Microwave Method: Place the white chocolate chips in a microwave-safe bowl. Heat in 30-second intervals, stirring in between, until fully melted and smooth. Be careful not to overheat, as this can cause the chocolate to seize.
– Double Boiler Method: Alternatively, you can melt the chocolate using a double boiler. Fill a pot with water and bring it to a simmer. Place a heatproof bowl on top, ensuring it doesn’t touch the water, and add the chocolate chips. Stir until melted.
Regardless of the method you choose, be sure to incorporate the optional coconut oil at this stage if you’re using it. This will help achieve a smooth and glossy coating.
6. Coating the Balls
Once the chocolate is melted and smooth, it’s time to coat the chilled Oreo Bliss Balls. Using a fork or a toothpick, carefully dip each ball into the melted chocolate, ensuring it is fully coated.
– Technique for Even Coverage: Allow excess chocolate to drip off before placing the coated ball back on the parchment-lined baking sheet. This will prevent pooling and ensure a clean finish.
– Avoiding Mess: If you find that the chocolate is too thick or difficult to work with, you can add a bit more coconut oil or a splash of vegetable oil to thin it out.
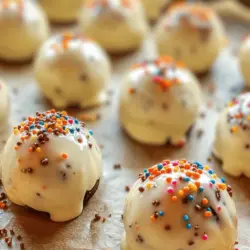
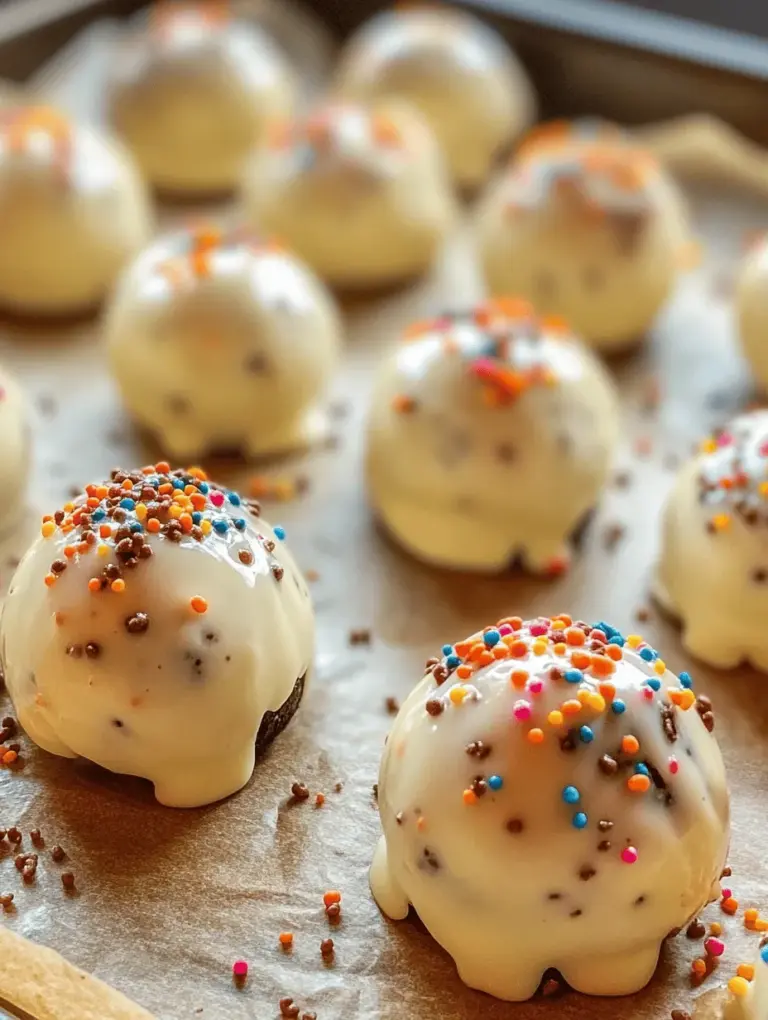
7. Adding Toppings
Now comes the fun part—adding toppings! While the chocolate coating is still wet, sprinkle crushed Oreos or your choice of decorations over the top. This is where you can get creative:
– Crushed Oreos: For a classic touch, use additional crushed Oreos to reinforce the flavor.
– Sprinkles or Edible Glitter: Add a festive flair with colorful sprinkles or shimmering edible glitter. Choose colors that match your occasion for a more personalized touch.
8. The Final Chill
After all the bliss balls are coated and topped, return them to the refrigerator for an additional 30 minutes to allow the chocolate to set completely. This final chill is essential for solidifying the coating and ensuring a perfect bite.
—
With these steps, you’re well on your way to creating your own decadent Oreo Bliss Balls. The combination of rich chocolate, creamy filling, and delightful toppings makes these treats a crowd-pleaser for any event. Stay tuned for the next part of this article, where we’ll explore the joy of customization and share creative ideas to make your Oreo Bliss Balls uniquely yours.
{{image_1}}
Variations on the Basic Recipe
Oreo Bliss Balls are a wonderfully versatile treat, inviting creativity with each batch you make. While the original recipe is delightfully indulgent, consider exploring various adaptations that cater to different tastes and preferences.
Different Types of Cookies:
Experimenting with different types of Oreos can yield a myriad of flavors. For example, using Golden Oreos will give your bliss balls a buttery, vanilla twist, while Peanut Butter Oreos will infuse a rich, nutty flavor, perfect for peanut butter lovers. You can also try Mint Oreos for a refreshing minty taste or even Pumpkin Spice Oreos during the fall season for a seasonal flair.
Flavor Enhancements:
For those looking to elevate their Oreo Bliss Balls, consider adding a splash of vanilla or almond extract. A teaspoon of vanilla can enhance the sweetness and depth of flavor, while almond extract will impart a warm, nutty aroma. You could also mix in a bit of sea salt to create a delightful sweet-salty contrast, making each bite even more satisfying.
Decorating Ideas
The presentation of your Oreo Bliss Balls can take them from delicious to extraordinary. Here are some fun decorating ideas to try:
Seasonal Themes:
You can easily transform your bliss balls to fit various holidays. Use festive sprinkles for birthdays or holidays, like red and green for Christmas or pastel colors for Easter. This not only makes them visually appealing but adds a playful touch that will delight your guests.
Alternative Toppings:
Consider rolling your bliss balls in different toppings to add texture and flavor. Toasted coconut can give a tropical twist, while chopped nuts (like walnuts or pecans) add crunch and nuttiness. For chocolate lovers, rolling them in mini chocolate chips or drizzling melted chocolate over the top can create a decadent finish.
Healthier Alternatives
While Oreo Bliss Balls are undeniably indulgent, there are ways to enjoy them with a healthier twist. Here are some suggestions to make lighter versions without sacrificing taste:
Using Low-Fat Ingredients:
Opt for low-fat cream cheese or Greek yogurt in place of regular cream cheese. This substitution retains the creamy texture while reducing the overall fat content. Greek yogurt, in particular, adds a protein boost, making these treats a bit more nutritious.
Reducing Sugar:
You can decrease the sugar content by using dark chocolate or sugar-free options. Dark chocolate adds a rich flavor while being lower in sugar compared to regular chocolate. Additionally, consider using sugar substitutes like stevia or monk fruit for a guilt-free sweetness that won’t impact blood sugar as much.
Balance of Indulgence and Health:
It’s important to strike a balance between indulgence and healthier choices. By making mindful substitutions, you can enjoy these bliss balls without the guilt, allowing you to savor the sweet treat on occasion without compromising your health goals.
Perfect Occasions for Serving Oreo Bliss Balls
Oreo Bliss Balls are perfect for a variety of occasions, making them a versatile treat for any event.
Celebrations:
These delightful snacks shine at celebrations like birthdays, holidays, and special events. Their bite-sized nature makes them easy to serve and share, and they can easily be dressed up to match the theme of your gathering.
Everyday Treats:
Not just for special occasions, Oreo Bliss Balls are also a fantastic everyday treat. They make for a delightful snack during family gatherings or movie nights, offering a quick and satisfying indulgence that everyone will enjoy.
Gift Ideas:
Consider presenting Oreo Bliss Balls as homemade gifts! Pack them in decorative containers or mason jars, and tie them with a ribbon. This thoughtful gesture is perfect for holidays or as a sweet surprise for friends and family. Homemade treats carry a personal touch that store-bought items often lack, making them a cherished gift.
Storage and Shelf Life
To enjoy your Oreo Bliss Balls for longer, proper storage is essential. Here are some best practices:
Storing Oreo Bliss Balls:
Place your bliss balls in an airtight container to keep them fresh. They can be stored in the refrigerator for up to one week. If you prefer a firmer texture, chilling them in the fridge will also help maintain their shape.
Shelf Life:
When stored correctly, Oreo Bliss Balls can last up to a week in the refrigerator. However, if you notice any changes in texture or a sour smell, it’s best to discard them.
Freezing and Thawing:
For longer storage, you can freeze your Oreo Bliss Balls. Arrange them in a single layer on a baking sheet and freeze until solid, then transfer them to a freezer-safe bag or container. They can typically be frozen for up to three months. To enjoy, simply thaw them in the refrigerator or at room temperature for a few hours before serving.
Conclusion
In summary, Oreo Bliss Balls are a delightful treat that combines simplicity with indulgent flavor. Their versatility allows for endless variations, making them suitable for any palate or occasion. Whether you decide to stick with the classic recipe or venture into creative adaptations, these bliss balls are sure to impress.
Encourage your friends and family to join in the fun by trying out the recipe and exploring their own creative variations. The joy of sharing these treats with loved ones not only brings sweetness to your gatherings but also creates lasting memories filled with laughter and joy. So grab your ingredients, roll up your sleeves, and start making some Oreo Bliss Balls today!