
Introduction
Mini lemon curd tarts are a quintessential dessert that perfectly encapsulates the bright and refreshing essence of citrus. These bite-sized treats are not only visually appealing but also deliver a delightful balance of tartness and sweetness that makes them irresistible. Their delicate crust filled with creamy lemon curd serves as the perfect ending to any meal or as a charming addition to a dessert table. Whether for a holiday gathering, a birthday party, or simply a sweet treat to enjoy at home, mini lemon curd tarts offer a delightful combination of flavors that are sure to impress.
The allure of homemade desserts lies in the control you have over the quality of the ingredients. When you make these mini tarts from scratch, you can ensure that only the freshest and highest-quality components are used, enhancing the overall flavor and texture. Fresh lemons, high-quality butter, and real eggs contribute to a rich, vibrant filling that pre-packaged desserts simply cannot match. This recipe not only allows you to enjoy the satisfaction of creating something delicious but also enables you to share a personal touch with those you love.
In this article, we will explore everything you need to know to make delightful mini lemon curd tarts from scratch. We’ll start by delving into the ingredients required for the tarts, emphasizing the importance of selecting high-quality items. Then, we’ll move on to crafting the perfect tart shells, providing step-by-step instructions for preparation and baking. Finally, we’ll guide you through the process of making luscious lemon curd, ensuring that you achieve a velvety smooth filling that will make your tarts stand out.
Understanding the Ingredients
To create the perfect mini lemon curd tarts, it is essential to understand the ingredients that go into them. Each component plays a vital role in achieving the ideal flavor and texture. Here’s a breakdown of the key ingredients you will need for both the tart shells and the lemon curd filling:
For the Tart Shells:
1. All-Purpose Flour: The foundation of your tart shells, all-purpose flour provides structure. Opting for a good-quality flour will yield a tender, flaky crust.
2. Butter: Unsalted butter is preferred for its fresh, creamy flavor. The butter must be cold to create a flaky texture; it’s essential to cut it into the flour rather than melting it.
3. Sugar: Granulated sugar adds a touch of sweetness to the crust, balancing the tartness of the lemon curd.
4. Salt: A small pinch of salt enhances the flavors of the other ingredients and contributes to the overall taste.
5. Egg Yolk: Using just the yolk helps to enrich the dough and provides a beautiful color, ensuring that the tarts have a rich flavor and golden hue.
6. Cold Water: This helps to bring the dough together without warming it, maintaining the integrity of the cold butter.
For the Lemon Curd:
1. Fresh Lemons: The star ingredient, fresh lemons provide the tart flavor that is the hallmark of lemon curd. Always use fresh lemons for the zest and juice to achieve the best flavor.
2. Granulated Sugar: Similar to the tart shells, sugar is necessary to sweeten the lemon curd and balance its acidity.
3. Eggs: Whole eggs and additional yolks are used to create a rich, creamy texture. The eggs serve as the thickening agent for the curd.
4. Butter: Unsalted butter is also used in the curd, adding richness and a silky texture.
5. Cornstarch: While not always necessary, a small amount of cornstarch can help stabilize the curd and ensure it holds its shape when chilled.
Choosing high-quality, fresh ingredients is crucial for creating the best mini lemon curd tarts. The flavor intensity of fresh lemons and the creaminess of real butter contribute significantly to the final taste. By using these ingredients thoughtfully, you can ensure that your tarts are bursting with flavor and have the perfect texture.
Making the Perfect Tart Shells
Now that we understand the importance of our ingredients, let’s dive into the process of creating the perfect tart shells. The tart shell is the base of our mini lemon curd tarts and should be flaky, buttery, and sturdy enough to hold the luscious lemon filling without becoming soggy.
Step 1: Prepare the Dough
Start by gathering your ingredients in a clean workspace. In a mixing bowl, combine the all-purpose flour, granulated sugar, and salt. Whisk these dry ingredients together to ensure they are well mixed.
Next, cut the cold unsalted butter into small cubes. It’s important that the butter remains cold, as this is key to achieving a flaky texture. Add the butter to the flour mixture and use a pastry cutter or your fingers to work the butter into the flour until the mixture resembles coarse crumbs. You should see small pieces of butter throughout the mixture.
Step 2: Add the Egg Yolk and Water
Once the butter is incorporated, create a well in the center of the mixture and add the egg yolk. Using a fork, gently mix the yolk into the flour mixture. Gradually add cold water, one tablespoon at a time, mixing until the dough just comes together. Be careful not to overwork the dough; it should be moist but not sticky.
Step 3: Chill the Dough
Once your dough is formed, shape it into a disc and wrap it in plastic wrap. Refrigerate for at least 30 minutes. Chilling the dough is crucial as it helps to solidify the butter, leading to a flakier crust when baked.
Step 4: Roll Out the Dough
After chilling, take the dough out of the refrigerator. On a lightly floured surface, roll out the dough to about 1/8-inch thickness. Make sure to rotate the dough frequently to avoid sticking. If the dough cracks at the edges, simply press it back together with your fingers.
Step 5: Cut and Shape the Tart Shells
Using a round cookie cutter or a glass, cut out circles of dough that are slightly larger than the diameter of your tart pans. Carefully transfer each circle into the tart pans, gently pressing it into the bottom and up the sides. If you have any excess dough hanging over the edges, you can trim it with a knife.
Step 6: Pre-Bake the Tart Shells
Once all the dough is shaped in the tart pans, use a fork to poke small holes in the bottom of each shell. This will help prevent them from puffing up during baking. To ensure the crust holds its shape, place the tart pans in the freezer for about 15 minutes before baking.
Preheat your oven to 350°F (175°C). Once the tarts are chilled, bake them for 15-20 minutes or until they are lightly golden. If the edges start to brown too quickly, you can cover them with strips of aluminum foil.
After baking, remove the tart shells from the oven and allow them to cool completely before filling them with the lemon curd.
Importance of Chilling the Dough
Chilling the dough is not just a step; it is a critical part of the tart-making process. The cold butter in the dough creates steam during baking, leading to that desired flaky texture. If the dough is not chilled, the butter can melt before the dough has a chance to bake properly, resulting in a dense crust instead of a light and airy one.
Baking Tips for Perfect Tart Shells
– Keep Everything Cold: Ensure that your tools, bowl, and even the flour are cold. This helps maintain the integrity of the butter during the dough-making process.
– Do Not Overwork the Dough: Handle the dough as little as possible once you add the wet ingredients. Overworking can lead to a tough crust.
– Check for Doneness: Keep an eye on your tart shells while baking. They should be lightly golden. If they are browning unevenly, rotate the pans halfway through baking.
Now that you have a solid understanding of making the perfect tart shells, we will move on to crafting the creamy lemon curd that will fill these delightful tarts.
{{image_1}}
Key Techniques for Ensuring a Smooth and Thick Lemon Curd
Creating the perfect lemon curd is the heart of your mini lemon curd tarts. To achieve that velvety texture and bright flavor, mastering a few key techniques is essential. First and foremost, use fresh lemons for their juice and zest; the freshness enhances the overall flavor profile of your lemon curd.
When preparing your curd, it’s crucial to whisk your eggs and sugar together until well combined before incorporating the lemon juice and zest. This step helps dissolve the sugar, resulting in a smoother mixture. Cook the curd over low to medium heat while continuously stirring; this prevents it from sticking to the bottom of the pan and reduces the risk of burning. As the mixture heats up, it will gradually thicken. To check for doneness, dip a spoon into the curd; if it coats the back of the spoon and holds a line when you run your finger through it, it’s ready.
Importance of Tempering Eggs to Prevent Curdling During Cooking
Tempering the eggs is another critical process in making lemon curd. This technique involves gradually introducing warm liquid to the eggs to prevent them from cooking too quickly, which can lead to scrambled eggs instead of a silky curd. To temper, whisk a small amount of the warm lemon mixture into the eggs before adding the egg mixture back into the saucepan. This gradual approach ensures that the temperature of the eggs rises slowly and evenly, resulting in a smooth lemon curd without any lumps.
Assembling the Mini Tarts
Once your lemon curd is perfectly smooth and thick, it’s time to fill your cooled tart shells. Begin by ensuring your tart shells have cooled completely. If they’re still warm, the heat can cause the lemon curd to soften and lose its structure.
1. Filling the Tart Shells: Use a small spoon or a piping bag fitted with a round tip to fill each tart shell with lemon curd. If using a piping bag, fill it with the curd, then pipe a small amount into each shell, filling just to the top. This method promotes a clean and professional appearance.
2. Portion Control: To ensure even filling, fill each tart shell in stages. Start with a small amount, and then go back to each one to add more if needed. This technique not only ensures uniformity but also minimizes the risk of overfilling, which can lead to messy edges.
3. Achieving a Neat Appearance: For a professional finish, smooth the tops of the filled tarts with the back of a spoon or an offset spatula. This creates an even surface and enhances the visual appeal. If desired, you can also use a toothpick to create decorative swirls on the surface of the curd.
Chilling and Serving the Tarts
After filling, it’s essential to chill your mini lemon curd tarts in the refrigerator for at least 2 hours. Chilling not only helps the curd set properly but also allows the flavors to meld beautifully. The cool temperature enhances the refreshing nature of the lemon curd, making each bite a delightful experience.
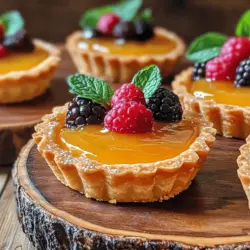
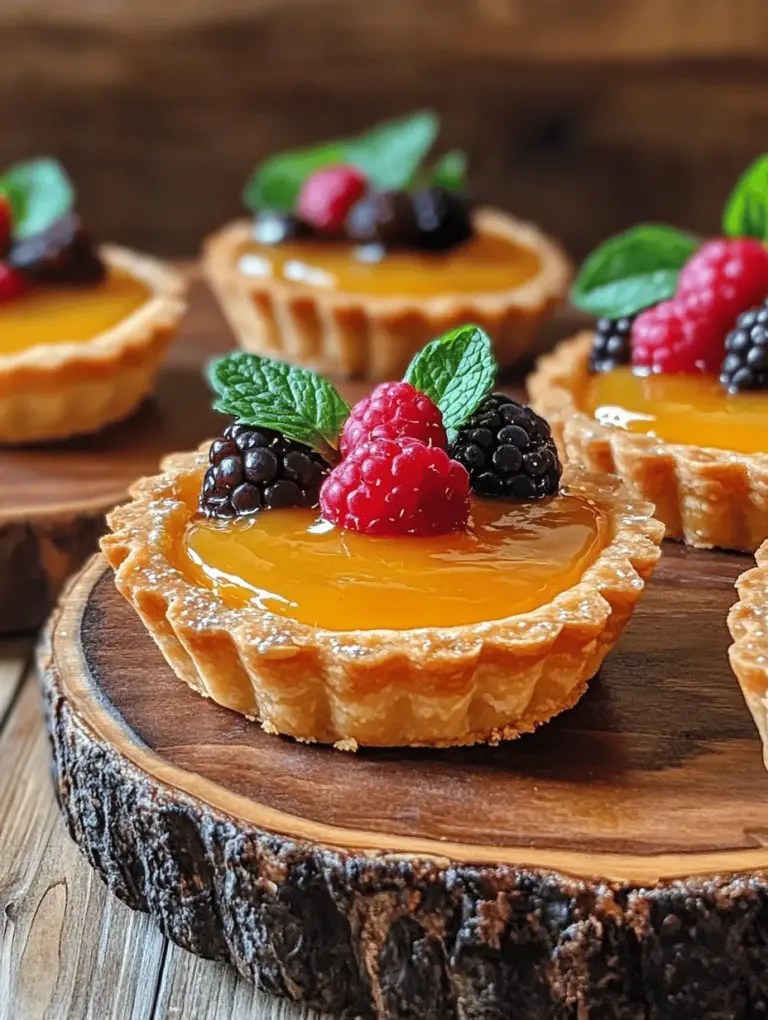
Garnishing Ideas: To elevate the presentation, consider garnishing your tarts with fresh berries such as raspberries or blueberries, which add a pop of color and a hint of sweetness that complements the tartness of the lemon. You can also add a few mint leaves for a touch of greenery and freshness. For an elegant touch, dust with powdered sugar right before serving.
Serving Suggestions: Present the tarts on a beautiful serving platter, perhaps with a drizzle of berry sauce or a sprinkle of edible flowers for an impressive touch. If serving at a gathering, consider pairing the tarts with a light, sparkling beverage or herbal tea, which enhances the citrus flavor and provides a refreshing contrast.
Nutritional Information
Understanding the nutritional content of your mini lemon curd tarts is essential, especially if you’re mindful of dietary needs or restrictions. Each tart contains approximately 150 calories, depending on the recipe specifics and portion sizes. The primary ingredients—lemons, eggs, and butter—contribute essential nutrients such as vitamin C, protein, and healthy fats.
Portion Sizes: It’s important to consider portion sizes when enjoying desserts. Mini tarts allow for indulgence without overdoing it. By serving these smaller portions, you can satisfy your sweet tooth while maintaining balance in your dessert consumption.
Dietary Considerations: If you’re catering to specific dietary restrictions, consider making gluten-free tart shells using almond flour or a gluten-free baking mix. This adaptation allows those with gluten sensitivities to enjoy the delightful taste of lemon curd tarts.
Conclusion
Making and sharing mini lemon curd tarts brings joy not only to the baker but also to those who enjoy them. The balancing act of tartness and sweetness creates a delightful treat that is perfect for any occasion, from casual gatherings to elegant celebrations.
Don’t hesitate to experiment with variations of this recipe, such as using other citrus fruits like limes, oranges, or even grapefruits to create new flavor profiles. Each twist adds a unique spin to this classic dessert.
Finally, there’s a special satisfaction that comes with creating homemade desserts. They not only taste better than store-bought options but also carry a personal touch that makes gatherings feel even more special. So go ahead, whip up a batch of these charming mini lemon curd tarts, and relish the smiles they bring to your friends and family.