Introduction
There’s something incredibly inviting about the aroma of freshly baked garlic butter bread rolls wafting through your kitchen. These rolls are not just a side dish; they are an experience—soft, pillowy, and bursting with rich garlic flavor, they can elevate any meal. Whether served alongside a hearty pasta dish or enjoyed on their own with a drizzle of olive oil, homemade garlic butter bread rolls are a delightful addition to any dining table.
The allure of homemade bread rolls lies in the ability to control the quality of ingredients and the joy that comes from crafting something delicious from scratch. While store-bought bread may be convenient, it often lacks the warmth and personal touch that comes from baking at home. Using fresh, high-quality ingredients allows you to create a product that not only tastes better but is also free from preservatives and artificial additives. Plus, the process of kneading, rising, and baking can be therapeutic, providing a wonderful sense of accomplishment when you pull a batch of golden rolls from the oven.
In this article, you can expect a thorough guide to making heavenly garlic butter bread rolls. We will walk you through each step of the process, from understanding the key ingredients to detailed instructions on how to achieve the perfect texture and flavor. We’ll also share tips for success and answer common questions to ensure your baking experience is as smooth as possible. Let’s dive into the delicious world of garlic butter bread rolls!
Understanding the Ingredients
Before we start baking, it’s essential to familiarize ourselves with the key ingredients that contribute to the flavor, texture, and success of these heavenly garlic butter bread rolls. Each component plays a vital role in the final outcome, so let’s break them down:
All-Purpose Flour
All-purpose flour is the backbone of our bread rolls, providing the necessary structure and texture. It contains a moderate amount of protein, which is crucial for gluten development. When mixed with water and kneaded, the proteins in the flour combine to form gluten, giving the rolls their characteristic chewy texture. For the best results, opt for unbleached all-purpose flour, as it has a slightly higher protein content, leading to better gluten formation.
Active Dry Yeast
Active dry yeast is our leavening agent, responsible for making the rolls rise and giving them a light, airy texture. When activated by warm milk and sugar, the yeast begins to ferment, producing carbon dioxide gas that gets trapped in the dough, creating those delightful air pockets. This process not only helps the dough rise but also contributes to the overall flavor profile of the bread.
Warm Milk
Warm milk is crucial for activating the yeast and enriching the dough. The warmth helps to awaken the dormant yeast, ensuring it becomes bubbly and frothy. Additionally, milk adds richness and moisture to the dough, resulting in tender rolls. Make sure the milk is warm but not hot—around 110°F (43°C) is ideal—to avoid killing the yeast.
Granulated Sugar
Granulated sugar plays a dual role in this recipe. It not only balances the flavors but also aids in the yeast activation process. Sugar serves as food for the yeast, promoting fermentation and browning during baking, which gives the rolls a beautiful golden crust. A touch of sweetness enhances the overall flavor of the garlic butter rolls without overpowering the savory notes.
Salt
Salt is an essential ingredient in bread-making. It enhances the flavor of the rolls and helps control the fermentation process of the yeast. Without salt, your bread can taste bland, and the yeast may become overactive, leading to a poor texture. Aim for a balance—too much salt can inhibit yeast activity, while too little can result in an unseasoned product.
Butter (Unsalted)
Unsalted butter is a key player in this recipe, contributing to the flavor and moisture of the rolls. The fat in butter enriches the dough, resulting in a tender crumb that melts in your mouth. Using unsalted butter allows you better control over the salt content in your rolls, ensuring they are perfectly seasoned.
Garlic
Garlic is the star ingredient of our garlic butter rolls, providing a robust flavor and aromatic punch. Fresh garlic, when minced and mixed into the dough, infuses the rolls with its distinctive taste. Roasting the garlic before adding it can also bring a sweeter, more mellow flavor to the rolls. For those who can’t get enough of garlic, consider adding garlic powder for an extra kick.
Fresh Parsley
Fresh parsley adds a pop of color and a hint of freshness to the garlic butter rolls. It complements the garlic flavor while providing a nutritious boost. Chopping the parsley finely ensures that it is evenly distributed throughout the dough, enhancing the visual appeal and taste of the finished rolls.
Optional Ingredients
While the primary ingredients are essential for the basic recipe, there are optional ingredients that can elevate your garlic butter rolls even further. For instance, a sprinkle of garlic powder can intensify the garlic flavor, while a dash of black pepper can add a subtle heat. Experimenting with these optional ingredients allows you to customize the rolls to your liking.
Step-by-Step Guide to Making Heavenly Garlic Butter Bread Rolls
Now that we’ve covered the essential ingredients, let’s dive into the step-by-step process of making these heavenly garlic butter bread rolls. Follow these instructions carefully, and you’ll be rewarded with a batch of warm, flavorful rolls that are sure to impress!
Activating the Yeast
First and foremost, we need to activate the yeast. This step is crucial for ensuring that your rolls rise beautifully. Here’s how you do it:
1. Warm the Milk: Measure out the warm milk (about 110°F or 43°C) and pour it into a mixing bowl. If you don’t have a thermometer, a good rule of thumb is to heat the milk until it’s warm to the touch but not hot.
2. Add Sugar: Sprinkle the granulated sugar into the warm milk. This sugar will serve as food for the yeast, helping it to activate.
3. Sprinkle Yeast: Next, sprinkle the active dry yeast over the surface of the warm milk and sugar mixture. Allow it to sit undisturbed for about 5 to 10 minutes. During this time, the yeast will begin to feed on the sugar, creating carbon dioxide bubbles.
4. Check for Activation: After the resting period, check for signs of activation. The yeast should appear frothy and bubbly, indicating that it’s alive and ready to work its magic in your dough. If it doesn’t foam, your yeast may be expired or the milk was too hot or cold; you’ll need to start over.
Making the Dough
With the yeast activated, it’s time to bring the dough together. Here’s a step-by-step guide:
1. Combine Dry Ingredients: In a large mixing bowl, whisk together the all-purpose flour and salt. This ensures that the salt is evenly distributed throughout the flour, which is crucial for proper flavor and yeast control.
2. Create a Well: Make a well in the center of the flour mixture. This is where you’ll add your wet ingredients.
3. Add Wet Ingredients: Pour the frothy yeast mixture into the well, along with the melted unsalted butter and minced garlic. Gently mix the ingredients together using a spatula or wooden spoon until a shaggy dough forms.
4. Incorporate Ingredients: Use your hands to bring the dough together, ensuring that all the flour is incorporated. The dough may be sticky at this point, which is perfectly normal.
Kneading the Dough
Kneading is a vital step in developing the gluten structure of the dough, which gives the bread rolls their texture. Here’s how to knead effectively:
1. Flour Your Surface: Lightly flour a clean work surface to prevent sticking. You can also flour your hands if the dough is particularly sticky.
2. Knead the Dough: Turn the dough out onto the floured surface and begin kneading. Fold the dough over itself, push it down with the heel of your hand, and then rotate it a quarter turn. Repeat this process for about 8 to 10 minutes.
3. Know When It’s Ready: The dough is ready when it’s smooth, elastic, and slightly tacky to the touch. You can perform the “windowpane test” by stretching a small piece of dough; if it forms a thin, translucent membrane without tearing, it’s perfect.
First Rise
After kneading, it’s time to let the dough rise. This step is crucial for developing flavor and texture:
1. Prepare for Rising: Form the kneaded dough into a ball and place it in a lightly greased bowl. Turn the dough to coat it in oil, which will prevent it from drying out.
2. Cover the Dough: Cover the bowl with a clean kitchen towel or plastic wrap. This traps warmth and moisture, creating the ideal environment for the dough to rise.
3. Let It Rise: Place the bowl in a warm, draft-free area and let the dough rise for about 1 to 1.5 hours, or until it has doubled in size. The time may vary depending on the temperature and humidity of your kitchen.
4. Check the Dough: After the first rise, gently poke the dough with your finger. If the indentation remains, it’s ready for the next step. If it springs back, it needs a bit more time to rise.
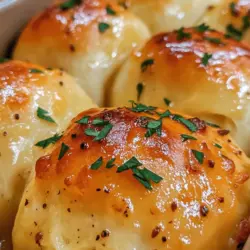
With these initial steps completed, you’re well on your way to creating the most heavenly garlic butter bread rolls. The combination of warming ingredients, careful kneading, and allowing the dough to rise ensures a delightful baking experience. Stay tuned for the next part, where we’ll continue with shaping the rolls, the second rise, and baking them to golden perfection!
{{image_1}}
Ideal Conditions for Rising
Creating the perfect environment for your bread rolls to rise is crucial for achieving light and fluffy textures. The ideal conditions include a warm temperature, generally around 75°F to 80°F (24°C to 27°C), and moderate humidity. If your kitchen is too cold, you might end up with dough that takes too long to rise, while excessive heat can cause the dough to rise too quickly, resulting in dense rolls. A good trick to create a warm rising environment is to preheat your oven to the lowest setting for just a few minutes, turn it off, and then place your covered dough inside. Alternatively, placing the dough in a warm spot near a sunny window or above the refrigerator can also do wonders.
Preparing the Garlic Butter Mix
The garlic butter mix is the soul of these heavenly rolls, providing that rich, savory flavor that elevates them from ordinary to extraordinary. To prepare the garlic butter mix, start by melting half a cup of unsalted butter in a small saucepan over low heat. Once melted, remove from heat and mix in four to six cloves of minced garlic, depending on your taste preference. Allow the garlic to infuse in the butter for a few minutes, releasing its aromatic qualities.
As you prepare the mix, consider the flavor balance. The sweetness of the butter pairs beautifully with the pungent, earthy notes of garlic, creating a rich backdrop for your rolls. A pinch of salt enhances the overall flavor and brings out the sweetness of the butter while a squeeze of fresh lemon juice can add a delightful brightness to the mix.
Suggestions for Customizing the Butter Mix
To further personalize your garlic butter blend, consider adding fresh herbs like parsley, thyme, or rosemary for a fragrant touch. A sprinkle of crushed red pepper flakes can introduce a subtle heat, while a dash of smoked paprika can lend an intriguing smokiness. For those who prefer a twist, try incorporating grated Parmesan cheese or nutritional yeast for a cheesy flavor without the dairy.
Shaping the Rolls
Once your dough has risen to its full potential, it’s time to shape those rolls. Divide the dough into equal portions, usually about 12 to 16 pieces, depending on your desired size. To shape the rolls, take a piece of dough and gently flatten it into a round disk. Then, tuck the edges of the dough into the center, forming a smooth ball. This technique helps create surface tension, which is vital for a well-shaped roll.
Techniques for Shaping Dough into Rolls
For an even size and texture, use a kitchen scale to measure each piece of dough, ensuring they are all uniform. This method not only leads to consistent baking times but also enhances the aesthetic appeal of your rolls. Once shaped, place the rolls seam-side down on a parchment-lined baking sheet, leaving enough space between them for further rising.
Second Rise
The second rise is a vital step in bread making that enhances the final texture of the rolls. After shaping, cover the rolls with a clean kitchen towel or plastic wrap to prevent them from drying out. Allow them to rise again for about 30 to 45 minutes in a warm environment until they double in size. This step contributes to a lighter and airier roll, as the yeast continues to work, creating air pockets that result in a tender crumb.
Importance of Covering the Dough
Preventing the dough from drying out during the second rise is crucial. If the dough dries, it can form a tough crust that inhibits rising and creates an undesirable texture. To avoid this, ensure the rolls are covered well, and if your environment is particularly dry, consider placing a pan of warm water in the oven alongside the dough to maintain humidity.
Preheating the Oven
Proper oven temperature is vital for baking bread. Preheat your oven to 375°F (190°C) about 20 minutes before you plan to bake. This allows the rolls to start cooking immediately upon entering the oven, ensuring a good rise and proper crust formation. An adequately preheated oven also contributes to even baking, preventing the outside from browning too quickly while the inside remains undercooked.
Adding Garlic Butter
Once the oven is ready and the rolls have completed their second rise, it’s time to apply the garlic butter. Use a pastry brush to generously coat the tops of the rolls with the garlic butter mixture. This not only adds flavor but also enhances the golden color of the crust as they bake. For maximum flavor distribution, brush the rolls immediately before baking to allow the butter to soak into the dough.
Suggestions for Additional Toppings or Variations
While garlic butter is undoubtedly delicious, consider experimenting with additional toppings. Sprinkling coarse sea salt on top before baking can add a delightful crunch and flavor contrast. Alternatively, a mix of herbs or grated cheese can create a gourmet touch. For a unique twist, try brushing the rolls with a blend of garlic butter and pesto for a herby kick.
Baking the Rolls
As your rolls bake, keep a close eye on the process. The key visual cues to look for include a golden-brown crust and a delightful aroma filling your kitchen. Typically, baking will take about 20-25 minutes. To check for doneness, tap the bottom of a roll; it should sound hollow. If you prefer a softer crust, you can cover the rolls with aluminum foil in the last few minutes of baking.
Importance of Monitoring the Baking Process
Monitoring the baking process is essential to achieving the perfect rolls. Every oven is different, and factors like humidity and altitude can affect baking times. Using an oven thermometer can help ensure your oven is at the correct temperature, and adjusting the time based on how your rolls are progressing is recommended.
Serving Suggestions and Pairings
Once your heavenly garlic butter bread rolls are out of the oven, let them cool slightly before serving. These rolls are incredibly versatile and can be enjoyed warm, straight from the oven. Consider serving them with a side of marinara sauce for dipping, a rich cream cheese spread, or a zesty herb dip for an appetizer that will impress your guests.
Pairing these rolls with meals is easy; they go wonderfully with a variety of dishes. Serve them alongside a hearty soup like tomato basil or minestrone, a fresh garden salad, or even as a complement to your main course, such as roasted chicken or pasta dishes.
For creative uses of leftovers, consider turning them into mini sandwiches or croutons for salads. Simply slice the rolls in half, fill them with your favorite ingredients, or cut them into cubes, toss them with olive oil and seasoning, and bake until crispy.
Storing and Reheating Leftovers
To keep your garlic butter rolls fresh, store them at room temperature in an airtight container for up to two days. If you want to extend their shelf life, you can refrigerate them, but note that refrigeration may alter their texture. To reheat, wrap the rolls in aluminum foil and place them in a preheated oven at 350°F (175°C) for about 10-15 minutes, or until warmed through. This method will help maintain their soft texture and delicious flavor.
Conclusion
Making homemade garlic butter bread rolls is a joyful and rewarding experience that fills your kitchen with delightful aromas and creates a comforting treat for all. Whether served as an appetizer, a side dish, or a snack, these rolls are sure to be a hit. I encourage you to try this recipe, experiment with flavors, and share your experiences. Baking is not just about creating delicious food; it’s also a therapeutic activity that connects us with the joy of cooking and the warmth of sharing homemade goodness with others. Embrace the process, savor the results, and enjoy every buttery bite of your heavenly garlic butter bread rolls.