Introduction
There’s something truly special about the aroma of freshly baked bread wafting through the kitchen, and homemade dinner rolls are often the highlight of any meal. Whether served alongside a warm bowl of soup, a savory roast, or a festive holiday feast, dinner rolls can elevate any dining experience. Among the myriad of recipes available, Heavenly Soft Dinner Rolls stand out for their pillowy softness and buttery flavor, making them an irresistible addition to any table.
What makes these rolls so heavenly? The secret lies in the careful selection of ingredients and the precise techniques used to achieve that perfect fluffy texture. Each bite is a delightful experience, combining a tender crumb with a touch of sweetness that complements both savory and sweet dishes. This recipe is not only straightforward but also allows for some creativity—whether you’re adding herbs for a savory touch or a hint of sweetness with a glaze, these rolls can adapt to suit any occasion.
From casual family dinners to special gatherings, these rolls are versatile enough to shine at any meal. Imagine serving a basket of warm, soft rolls to your guests, inviting them to pull apart the fluffy goodness and slather it with butter or dip it in gravy. The appeal of these rolls is not just in their taste but also in the warmth and comfort they bring to the dining experience.
Understanding the Ingredients
Creating the perfect dinner roll begins with understanding the ingredients that contribute to its delightful texture and flavor. Each component plays a vital role, and knowing how they work together will help you achieve the best results.
All-Purpose Flour
At the heart of any bread recipe is the flour, and for this Heavenly Soft Dinner Rolls recipe, all-purpose flour is the star. This versatile flour contains a balanced amount of protein, which is essential for developing gluten—the network that gives bread its structure and chew. While bread flour can also be used for its higher protein content, all-purpose flour strikes a lovely balance, allowing for softness without compromising on the roll’s ability to hold its shape. When measuring flour, it’s crucial to avoid packing it down in the cup, as this can lead to dense rolls. Instead, spoon it into the measuring cup and level it off for accuracy.
Active Dry Yeast
Next up is the active dry yeast, a key ingredient for fermentation and achieving that sought-after rise. Yeast is a living organism that ferments the sugars in the dough, producing carbon dioxide gas in the process. This gas gets trapped in the gluten structure, causing the dough to expand and create airy pockets—resulting in fluffy rolls. When using active dry yeast, it’s essential to activate it properly before mixing it into the dough. This usually involves dissolving it in warm water or milk, ensuring the temperature is just right (around 110°F to 115°F) to awaken the yeast without killing it.
Whole Milk and Unsalted Butter
For added richness and moisture, whole milk and unsalted butter are incorporated into the dough. Whole milk not only enhances the flavor but also contributes to the softness of the rolls. The fat in butter plays a critical role as well; it coats the flour’s proteins, limiting gluten formation and leading to a tender crumb. Unsalted butter is preferred to give you control over the saltiness of the rolls, allowing you to adjust the salt content to your taste.
Eggs
Eggs are often the unsung heroes in bread-making, providing both richness and structure. They help to emulsify the ingredients, creating a cohesive dough, while also contributing to the rolls’ beautiful golden color. The proteins in eggs also strengthen the dough, ensuring that the rolls rise well and maintain their shape during baking. Always use room temperature eggs for the best incorporation into the dough.
Optional Ingredients
To elevate the flavor of your Heavenly Soft Dinner Rolls, consider adding optional ingredients like garlic powder or nutmeg. Garlic powder can impart a subtle savory note that pairs wonderfully with butter, making these rolls perfect for accompanying pasta dishes or soups. A pinch of nutmeg can add a warm, aromatic quality that complements the sweetness of the rolls, especially when served during the holidays.
Step-by-Step Guide to Making Heavenly Soft Dinner Rolls
Now that we have a solid understanding of the ingredients that will make our dinner rolls heavenly, let’s dive into the step-by-step process of making them. Each step is crucial, and following these instructions will guide you to achieve the perfect fluffy rolls.
Activating the Yeast
The first step in creating your dinner rolls is to activate the yeast. Begin by measuring out the appropriate amount of active dry yeast and warm liquid (milk or water) in a small bowl. The temperature of the liquid should be between 110°F and 115°F—this warmth is essential for waking up the yeast. If you don’t have a thermometer, you can test the temperature with your finger; it should feel warm but not hot. Add a teaspoon of sugar to the mixture, which will provide food for the yeast. Allow the mixture to sit for about 5-10 minutes until it becomes frothy. This indicates that the yeast is alive and ready to work its magic in your dough.
Mixing the Dough
Once your yeast is activated, it’s time to mix the dough. In a large mixing bowl, combine your all-purpose flour, salt, and any optional seasonings. Create a well in the center and pour in the yeast mixture, followed by the melted unsalted butter, whole milk, and room temperature eggs. Using a wooden spoon or a spatula, gently mix the ingredients until they start to come together. The dough should be sticky but manageable; if it’s too wet, you can add a little more flour, a tablespoon at a time, until it reaches the right consistency.
Kneading Techniques
Kneading is a critical step that develops the gluten in the dough, giving your rolls their structure. Turn your dough out onto a lightly floured surface and begin kneading by pressing the dough with the heels of your hands, folding it over, and then turning it 90 degrees. Repeat this process for about 8-10 minutes, or until the dough is smooth and elastic. To test if it’s ready, perform the “windowpane test”: take a small piece of dough and stretch it out gently; if it can stretch without tearing and you can see light through it, you’re good to go.
The First Rise
Once kneading is complete, place the dough in a lightly greased bowl, cover it with a clean kitchen towel or plastic wrap, and let it rise in a warm, draft-free environment. This initial rise, known as fermentation, allows the yeast to produce carbon dioxide, causing the dough to expand. Aim for a rise of about 1 to 1.5 hours or until the dough has doubled in size. The timing may vary depending on the ambient temperature; warmer environments will speed up the process.
Shaping the Rolls
After the dough has risen, it’s time to shape the rolls. Gently punch down the dough to release any excess gas and turn it out onto a floured surface. Divide the dough into equal portions—typically, this recipe yields about 12 rolls. Shape each portion into a ball by cupping your hand over the dough and rotating it in a circular motion to create tension on the surface. Place the shaped rolls onto a greased baking dish, ensuring they are evenly spaced to allow for expansion during the second rise.
The Second Rise
Before baking, the rolls need a second rise to achieve that light and airy texture. Cover the baking dish with a kitchen towel and let the rolls rise for an additional 30-45 minutes. During this time, they will puff up significantly, filling the gaps between each roll. Patience is key here; allowing the rolls to rise adequately will ensure that you achieve the soft and fluffy texture that you’re aiming for.
—
By following these steps with care, you will be well on your way to creating Heavenly Soft Dinner Rolls that are sure to impress at your next meal. Stay tuned for the next part of the article, where we will explore the baking process and additional tips for achieving the perfect finish.
{{image_1}}
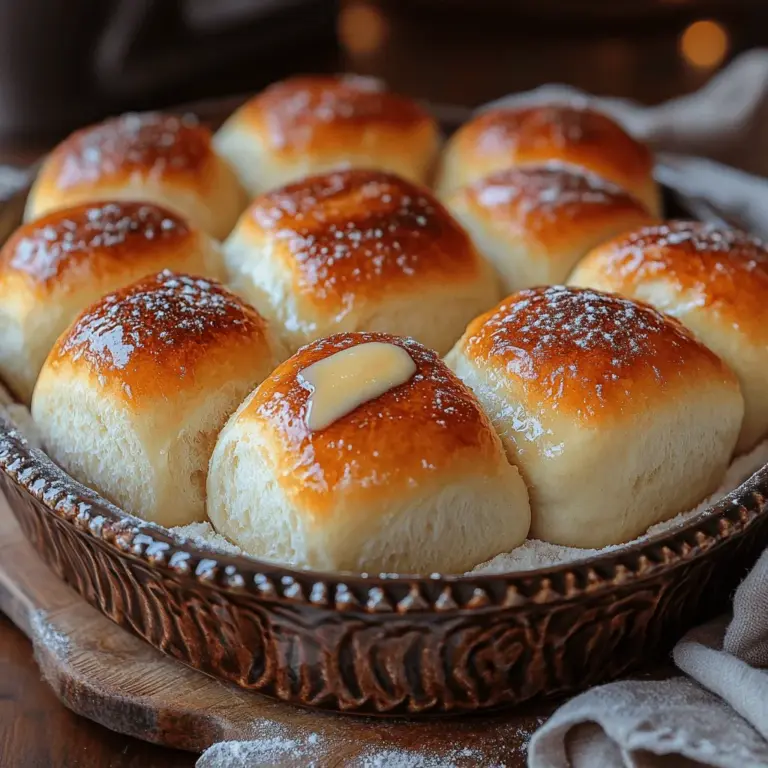
Baking to Perfection: Signs to Look for to Determine Doneness
When it comes to baking heavenly soft dinner rolls, knowing when they are perfectly baked is crucial for achieving the desired texture and flavor. The ideal dinner roll should have a golden-brown crust and a soft, fluffy interior. Here are some signs to look for to determine if your rolls are done:
1. Color: The top of the dinner rolls should be a rich golden-brown. This color indicates that the sugar in the dough has caramelized and that the rolls are cooked through.
2. Sound: Gently tap the bottom of a roll. If it sounds hollow, that’s a good indication that the interior is fully cooked. If it doesn’t, you may need to bake them for a few more minutes.
3. Temperature: For the most accurate test, use an instant-read thermometer. The internal temperature of the rolls should be around 190°F to 200°F. If they haven’t reached this temperature, continue baking for an additional five minutes, checking frequently.
4. Texture: The rolls should feel light and airy when touched. If they feel dense or heavy, they may need more time in the oven.
Once baked to perfection, let your dinner rolls cool in the pan for about 5-10 minutes before transferring them to a wire rack. This cooling process helps maintain their soft texture.
Serving Suggestions for Your Dinner Rolls
There are countless ways to enjoy your freshly baked dinner rolls, making them a versatile addition to any meal. Here are some serving suggestions to elevate your dining experience:
– Pairing with Butter and Various Spreads: There’s nothing quite like a warm dinner roll slathered with butter. For an extra touch, consider flavored butters, such as garlic herb, honey cinnamon, or even a tangy cream cheese spread. These will enhance the flavor of the rolls and make for an inviting appetizer.
– Serving Alongside Soups, Stews, and Salads: Dinner rolls are the perfect accompaniment to hearty soups and stews. Their soft texture is ideal for soaking up delicious broths. Additionally, they pair beautifully with fresh salads, providing a satisfying contrast to crisp greens.
– Creative Ideas for Using Leftover Rolls: If you happen to have any rolls left over, don’t let them go to waste! They can be transformed into delightful sliders filled with leftover meats, cheeses, or veggies. Alternatively, consider making breakfast sandwiches by stuffing them with eggs, cheese, and your choice of protein. You can even toast them and use them as croutons for salads or soups.
Nutritional Information
Understanding the nutritional value of your homemade dinner rolls can help you appreciate their place in a balanced diet. Each roll typically contains approximately:
– Calories: 150-180 calories per roll, depending on the specific ingredients used.
– Carbohydrates: Around 25-30 grams, providing a quick source of energy.
– Protein: Approximately 4-5 grams, which contributes to muscle repair and growth.
– Fat: Roughly 2-5 grams, primarily from the butter or oil included in the recipe.
The primary ingredients also contribute to the overall nutritional profile of the rolls. For example, flour is a good source of carbohydrates and provides essential B vitamins, while yeast contributes to gut health by providing probiotics. Adding whole wheat flour can enhance the fiber content, making these rolls even more nutritious.
The Science of Bread Making
Baking bread is as much a science as it is an art. Understanding the underlying processes can enhance your baking skills and help you achieve the perfect roll every time.
– How Yeast Works: Yeast is a living organism that ferments the sugars in the dough, producing carbon dioxide gas and alcohol. This gas creates bubbles that cause the dough to rise, giving bread its light and airy texture. When the rolls are baked, the heat kills the yeast, stopping the fermentation process and solidifying the structure of the bread.
– The Role of Gluten Development: Gluten is a protein found in wheat flour that provides elasticity and strength to the dough. When kneaded, gluten strands form a network that traps the carbon dioxide produced by yeast, allowing the dough to rise. Proper gluten development is crucial for achieving soft, fluffy rolls. Too little kneading results in dense rolls, while over-kneading can lead to a tough texture.
– Impact of Temperature and Humidity: The environment in which you bake can significantly affect the dough’s behavior. Warmer temperatures can accelerate yeast activity, causing the dough to rise faster, while cooler temperatures slow it down. Humidity can also impact the dough’s hydration level; in a humid environment, you may need less water, whereas in a dry climate, more water may be necessary. Adjusting these factors can help you master the art of bread-making.
Common Mistakes to Avoid
Even experienced bakers can encounter pitfalls when making dinner rolls. Here are some common mistakes to watch out for and how to avoid them:
1. Overworking or Under-Kneading the Dough: Kneading is essential for gluten development, but it’s possible to overdo it. Over-kneaded dough can become tough and chewy, while under-kneaded dough may not rise properly. Aim for a smooth, elastic texture that springs back when poked.
2. Incorrect Yeast Activation: If your yeast isn’t activated properly, your rolls won’t rise. Ensure your water is warm (around 110°F) but not hot, as excessive heat can kill the yeast. If your yeast doesn’t foam after mixing it with water and sugar, it’s likely inactive and should be replaced.
3. Not Allowing Enough Rise Time: Patience is key in baking. Rolling the dough before it has had adequate time to rise can result in dense rolls. Allow the dough to double in size during the first rise and let the shaped rolls rise until they are puffy before baking. This step is essential for achieving that light, airy texture.
Conclusion
Homemade dinner rolls are a comforting and satisfying addition to any meal, bringing warmth and joy to your dining table. The process of making them from scratch is not only rewarding but also allows you to enjoy the delightful aroma of freshly baked bread wafting through your home. With the right techniques and a little practice, you can master this recipe and create rolls that will impress family and friends alike.
Remember, baking is a journey that encourages experimentation. Feel free to modify the recipe by incorporating herbs, spices, or even cheese for a unique twist. Enjoy the process, embrace the occasional mishap, and savor the delicious results of your efforts. Happy baking!
