Introduction
There are few desserts that can evoke feelings of nostalgia and comfort quite like a classic banana pudding. This beloved dessert has been a staple at family gatherings, picnics, and even holiday celebrations for generations. Its delightful layers of creamy pudding, fresh bananas, and crunchy vanilla wafers create a harmonious blend of textures and flavors that can transport you back to simpler times. Whether you’re enjoying it on a hot summer day or as a cozy treat on a chilly evening, Homestyle Banana Pudding Delight is sure to please your taste buds and warm your heart.
In this article, we will explore the components that make up this timeless dessert, provide a detailed breakdown of the ingredients, and guide you through the essential steps of creating your very own Homestyle Banana Pudding Delight. By following this comprehensive guide, you’ll not only learn how to make this classic treat but also understand the importance of each ingredient and step involved in the process.
Understanding the Components of Banana Pudding
To truly appreciate the joy of banana pudding, it’s essential to understand the role each component plays in creating this delightful dessert. Let’s take a closer look at the key elements that come together to make Homestyle Banana Pudding Delight truly special.
The Role of Bananas in Pudding
At the heart of any banana pudding are the bananas themselves. Choosing ripe bananas is crucial for achieving the best flavor and texture. Ripe bananas offer a natural sweetness that enhances the overall taste of the pudding. When selecting bananas, look for those that are yellow with a few brown speckles. These indicate that the bananas are perfectly ripe and will provide the creamy, rich texture that sets this dessert apart. Unripe bananas can be too firm and lack the sweetness and flavor necessary for a truly delicious pudding.
The Significance of Vanilla Wafers
Vanilla wafers are another essential component of banana pudding. Not only do they provide a delightful crunch that contrasts beautifully with the creamy pudding and soft bananas, but they also contribute to the structure of the dessert. As the banana pudding sits, the vanilla wafers absorb some of the moisture from the pudding, softening slightly while still maintaining a bit of their crunch. This textural contrast adds depth to each bite and elevates the overall experience of enjoying banana pudding.
The Creamy Pudding Base
The pudding base is what ties all the components together, creating that luscious, velvety texture that makes banana pudding so irresistible. The pudding is typically made from a combination of milk, sugar, flour, and eggs, resulting in a rich and creamy consistency. This base is not only delicious but also serves as a canvas for the flavors of the bananas and vanilla wafers to shine. The process of making the pudding involves careful whisking and cooking to achieve the perfect thickness, ensuring that it holds its shape when layered.
Ingredients Breakdown
Now that we’ve established the importance of each component, let’s delve into the specific ingredients you’ll need to create your Homestyle Banana Pudding Delight. Understanding the role of each ingredient will not only help you make the best choices while shopping but also enhance your appreciation for the final product.
Fresh Bananas: Choosing the Right Ones
When it comes to bananas, quality matters. Always opt for fresh, ripe bananas for your pudding. As mentioned earlier, look for bananas that are yellow with brown speckles. The perfect banana should be firm yet slightly soft to the touch, indicating that it’s at its peak ripeness. If you have bananas that are overly brown and soft, they may be too mushy for layering and could affect the texture of your pudding. If you’re planning to make banana pudding ahead of time, choose bananas that are just ripe enough to withstand a little oxidation without turning mushy too quickly.
Sugar and Flour: The Sweet and Thickening Agents
Sugar and flour are the backbone of your pudding base. The sugar adds sweetness, balancing the natural flavors of the bananas, while the flour acts as a thickening agent, giving the pudding its characteristic creamy consistency. When choosing sugar, granulated white sugar is the most common option, but feel free to experiment with alternatives like brown sugar for a deeper flavor. Be mindful of the flour you choose; all-purpose flour is typically used, but if you’re looking for a gluten-free option, cornstarch can serve as an effective substitute. The key is to achieve a balance between sweetness and thickness, ensuring your pudding is neither overly sweet nor too runny.
Whole Milk and Heavy Cream: The Foundation of Creaminess
The combination of whole milk and heavy cream is what gives your banana pudding its luxurious mouthfeel. Whole milk provides a creamy base while keeping the pudding smooth and pourable. Heavy cream, on the other hand, adds richness and a velvety texture that elevates the dessert to a whole new level. If you prefer a lighter version, you can use all whole milk, but for the ultimate indulgence, the combination of both will yield the best results. Remember, the quality of your dairy products can significantly impact the flavor of your pudding, so opt for fresh, high-quality milk and cream whenever possible.
Eggs: The Secret to Richness
Egg yolks play a crucial role in the pudding-making process. They not only add richness and depth of flavor but also provide emulsification, helping to bind the ingredients and create a smooth texture. Using large eggs is standard in most recipes, and you’ll want to ensure they are at room temperature for better incorporation into the pudding mixture. When whisking the egg yolks with sugar, the goal is to create a light and fluffy mixture that will incorporate well with the other ingredients when heated.
Vanilla Extract: Elevating Flavor
Vanilla extract is the finishing touch that takes your banana pudding to the next level. Its warm, sweet aroma complements the bananas and enhances the overall flavor profile of the dessert. When selecting vanilla extract, choose high-quality pure vanilla extract over imitation vanilla for the best results. The difference in flavor is significant, and a little goes a long way in making your banana pudding truly exceptional.
The Step-by-Step Process to Making Homestyle Banana Pudding
Now that you understand the components and ingredients that make up Homestyle Banana Pudding Delight, it’s time to dive into the step-by-step process of making this classic dessert. The following instructions will guide you through preparing the pudding base, layering the ingredients, and achieving the perfect banana pudding.
Preparing the Pudding Base
1. Gather Your Ingredients: Before you begin, make sure you have all your ingredients measured and ready to go. This will ensure a smooth cooking process and help you avoid any last-minute scrambling.
2. Whisk the Egg Yolks: In a medium-sized mixing bowl, whisk together the egg yolks and granulated sugar until the mixture is pale and slightly thickened. This process helps to dissolve the sugar and aerate the eggs, which will contribute to the richness of your pudding.
3. Combine Dry Ingredients: In another bowl, whisk together the flour (or cornstarch) and a pinch of salt. This will help evenly distribute the thickening agent throughout the mixture.
4. Heat the Milk and Cream: In a medium saucepan over medium heat, combine the whole milk and heavy cream. Stir occasionally until the mixture is just below boiling, and you start to see steam rising. Be careful not to let it boil, as this can affect the texture of your pudding.
5. Temper the Egg Mixture: Once the milk and cream are heated, it’s time to temper the egg mixture. Slowly whisk a small amount of the hot milk mixture into the egg yolk mixture to raise the temperature of the eggs without cooking them. Gradually add more of the hot mixture, continuing to whisk until everything is combined.
6. Cook the Pudding: Return the tempered egg mixture to the saucepan and place it back on the heat. Cook the mixture over medium heat, stirring constantly with a wooden spoon or spatula. You want to ensure you reach the desired thickness without allowing the pudding to scorch on the bottom. This process usually takes about 5-10 minutes. You’ll know it’s ready when it coats the back of the spoon and holds a line when you run your finger through it.
7. Add Vanilla Extract: Once the pudding has thickened, remove it from the heat and stir in the vanilla extract. Allow it to cool slightly before using it to layer your banana pudding.
As you prepare the pudding base, the aroma of vanilla and warm milk will fill your kitchen, setting the stage for a comforting and delightful dessert. In the next part of this article, we will discuss how to assemble your Homestyle Banana Pudding Delight, layer by layer, to create the perfect presentation for this nostalgic treat.
{{image_1}}
Techniques to Thicken the Mixture
Achieving a perfectly thickened banana pudding mixture is essential for an enjoyable dessert that holds its layers well. Here are some best practices to avoid lumps and ensure a smooth consistency:
1. Use Cornstarch or Flour: These thickeners are vital in creating the right texture. Combine them with sugar before adding to the milk to prevent clumping. This helps to evenly distribute the thickening agent throughout the mixture.
2. Whisk Constantly: When heating your mixture, continuous whisking is crucial. This prevents the ingredients from settling at the bottom and sticking to the pan, which can lead to lumps. It also helps to incorporate air, contributing to a light texture.
3. Heat Gradually: Start on low heat and gradually increase it. This allows the mixture to thicken evenly and reduces the risk of burning the bottom. Once it begins to bubble, lower the heat to maintain a gentle simmer.
4. Check for Doneness: The mixture should coat the back of a spoon. If it drips off easily, it needs more time to cook. Remember, it will continue to thicken as it cools, so don’t overdo it.
Incorporating Egg Yolks: The Tempering Process
Tempering egg yolks is a crucial step in many creamy dessert recipes, including banana pudding. This technique allows you to incorporate eggs into a hot mixture without curdling them. Here’s how to do it:
1. Separate the Yolks: Begin by separating the egg yolks from the whites. Use only the yolks for this recipe, as they provide richness and help thicken the pudding.
2. Prepare a Bowl: Place the yolks in a heatproof bowl. Whisk them lightly to break them up.
3. Heat the Milk Mixture: In a saucepan, heat your milk and sugar mixture until it’s hot but not boiling.
4. Slowly Add the Hot Mixture: Gradually pour about a cup of the hot milk mixture into the bowl with the egg yolks while whisking constantly. This step is crucial as it raises the temperature of the yolks without cooking them.
5. Return to the Heat: Once the yolks are tempered, pour the mixture back into the saucepan. Continue to cook over medium heat, stirring constantly, until the mixture thickens.
Adding Vanilla Extract for Flavor Enhancement
Vanilla extract adds depth to your banana pudding, enhancing its overall flavor. Here’s how to incorporate it for maximum impact:
1. Timing is Key: Add the vanilla extract after removing the mixture from the heat. This ensures that the heat does not evaporate the delicate flavors.
2. Quality Matters: Use pure vanilla extract for the best taste. Imitation vanilla can lack the depth of flavor found in the real thing.
3. Adjust to Taste: Start with a teaspoon of vanilla extract and adjust according to your preference. A little goes a long way, so taste your mixture before adding more.
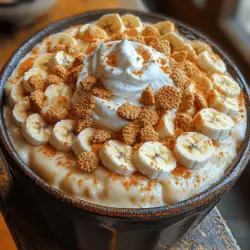
Layering Your Banana Pudding
The visual appeal of banana pudding comes from its beautifully arranged layers of creamy pudding, fresh bananas, and crunchy wafers. Here’s how to build those layers effectively:
Building the Layers: A Visual Delight
1. Start with the Pudding: Begin by spooning a layer of pudding into your serving dish. This base helps stabilize the layers above.
2. Add Sliced Bananas: Arrange a layer of banana slices on top of the pudding. Ensure they are evenly spaced for a balanced flavor in every bite.
3. Layer the Wafers: Next, place a layer of vanilla wafers on top of the bananas. You can either lay them flat or break them into pieces for a more rustic look.
4. Repeat the Process: Continue layering pudding, bananas, and wafers until you reach the top of your dish. Finish with a final layer of pudding for a smooth finish.
Tips for Achieving the Perfect Layering Technique
1. Use a Clear Dish: A glass dish allows the beautiful layers to show through, making it more appealing when served.
2. Keep Bananas Even: For optimal flavor, ensure the banana slices are evenly distributed. This prevents any one layer from being too banana-heavy.
3. Avoid Sogginess: If you’re preparing the pudding ahead of time, consider placing the wafers on top closer to serving time. This keeps them crunchy and prevents them from becoming soggy.
Chilling and Finishing Touches
Chilling your banana pudding is a crucial step that enhances its flavor and texture. Here’s why and how to do it right:
The Importance of Chilling
Allowing your banana pudding to chill for several hours (ideally overnight) before serving is essential for several reasons:
1. Flavor Development: Chilling helps the flavors meld together, making each bite more delicious.
2. Texture Improvement: A good chill allows the pudding to set properly, resulting in a firmer and creamier consistency. This makes it easier to serve and helps maintain the integrity of the layers.
Whipping the Cream: Achieving the Right Consistency
For the perfect topping, whipping cream is an art. Here’s how to do it:
1. Choose the Right Cream: Use heavy whipping cream for the best results. It has a higher fat content that whips up beautifully and holds its shape.
2. Chill Your Equipment: Place your mixing bowl and beaters in the refrigerator for about 15 minutes before whipping. This helps the cream whip more efficiently.
3. Whip to Soft Peaks: Start at medium speed until the cream thickens, then increase to high speed. Whip until soft peaks form, which means the cream will hold its shape but is still soft and spreadable.
4. Sweeten to Taste: Add powdered sugar or vanilla extract while whipping to enhance the flavor. Start with a tablespoon of sugar and adjust to your taste preference.
Decorative Garnishes: Enhancing Presentation
Presentation plays a significant role in the enjoyment of any dessert. Here are some ideas for garnishing your banana pudding:
1. Top with Whipped Cream: Generously dollop whipped cream on top for a rich finish.
2. Add Banana Slices: Place a few fresh banana slices on top of the whipped cream for visual appeal and freshness.
3. Sprinkle with Crushed Wafers: For added texture, sprinkle crushed vanilla wafers over the top. This not only adds crunch but also ties in the flavors of the pudding.
4. Chocolate Shavings or Drizzle: For a twist, add chocolate shavings or a drizzle of chocolate sauce for a decadent touch.
Serving Suggestions and Variations
When it comes to serving banana pudding, presentation and portioning can elevate the experience. Here are some suggestions:
Best Ways to Serve Banana Pudding
1. Individual Cups: For a more personalized touch, serve banana pudding in individual cups or jars. This makes it easy for guests to enjoy and reduces the mess.
2. Family-Style Serving: Present the pudding in a large, beautiful dish for a communal feel. This encourages sharing and adds a homey touch to any gathering.
3. Portion Sizes: Depending on the richness of your banana pudding, consider serving smaller portions, especially if there are multiple desserts at the event.
Creative Twists on the Classic Recipe
To keep things exciting, consider these creative variations on the classic banana pudding:
1. Chocolate Banana Pudding: Add cocoa powder or melted chocolate to the pudding mixture for a delightful chocolate banana fusion.
2. Nutty Banana Pudding: Incorporate chopped nuts, such as pecans or walnuts, either in the layers or as a garnish for added crunch and flavor.
3. Alternative Toppings: Swap the whipped cream for a cream cheese frosting for a richer topping or try a layer of caramel sauce for a decadent twist.
4. Fruit Variations: Experiment with other fruits, such as strawberries or raspberries, for a fruity layer that complements the banana.
Conclusion
Homestyle Banana Pudding Delight is more than just a dessert; it’s a heartwarming recipe that brings back cherished memories. With its creamy layers and sweet banana flavor, this dish is perfect for both special occasions and everyday indulgences. By following this comprehensive guide, you’ll be able to create your own batch of banana pudding that is sure to become a family favorite.
The combination of techniques for thickening the mixture, the careful incorporation of egg yolks, and the careful layering of ingredients ensures that your pudding will be both delicious and visually appealing. With the right chilling and finishing touches, you can elevate your dessert to a new level. Remember to experiment with serving suggestions and creative twists to keep the recipe exciting. Enjoy crafting your Homestyle Banana Pudding Delight!