Introduction
Delightful and decadent, the Apple Crisp Cheesecake combines the creamy richness of cheesecake with the classic, warm flavors of apple crisp. This dessert is perfect for any occasion, from family gatherings to holiday celebrations. If you are looking for a show-stopping dessert that will impress your guests, look no further than this irresistible combination of textures and flavors. The smooth and velvety cheesecake filling is perfectly balanced by the spiced apple filling and the crunchy, buttery topping, creating a symphony of taste in every bite.
In this article, we will provide a comprehensive guide to creating this delicious dessert, including a detailed recipe, background on its ingredients, and tips for perfecting your cheesecake. Join us as we explore the art of cheesecake making and how to elevate it with a touch of apple crisp goodness.
Understanding the Appeal of Apple Crisp Cheesecake
Exploring the Combination of Flavors and Textures
Apple Crisp Cheesecake is not just another dessert; it’s an experience. The combination of the creamy cheesecake filling with the warm and spiced apples, all topped with a crunchy streusel, creates a delightful contrast that excites the palate. The richness of the cheesecake is tempered by the tartness of the apples, while the topping adds a satisfying crunch. Each layer plays its part in a harmonious blend of flavors that is both comforting and indulgent.
The cheesecake itself is a canvas for creativity, allowing you to experiment with various flavor profiles. The addition of cinnamon, nutmeg, or even a hint of caramel can elevate your cheesecake to new heights. The apple crisp topping, often made with oats, brown sugar, and butter, introduces an element of texture that complements the smoothness of the filling beautifully.
The History and Evolution of Cheesecake
Cheesecake has a rich history that dates back to ancient Greece, where it was considered a delicacy served to athletes during the first Olympic Games. Over the centuries, cheesecake evolved through various cultures, with different ingredients and methods being introduced. The classic New York-style cheesecake, known for its dense and creamy texture, became popular in the United States in the 20th century, thanks to the introduction of cream cheese as a key ingredient.
The idea of incorporating fruit into cheesecake is not new; many variations feature fruit toppings, fruit purees, or even layers within the cheesecake itself. The Apple Crisp Cheesecake builds upon this tradition by combining the beloved flavors of apple crisp with the classic cheesecake base, creating a dessert that pays homage to both the classic and the contemporary.
Why Apple Crisp Makes the Perfect Topping
Apples are one of the most versatile fruits in desserts, and their natural sweetness and tartness make them an ideal complement to rich cheesecake. The combination of spiced apples, often cooked with cinnamon and sugar, adds warmth and depth to the dish, while the crisp topping introduces a contrast in texture. The crunchiness of the topping, made from oats, flour, and butter, contrasts beautifully with the creaminess of the cheesecake, providing a delightful textural experience.
Moreover, apple crisp has a nostalgic quality that evokes memories of family gatherings and holiday celebrations. By incorporating apple crisp into a cheesecake, you create a dessert that is not only delicious but also comforting and familiar, making it a perfect choice for any occasion.
Gathering Your Ingredients
A Detailed Breakdown of the Essential Components
To create the perfect Apple Crisp Cheesecake, you will need to gather a few essential ingredients that will come together to create this delicious dessert. Below is a comprehensive list of what you will need:
For the Base: Creating the Perfect Graham Cracker Crust
– Graham cracker crumbs: The foundation of your cheesecake crust, graham cracker crumbs provide a sweet and slightly nutty flavor.
– Sugar: A little added sweetness to enhance the flavor of the crust.
– Butter: Melted butter binds the crumbs together and adds richness.
For the Cheesecake Filling: Key Ingredients for a Creamy Texture
– Cream cheese: The star ingredient that gives cheesecake its signature creamy texture and tangy flavor.
– Sugar: Used to sweeten the filling and balance the richness of the cream cheese.
– Sour cream: Adds a delightful tang and creaminess to the filling.
– Eggs: Provide structure and stability to the cheesecake while keeping it moist.
– Vanilla extract: Enhances the overall flavor profile of the filling.
The Apple Crisp Topping: Adding Crunch and Flavor
– Apples: Choose a mix of tart and sweet varieties, such as Granny Smith and Honeycrisp, for optimal flavor.
– Brown sugar: Adds a deep, caramel-like sweetness to the apple mixture.
– Cinnamon and nutmeg: Essential spices that warm the flavor of the apples.
– Oats: Provide texture and crunch to the topping.
– Flour: Helps to bind the topping ingredients together.
– Butter: Adds richness and helps to create a crispy texture.
Preparing the Crust
Step-by-Step Guide to Making the Graham Cracker Crust
Creating the perfect graham cracker crust is essential for your Apple Crisp Cheesecake. Follow these simple steps to achieve a crust that is both flavorful and holds its shape perfectly.
1. Preheat your oven: Begin by preheating your oven to 350°F (175°C). This ensures that your crust bakes evenly and achieves a nice golden color.
2. Combine the dry ingredients: In a medium bowl, mix together 1 ½ cups of graham cracker crumbs and ¼ cup of granulated sugar until well combined.
3. Add melted butter: Pour in ½ cup of melted butter into the dry mixture. Use a fork or your hands to mix until the crumbs are fully coated and resemble wet sand. This step is crucial for ensuring your crust holds together during baking.
4. Press into a pan: Grease a 9-inch springform pan lightly with cooking spray. Pour the graham cracker mixture into the pan and use the back of a measuring cup or your fingers to firmly press the mixture into the bottom and slightly up the sides of the pan. Make sure to create an even layer.
5. Bake the crust: Place the crust in the preheated oven and bake for about 10 minutes, or until it is lightly golden and fragrant. This step helps to set the crust and enhances its flavor.
6. Cool the crust: Once baked, remove the crust from the oven and set it aside to cool completely while you prepare the cheesecake filling.
Tips for Ensuring a Firm and Flavorful Base
– Use fresh graham cracker crumbs: For the best flavor, use freshly crushed graham crackers instead of pre-packaged crumbs, as they can lose their taste over time.
– Do not skip the melting: Make sure your butter is fully melted to ensure an even mixture.
– Press firmly: Ensure you press the crust mixture firmly into the pan to avoid crumbling when serving.
Baking the Crust: Achieving the Right Texture
The key to a great cheesecake crust is achieving the right texture. Underbaking can lead to a crust that falls apart, while overbaking can cause it to become too hard. By following the baking time and observing the color of the crust, you can ensure a perfectly baked graham cracker crust that is both sturdy and flavorful.
Crafting the Cheesecake Filling
Mixing the Ingredients for a Smooth Consistency
Now that your crust is prepared and cooled, it’s time to craft the cheesecake filling. A smooth and creamy filling is essential for a successful Apple Crisp Cheesecake. Here’s how to do it:
1. Prepare your cream cheese: Ensure that your 24 ounces of cream cheese is at room temperature. Softened cream cheese mixes more easily and creates a smoother filling.
2. Beat the cream cheese: In a large mixing bowl, use an electric mixer to beat the softened cream cheese on medium speed until it is smooth and free of lumps.
3. Add sugar: Gradually add in 1 cup of granulated sugar, continuing to beat until well combined.
4. Incorporate sour cream: Add 1 cup of sour cream to the mixture and beat until smooth. The sour cream adds creaminess and balances the sweetness.
5. Add eggs: One at a time, add in 3 large eggs, mixing on low speed after each addition until just combined. Avoid overmixing, as this can introduce too much air into the batter, leading to cracks during baking.
6. Finish with vanilla: Finally, add 1 teaspoon of vanilla extract and mix until everything is well incorporated.
The Importance of Softened Cream Cheese
Using softened cream cheese is key to achieving a lump-free and smooth cheesecake filling. Cold cream cheese can result in a lumpy batter, which can lead to an uneven texture in the final product. To soften cream cheese quickly, you can cut it into small cubes and let it sit at room temperature for about 30 minutes, or you can microwave it on low power for 10-15 seconds.
In the next part of this article, we will continue with the step-by-step instructions for assembling and baking the Apple Crisp Cheesecake, as well as tips for ensuring it turns out perfectly every time. Stay tuned as we guide you through the final steps of this delicious dessert.
{{image_1}}
How to Incorporate Apples for the Best Flavor
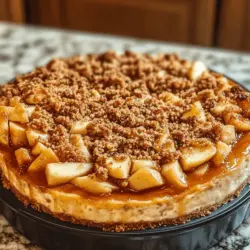
To achieve the best flavor in your Apple Crisp Cheesecake, selecting the right type of apples is paramount. For a perfect balance of sweetness and tartness, opt for a mix of Granny Smith and Honeycrisp apples. Granny Smith apples provide a nice tartness that cuts through the richness of the cheesecake, while Honeycrisp offers a natural sweetness and crisp texture.
Before adding the apples to the cheesecake filling, peel, core, and slice them into thin, even pieces to ensure they cook evenly. A simple toss in a mixture of cinnamon and sugar can elevate their flavor profile, creating a deliciously fragrant filling. Allow the apples to sit for about 10 minutes after tossing them; this will help bring out their juices, enhancing the overall taste of your cheesecake.
Assembling the Cheesecake
Once you have prepared your crust and the apple filling, it’s time to assemble your cheesecake. Start by pouring the prepared cheesecake filling into a springform pan lined with parchment paper. Make sure to spread the filling evenly using a spatula to create a smooth surface. This step is crucial as it ensures that the cheesecake bakes uniformly, preventing any cracks from forming on the surface.
Baking Tips for Achieving the Perfect Consistency
Baking cheesecakes requires a gentle touch, so preheat your oven to 325°F (163°C). To prevent the cheesecake from cracking, consider using a water bath. Wrap the outside of the springform pan with aluminum foil to prevent water from leaking in, and place it in a larger baking dish filled with hot water. This method helps regulate the temperature and moisture in the oven, leading to a creamier texture.
Bake the cheesecake for about 60 to 70 minutes or until the edges are set, but the center still slightly jiggles. This slight jiggle is a sign that the cheesecake will firm up as it cools. Overbaking can lead to a dry texture, so keep a close eye on it towards the end of the baking time.
Signs to Look for When Your Cheesecake is Done
Knowing when your cheesecake is done can be tricky. Look for the edges to be puffed and slightly golden, while the center should appear slightly underbaked. It will continue to cook as it cools. Additionally, if you gently shake the pan, the center should have a slight wobble but not be too liquid. If you notice cracks starting to form, the cheesecake may be overbaked, so adjust your time in future attempts accordingly.
Creating the Apple Crisp Topping
The apple crisp topping is where the magic happens, adding texture and flavor to your cheesecake. Start by mixing together rolled oats, brown sugar, flour, and cinnamon in a bowl. The combination of these ingredients creates a delightful crumble that will bake to a crispy perfection.
Mixing the Topping Ingredients for the Right Crumble
To achieve the right consistency, incorporate melted butter into the dry ingredients. Use your fingers or a fork to mix until the mixture resembles coarse crumbs. This step is essential to ensure that the topping has that delightful crunch you expect from a crisp.
Adjusting Sweetness and Texture to Your Preference
Taste the mixture before adding it to your cheesecake. If you prefer a sweeter topping, feel free to adjust the sugar amount. Conversely, if you like a less sweet flavor, reduce the sugar, or you can even add a pinch of salt to balance the sweetness.
Incorporating Nuts for Added Crunch (Optional)
For an extra layer of flavor and crunch, consider adding chopped nuts such as pecans or walnuts to your apple crisp topping. Nuts not only enhance the texture but also provide a rich, nutty flavor that complements the apples beautifully. Simply fold in about half a cup of your favorite nuts into the topping mixture before layering it on your cheesecake.
Finishing Touches: Combining Layers
Timing is crucial when it comes to adding the topping. Once the cheesecake has finished baking and has had a chance to cool for about 10-15 minutes, gently spread the apple topping over the cheesecake. This ensures that the topping adheres to the filling without sinking in.
Baking to Perfection: Achieving a Golden Brown Finish
After adding the topping, return the cheesecake to the oven for an additional 15-20 minutes. This final bake allows the topping to become golden brown and crisp. Keep an eye on it to prevent burning, and you can rotate the pan halfway through this time for even cooking.
Cooling Techniques for the Best Texture
After baking, allow the cheesecake to cool in the pan on a wire rack for about an hour. Once it reaches room temperature, carefully run a knife around the edges of the pan to loosen the cheesecake. This step is key to preventing cracking as it cools. Transfer the cheesecake to the refrigerator and chill for at least four hours, or preferably overnight. Chilling allows the flavors to meld and the texture to set perfectly.
Serving and Enjoying Your Apple Crisp Cheesecake
When it’s time to serve your delicious Apple Crisp Cheesecake, take it out of the refrigerator and let it sit for about 10 minutes to soften slightly. This will make slicing easier and enhance the overall flavor experience.
How to Slice and Serve the Cheesecake
Using a sharp knife, slice the cheesecake into even pieces. For cleaner slices, dip the knife in hot water before cutting and wipe it clean after each cut. Serve each slice with a drizzle of caramel sauce or a dollop of whipped cream for an extra indulgence.
Pairing Suggestions for a Delightful Dessert Experience
This cheesecake pairs wonderfully with a variety of beverages. A cup of freshly brewed coffee or a glass of dessert wine can elevate the flavors of the cheesecake. For a refreshing twist, consider serving it alongside a scoop of vanilla ice cream or some fresh apple slices.
Storing Leftovers for Maximum Freshness
If you have leftovers, store them in an airtight container in the refrigerator. The cheesecake can last up to a week, but it’s best enjoyed within the first few days for the freshest taste. If you want to keep it longer, consider freezing individual slices wrapped tightly in plastic wrap and aluminum foil. When ready to enjoy, thaw in the refrigerator overnight and serve.
Conclusion
The Apple Crisp Cheesecake is a delightful blend of flavors and textures that will impress your guests and satisfy your sweet tooth. With the right techniques and a little patience, you can create this stunning dessert at home. This recipe not only highlights the deliciousness of its ingredients but also the joy of baking. Whether it’s a special occasion or a treat for yourself, this cheesecake will surely become a favorite in your dessert repertoire. Enjoy the sweet harmony of creamy cheesecake and crispy apple topping, and savor each bite!