No-Bake Strawberry Crunch Cake Recipe: A Summer Delight
As the temperatures rise and summer days stretch longer, the craving for lighter, refreshing desserts becomes ever more apparent. No-bake desserts have surged in popularity, offering a convenient solution for those who want to indulge without the need for an oven. Among these delightful creations, the No-Bake Strawberry Crunch Cake stands out as a quintessential summer treat. This cake combines the sweetness of fresh strawberries with a creamy texture and a satisfyingly crunchy base, making it an ideal dessert for picnics, barbecues, or simply enjoying on a warm afternoon.
The allure of the No-Bake Strawberry Crunch Cake lies not only in its delightful flavors but also in its simplicity. Utilizing fresh strawberries and straightforward ingredients, this recipe is accessible for both novice bakers and seasoned dessert enthusiasts. The ease of preparation—requiring no baking, just mixing and layering—adds to its charm, allowing you to whip up this dessert in no time at all.
Understanding the Components of No-Bake Strawberry Crunch Cake
At the heart of the No-Bake Strawberry Crunch Cake are three essential layers that harmonize to create a balanced and satisfying dessert. Each layer contributes its own unique flavor and texture, coming together to form a cake that’s both visually appealing and delicious.
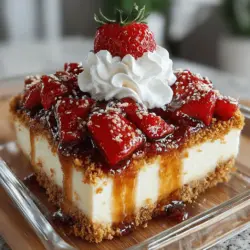
1. The Crust: The foundation of the cake, the crust is typically made from crushed graham crackers, which provide a sweet and slightly crunchy base. This layer sets the stage for the creamy center and fruity topping, offering a delightful contrast to the softer layers above.
2. The Cream Cheese Layer: This luscious layer is where the cake gains its creamy texture. Made with softened cream cheese, powdered sugar, and whipped topping, it introduces a rich and smooth element that complements the freshness of the strawberries. The cream cheese layer adds depth to the dessert, making each bite indulgent.
3. The Strawberry Layer: The crowning glory of the cake, the strawberry layer showcases the star ingredient—fresh strawberries. This layer not only adds a vibrant color but also a burst of natural sweetness. The strawberries can be complemented with a touch of granulated sugar and lemon juice, enhancing their flavor and bringing a refreshing brightness to the entire dessert.
The Ingredients Breakdown
To create the No-Bake Strawberry Crunch Cake, you’ll need a few key ingredients for each layer. Let’s take a closer look at what goes into this delightful dessert.
The Crust Ingredients
– Crushed Graham Crackers: The base of the crust, crushed graham crackers offer a mild sweetness and a sandy texture that forms a perfect foundation for the cake. They absorb moisture without becoming soggy, ensuring that the crust remains firm and crunchy.
– Granulated Sugar: A small amount of granulated sugar is mixed in with the crushed graham crackers, enhancing the sweetness of the crust. This sugar helps to balance the flavors in the dessert, making each layer taste harmonious.
– Melted Butter: The melted butter acts as a binding agent, holding the crushed graham crackers together. It adds richness to the crust, contributing to its overall flavor and making it more satisfying to eat.
The Cream Cheese Layer
– Softened Cream Cheese: Using softened cream cheese is crucial for achieving the desired creamy consistency. It blends smoothly with the other ingredients, creating a luscious filling that contrasts beautifully with the crunch of the crust.
– Powdered Sugar: Powdered sugar is used instead of granulated sugar in the cream cheese layer, as it dissolves easily and provides a smooth sweetness. This helps to maintain the creamy texture without any graininess.
– Vanilla Extract: A splash of vanilla extract enhances the flavor of the cream cheese layer, adding a warm note that complements the sweetness of the strawberries.
– Whipped Topping: The addition of whipped topping lightens the cream cheese layer, making it airy and fluffy. This ingredient ensures that the layer maintains a light texture, preventing the cake from feeling overly dense.
The Strawberry Layer
– Fresh Strawberries: The key ingredient in the strawberry layer, fresh strawberries are essential for achieving the vibrant flavor and eye-catching appearance of the cake. Their natural sweetness and juiciness make them a perfect topping for the creamy filling.
– Granulated Sugar: Similar to the crust, a bit of granulated sugar is added to the strawberries to enhance their natural sweetness. This helps to draw out the juices, creating a syrupy mixture that coats the berries.
– Lemon Juice: A splash of lemon juice brightens the flavor of the strawberries, balancing their sweetness and adding a refreshing zing. This acidity enhances the overall taste profile of the dessert.
– Optional Strawberry Pie Filling: For those who prefer a sweeter, more textured layer, an optional addition of strawberry pie filling can be stirred in with the fresh strawberries. This can provide extra sweetness and a bit of thickness, creating a more substantial layer on top of the cream cheese.
Step-by-Step Instructions for Crafting the Cake
Now that we’ve covered the ingredients and their roles in the No-Bake Strawberry Crunch Cake, it’s time to get into the fun part—preparing the cake itself. Let’s start with the crust, the first step in this delicious journey.
Preparing the Crust
1. Crush the Graham Crackers: Begin by placing your graham crackers in a food processor and pulsing them until they reach a fine crumb consistency. Alternatively, you can place them in a resealable plastic bag and crush them with a rolling pin if you don’t have a food processor.
2. Mix with Sugar and Butter: In a mixing bowl, combine the crushed graham crackers with granulated sugar. Pour in the melted butter and stir until all the cracker crumbs are evenly coated. The mixture should resemble wet sand and hold together when pressed.
3. Form the Crust: Press the graham cracker mixture firmly into the bottom of a springform pan or a 9×13-inch baking dish. Use the back of a measuring cup or your fingers to ensure the crust is packed tightly and evenly across the bottom.
4. Chill the Crust: Place the crust in the refrigerator for about 15-20 minutes to allow it to set. This step is crucial for ensuring that the crust holds its shape when the other layers are added.
With the crust ready, you can now move on to crafting the creamy filling and the strawberry topping, setting the stage for a deliciously layered dessert that is sure to impress. Stay tuned for the next steps in our No-Bake Strawberry Crunch Cake recipe, where we’ll delve into creating the luscious cream cheese layer and the vibrant strawberry topping that make this cake a summer favorite.
Instructions for Mixing and Pressing the Crust Mixture
To begin crafting your No-Bake Strawberry Crunch Cake, focus on the crust, which forms the essential base for this delightful dessert. In a large mixing bowl, combine 1 cup of crushed graham crackers, 1 cup of finely chopped pecans, and ½ cup of granulated sugar. Mix these dry ingredients thoroughly to ensure an even distribution of flavors.
Next, melt ½ cup of unsalted butter and allow it to cool slightly before adding it to the dry mixture. Stir the melted butter into the graham cracker and nut mixture until it is well combined and resembles wet sand. This mixture will serve as the foundation for your cake, so it’s crucial to press it firmly into the bottom of your prepared 9-inch springform pan. Use the back of a measuring cup or your fingertips to create an even layer.
Importance of Chilling the Crust Before Adding Other Layers
Once you’ve pressed the crust mixture into the pan, it’s essential to chill it in the refrigerator for at least 30 minutes. This chilling step allows the butter to solidify, which in turn helps the crust hold its shape when the cream cheese layer is added. Skipping this step may result in a crumbly crust that doesn’t support the weight of the layers above, leading to a messy presentation when serving. Therefore, patience is key; let your crust chill while you prepare the cream cheese layer.
Crafting the Cream Cheese Layer
The cream cheese layer is where the magic happens, providing richness and flavor to balance the sweetness of the strawberries. Start by taking 8 ounces of softened cream cheese and placing it in a large mixing bowl. Add in ½ cup of powdered sugar and 1 teaspoon of vanilla extract. Using an electric mixer, beat these ingredients together on medium speed until the mixture is smooth and creamy, typically around 2 minutes.
Detailed Mixing Instructions to Ensure a Smooth and Fluffy Texture
To achieve that desired fluffy texture, it’s important to ensure your cream cheese is at room temperature before mixing. Cold cream cheese can lead to lumps that are difficult to incorporate. If your cream cheese is too firm, consider microwaving it for 10 seconds to soften it slightly. Once your mixture is smooth, switch gears and fold in the whipped topping.
Techniques for Folding in Whipped Topping Without Deflating
When incorporating 1 cup of whipped topping into your cream cheese mixture, use a gentle folding technique. Begin by adding half of the whipped topping to the cream cheese mixture and using a spatula to fold it in. Make sure to scrape the sides and bottom of the bowl to combine all ingredients evenly. Once the first half is incorporated, repeat the process with the remaining whipped topping. This method preserves the airiness of the whipped topping, ensuring your cream cheese layer remains light and fluffy.
Assembling the Cake
Now that both layers are ready, it’s time to assemble your No-Bake Strawberry Crunch Cake. Start by spreading the cream cheese layer evenly over the chilled crust. Use a spatula to smooth it out, making sure to reach all corners of the pan.
Step-by-Step Process for Layering the Cream Cheese and Strawberries
Next, prepare your strawberries. Slice about 2 cups of fresh strawberries, tossing them with 2 tablespoons of granulated sugar in a separate bowl. Allow the strawberries to macerate for about 10 minutes, releasing their juices and creating a sweet syrup. After the strawberries have softened, layer them on top of the cream cheese layer.
To maintain an attractive presentation, arrange the strawberries so they are evenly distributed. You can create a decorative pattern, such as concentric circles or a simple pile in the center. The visual appeal of your dessert is just as important as the taste!
Tips on Distributing the Strawberry Mixture Evenly for Best Presentation
When distributing the strawberry mixture, consider using a slotted spoon to drain excess syrup before placing them on the cake. This prevents the cream cheese layer from becoming too soggy, maintaining the structural integrity of your cake. Aim for an even distribution to ensure that every slice has a perfect balance of cream cheese and strawberries.
Chilling for Perfection
Once your cake is assembled, it requires another chilling session. Cover the springform pan with plastic wrap or a lid and refrigerate the cake for at least 4 hours, or ideally overnight.
Explanation of Why Chilling is Crucial for Flavor Melding and Setting
Chilling is crucial not just for setting the layers but also for allowing the flavors to meld. The cream cheese will firm up, and the strawberries will infuse their sweetness into the cream cheese layer, enhancing the overall flavor profile. This waiting period ensures that when you slice into your cake, the layers hold together beautifully.
Recommended Chilling Time for Optimal Results
For the best results, aim for a chilling time of at least 6 hours. This longer duration provides the best texture and flavor, making each bite a delightful experience.
The Serving Experience
As you prepare to serve your No-Bake Strawberry Crunch Cake, consider how to enhance its presentation and flavor.
Suggestions for Garnishing the Cake Before Serving
One simple yet effective way to elevate your cake is to garnish it with additional fresh strawberries on top. You might also consider drizzling a small amount of chocolate sauce or a sprinkle of crushed graham crackers for added texture.
Ideas for Whipped Topping or Additional Fresh Strawberries
For an extra touch of indulgence, serve slices of cake with a dollop of whipped topping. This not only adds creaminess but also a visual appeal that invites guests to dig in. Fresh mint leaves can also be used as a garnish, adding a pop of color and a hint of freshness.
Presentation Tips for Serving at Gatherings or Special Occasions
When it comes to serving, consider using a cake stand to showcase your No-Bake Strawberry Crunch Cake. This can elevate the dessert and make it the centerpiece of your gathering. For best serving practices, use a sharp knife dipped in warm water to cut clean slices. This technique will prevent the layers from sticking to the knife, resulting in beautiful, clean cuts.
Discussion of Portion Sizes and How to Cut the Cake for Best Serving
Typically, this cake serves about 10 to 12 people, depending on portion sizes. When cutting, aim for wedges that are about 2 inches wide at the base. This size is generous enough to delight your guests without overwhelming them.
Nutritional Information and Servings
While this No-Bake Strawberry Crunch Cake is a dessert, it contains several ingredients that offer nutritional benefits. Strawberries, for instance, are low in calories and rich in vitamin C, fiber, and antioxidants.
Overview of Nutritional Benefits of Strawberries and Other Ingredients
Strawberries are known for their health benefits, including promoting heart health and aiding in digestion. The pecans in the crust provide healthy fats, protein, and essential nutrients like magnesium and vitamin E, further enhancing the nutritional profile of this dessert.
Breakdown of Serving Size and Total Servings per Recipe
This recipe yields approximately 10 to 12 servings, with each slice containing roughly 250 calories, depending on the specific brands of ingredients used. This makes it a delightful treat that can fit into a balanced diet when enjoyed in moderation.
Insight Into How This Dessert Fits Into a Balanced Diet
While it’s a sweet treat, the presence of fruit and nuts allows for a more balanced dessert option. Enjoying a slice of this cake as part of a meal or special occasion can be a delightful way to incorporate fruits into your diet.
Conclusion
The No-Bake Strawberry Crunch Cake is an effortlessly delicious dessert that combines the freshness of strawberries with a creamy, decadent filling. Its simplicity and no-bake nature make it an ideal choice for warm weather gatherings or any occasion where you want to impress your guests without spending hours in the kitchen.
I encourage you to try making this cake for yourself – it’s an experience that’s as rewarding as it is delicious. Not only will you savor each bite, but you’ll also enjoy the joy of sharing this delightful treat with family and friends. With its vibrant flavors and refreshing qualities, this dessert is sure to become a favorite during the warmer months and beyond.