Introduction
If you’re looking for a dessert that perfectly balances a rich, creamy texture with the delightful crunch of cookie layers, then the Oreo Delight Icebox Cake is the answer. This no-bake treat has captured the hearts of dessert lovers everywhere, thanks to its simplicity and indulgent flavor profile. Imagine layers of luscious cream filling nestled between crunchy Oreo cookies, creating a masterpiece that requires no baking—perfect for warm weather gatherings or any occasion where you want to impress without spending hours in the kitchen.
The popularity of no-bake desserts has soared, especially during the hotter months. When temperatures rise, the last thing anyone wants is to spend hours in a hot kitchen, turning on the oven. That’s where icebox cakes shine. They are not only a breeze to prepare but also allow you to avoid the heat while still serving up something delicious. The Oreo Delight Icebox Cake combines the beloved flavors of Oreos and cream, making it an ideal choice for parties, family gatherings, or simply as a sweet treat to enjoy at home.
This dessert’s appeal lies in its creamy, chocolatey goodness and the fact that it comes together quickly with minimal effort. With just a few simple steps, you can whip up a dessert that will leave your guests raving and asking for seconds. Whether you’re an experienced baker or a novice in the kitchen, this recipe is designed for everyone. Let’s dive into the world of icebox cakes and the specific steps needed to create this delightful Oreo creation.
Understanding Icebox Cakes
Before we delve into the specifics of creating the Oreo Delight Icebox Cake, it’s essential to understand what an icebox cake is and how it differs from traditional cakes. Icebox cakes are a type of dessert that originated in the early 20th century, taking advantage of the refrigeration technology that allowed for the cooling of foods. The term “icebox” refers to the early refrigerators that were used to cool these cakes, and the method of preparation has remained largely the same over the decades.
Unlike traditional cakes that require baking, icebox cakes are made by layering cookies or wafers with a creamy filling, which is often made from whipped cream or cream cheese. The magic happens in the refrigerator, where the layers meld together as the cookies absorb moisture from the filling, softening them and creating a cohesive dessert. This technique results in a cake-like structure that is both rich and airy, offering a completely different texture compared to baked cakes.
The appeal of no-bake recipes, especially icebox cakes, lies in their simplicity. They are perfect for home cooks who may not have extensive baking skills or those who want to create an impressive dessert without the fuss. With minimal ingredients and straightforward steps, icebox cakes like the Oreo Delight Icebox Cake can be prepared in advance, allowing you to spend more time enjoying your time with family and friends.
Key Ingredients for Oreo Delight Icebox Cake
Now that we have a solid understanding of what icebox cakes are, let’s take a closer look at the key ingredients that make the Oreo Delight Icebox Cake so irresistible. Each component plays a vital role in creating the perfect balance of flavors and textures that this dessert is known for.
Oreo Cookies: Providing Flavor and Texture
At the heart of the Oreo Delight Icebox Cake are the iconic Oreo cookies. These chocolate sandwich cookies are not only the base of the cake but also contribute to its rich, chocolatey flavor. The combination of chocolate cookies and creamy filling creates a delightful contrast that is beloved by many. The crunch of the Oreos adds texture to each bite, making the dessert more satisfying.
Cream Cheese: Contributing Creaminess and Tang
Cream cheese is another essential ingredient in this recipe. It adds a creamy and slightly tangy flavor that balances the sweetness of the dessert. Softened cream cheese is easy to blend with other ingredients, ensuring a smooth filling that holds its shape between the layers of cookies. This ingredient is key to achieving that rich, creamy consistency that makes the Oreo Delight Icebox Cake so enjoyable.
Powdered Sugar: For Sweetness and Smoothness
To sweeten the cream cheese filling, powdered sugar is used. Powdered sugar, also known as confectioners’ sugar, dissolves more quickly than granulated sugar, allowing for a smoother texture in the filling. It provides the necessary sweetness without any grittiness, giving the finished dessert that perfect melt-in-your-mouth quality.
Heavy Whipping Cream: Creating a Light and Airy Texture
Heavy whipping cream is one of the most important ingredients in this recipe. When whipped, it incorporates air, creating a light and airy texture that complements the dense layers of Oreos and cream cheese. This ingredient is key to achieving that luxurious mouthfeel that makes the Oreo Delight Icebox Cake so special. The whipped cream not only lightens the filling but also helps bind the layers together, ensuring a cohesive dessert.
Vanilla Extract: Enhancing Flavor Depth
A splash of vanilla extract enhances the overall flavor of the cake, adding warmth and depth to the creamy filling. Vanilla is a classic ingredient in many desserts, and its addition here elevates the taste profile, making the cake even more delicious.
Cocoa Powder and Optional Decorations: For Finishing Touches
To add a touch of elegance and to deepen the chocolate flavor, cocoa powder can be included in the cream filling. This ingredient enhances the richness of the dessert while ensuring that each bite is packed with chocolate goodness. Additionally, consider garnishing the cake with crushed Oreos, chocolate shavings, or a drizzle of chocolate syrup for an extra special touch. These finishing elements not only make the dessert visually appealing but also add new layers of flavor.
Step-by-Step Instructions
Now that we’ve covered the ingredients and their roles in the Oreo Delight Icebox Cake, let’s dive into the step-by-step instructions for preparing this delicious dessert. The process is straightforward, and with a little preparation, you’ll be on your way to creating a stunning icebox cake.
Preparing the Cream Filling
1. Soften the Cream Cheese: Start by taking the cream cheese out of the refrigerator and allowing it to soften at room temperature for about 30 minutes. Softening the cream cheese is crucial as it ensures that it blends smoothly with the other ingredients, resulting in a creamy filling without any lumps.
2. Whip the Heavy Cream: In a separate mixing bowl, pour in the heavy whipping cream. Using an electric mixer, whip the cream until soft peaks form. This process usually takes about 3 to 5 minutes. Be careful not to overwhip, as this can turn the cream into butter. The whipped cream should hold its shape but still be light and fluffy.
3. Combine the Ingredients: In another large mixing bowl, combine the softened cream cheese, powdered sugar, and vanilla extract. Using an electric mixer, beat these ingredients together until they are smooth and creamy. This step is essential to ensure that the sugar is fully incorporated and the mixture is free of lumps.
4. Fold in the Whipped Cream: Once the cream cheese mixture is smooth, gently fold in the whipped cream using a spatula. This folding technique helps preserve the lightness and airiness of the whipped cream, which is vital for the overall texture of the cake. Be careful not to overmix; you want to maintain that fluffy consistency.
5. Add Cocoa Powder (Optional): If you choose to include cocoa powder for an extra chocolatey kick, sift it into the cream filling mixture at this stage. Gently fold it in until fully incorporated, ensuring that the cocoa is evenly distributed throughout the cream.
With your cream filling prepared, you’re now ready to assemble your Oreo Delight Icebox Cake. The next steps involve layering the cookies and cream filling in a beautiful arrangement that will create a stunning dessert once set.
Stay tuned for the continuation, where we will guide you through the assembly process, chilling time, and any additional serving suggestions to make your Oreo Delight Icebox Cake a hit!
{{image_1}}
Whipping the Cream
Whipping the cream is a crucial step in making the Oreo Delight Icebox Cake, as it provides the light, airy texture that balances the rich flavors of the Oreos and chocolate pudding. To achieve the perfect whipped cream, start with a cold mixing bowl and cold heavy cream. The cold temperature helps the cream whip faster and increases the chances of reaching stiff peaks.
Techniques for Whipping Cream to Stiff Peaks
1. Choose the Right Cream: Use heavy whipping cream with at least 36% fat content. This ensures a rich and stable whipped cream that holds its shape well.
2. Use a Chilled Bowl and Whisk: Place your mixing bowl and whisk (or beaters) in the refrigerator for about 10-15 minutes before whipping. The colder your tools, the better the cream will whip.
3. Start Slow: Begin whisking the cream on low speed to avoid splattering, gradually increasing to medium-high speed. This allows for more control and helps incorporate air evenly.
4. Watch for Peaks: As you whip, the cream will pass through various stages—soft peaks, then stiff peaks. Stiff peaks will hold their shape when you lift the whisk out of the bowl, creating a pointed tip. Stop whipping as soon as you reach this point to prevent the cream from turning into butter.
Importance of Gently Folding to Maintain Texture
Once your cream is whipped, it’s essential to fold it gently into the other ingredients (like the chocolate pudding). Folding is a technique used to combine mixtures without deflating the air you’ve incorporated. To fold properly:
– Use a large spatula and scoop from the bottom of the bowl, bringing the whipped cream up and over the chocolate mixture.
– Rotate the bowl as you fold to ensure even incorporation.
– Be patient; this process should be done slowly to maintain the fluffy texture.
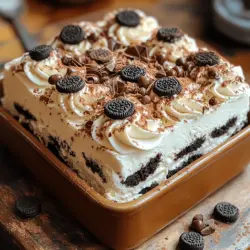
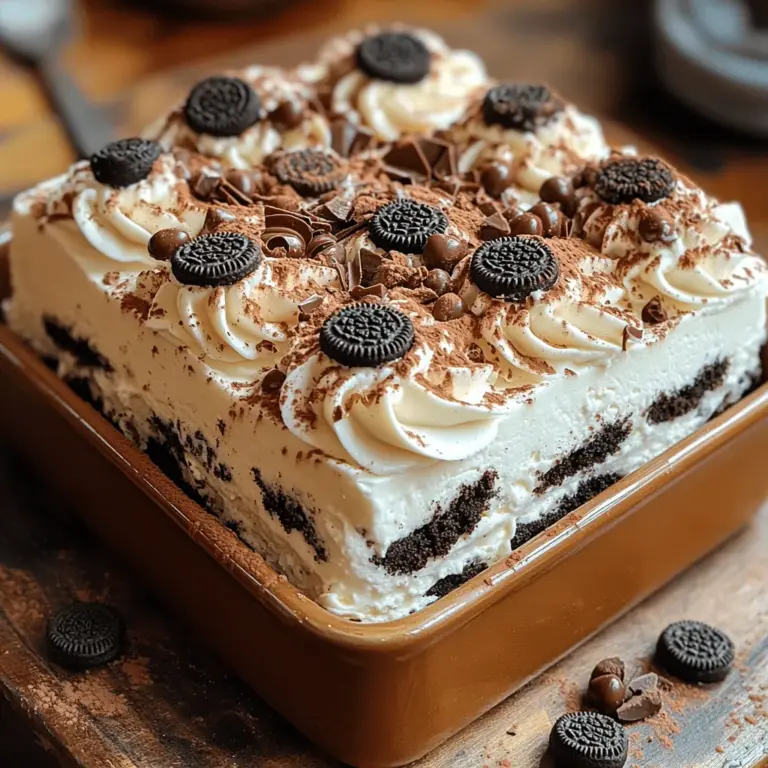
Layering the Cake
Now it’s time to assemble your Oreo Delight Icebox Cake. Layering is where the magic happens, creating a visually appealing dessert that is also bursting with flavor.
Best Practices for Dipping Oreo Cookies
To get the best flavor and texture from your Oreo layers, you want to dip each cookie quickly in milk. This soaking process softens the cookies just enough to create a tender layer without making them mushy.
1. Choose Your Milk: You can use regular milk, almond milk, or any milk substitute of your choice. For a richer flavor, consider using chocolate milk.
2. Quick Dips: Dip each Oreo in the milk for about 1-2 seconds, ensuring both sides are moistened but not soggy. The goal is to soften the cookie while still maintaining some structure.
Arranging Layers for Optimal Flavor and Texture
1. First Layer: Start with a layer of dipped Oreos in the bottom of a rectangular or square dish. Arrange them in a single layer, covering the bottom completely.
2. Adding Filling: Spread a layer of the whipped cream and pudding mixture over the cookies. Use a spatula to ensure an even layer.
3. Repeat the Process: Continue layering the dipped Oreos and whipped cream mixture until you run out of ingredients, finishing with a layer of whipped cream on top. Aim for at least three layers for a balanced flavor profile.
Explanation of Chilling Time and Its Significance in Flavor Melding
After assembling the icebox cake, cover it with plastic wrap and refrigerate for at least 4 hours, though overnight is ideal. This chilling time is crucial for allowing the flavors to meld together and for the cookies to soften significantly, resulting in a cohesive, sliceable dessert. The chilling also helps the whipped cream set, giving the cake structure and making it easier to cut into clean slices.
Serving and Presentation Ideas
Presentation can elevate your Oreo Delight Icebox Cake from delicious to stunning. Here are some creative serving suggestions.
Dusting with Cocoa Powder for a Professional Finish
Before serving, dust the top of the cake with cocoa powder using a fine mesh sieve. This adds a touch of elegance and provides a visual contrast against the white whipped cream, enhancing the overall appearance.
Creative Ways to Use Chocolate Shavings or Mini Oreos for Decoration
For an extra decorative touch, consider garnishing the top with chocolate shavings or mini Oreos. You can create chocolate shavings by using a vegetable peeler on a chocolate bar. Sprinkle them generously over the whipped cream layer for added flair. Alternatively, place mini Oreos around the edge of the cake or on top as a fun, playful element.
Suggestions for Serving Sizes and Optimal Serving Conditions
This cake serves well chilled, making it perfect for summer gatherings or any occasion. Cut the cake into squares or rectangles for easy serving. Each serving can be about 2-3 inches, depending on your crowd and their dessert appetite. Pair it with fresh berries or a drizzle of chocolate sauce for a complete dessert experience.
Storage and Shelf Life
One of the best aspects of the Oreo Delight Icebox Cake is its ability to be made ahead of time and stored for later enjoyment.
Best Practices for Storing Leftovers
1. Cover Properly: If you have any leftovers, cover the cake tightly with plastic wrap or aluminum foil to prevent it from absorbing any odors from the refrigerator.
2. Use an Airtight Container: If you prefer, transfer any remaining cake into an airtight container. This will also help preserve the flavors.
Explanation of How the Cake Holds Up Over Time
When stored in the refrigerator, the Oreo Delight Icebox Cake can last for 4-5 days. The flavors continue to blend, and while the texture softens, it remains deliciously creamy.
Tips for Maintaining Texture and Flavor After Refrigeration
– Serve Cold: Always serve the cake cold for the best texture and flavor. Allow it to sit at room temperature for a few minutes before slicing to make cutting easier, but not too long as it may lose its chill.
– Avoid Freezing: While it may be tempting to freeze leftovers, the whipped cream can separate upon thawing, compromising the cake’s texture and flavor. It’s best enjoyed fresh from the fridge.
Nutritional Information
Understanding the nutritional content of your dessert can help balance indulgence with moderation.
Breakdown of Nutritional Content Per Serving
For a standard serving of the Oreo Delight Icebox Cake (approximately 1/8 of the cake), you can expect the following nutritional breakdown:
– Calories: Approximately 350
– Fat: 20g
– Saturated Fat: 10g
– Cholesterol: 60mg
– Sodium: 200mg
– Carbohydrates: 36g
– Fiber: 1g
– Sugars: 22g
– Protein: 4g
Discussion on Indulgence Versus Moderation
While this cake is undeniably rich and indulgent, it’s essential to enjoy it in moderation. The combination of Oreos, cream, and chocolate pudding offers a delightful treat, but balancing it with healthier meals throughout the day can help satisfy sweet cravings without overindulging.
Conclusion
The Oreo Delight Icebox Cake is a simple yet delicious dessert that promises to impress at any gathering. Its no-bake nature makes it a convenient choice for those hot summer days when you want something sweet without turning on the oven. The layers of soft, creamy filling paired with the chocolatey crunch of Oreos create a dessert experience that is hard to resist.
We encourage you to try making this delightful cake and enjoy the process of layering and chilling it to perfection. Icebox cakes like this one are versatile, allowing you to experiment with different flavors and fillings to suit your taste. As you embrace the world of icebox cakes, you’ll find they hold a special place in modern dessert culture, combining nostalgia with innovation in a delightful package. Enjoy your culinary adventure!