Introduction
As the sun shines brighter and the days grow longer, there’s no better way to celebrate the joys of summer than with a refreshing dessert that embodies the season’s essence. Enter the Peaches & Cream Bliss Bars—an indulgent treat that perfectly balances the vibrant, juicy sweetness of fresh peaches with a velvety cream layer, all nestled atop a buttery, crumbly crust. This dessert is not only a feast for the eyes but also a delightful combination of flavors and textures that will leave you and your guests craving more.
Peaches are the star of this recipe, and their significance during the summer months cannot be overstated. With their luscious sweetness and fragrant aroma, peaches evoke memories of sun-soaked picnics and backyard barbecues. They are not just delicious; they also pack a nutritional punch. Rich in vitamins A and C, fiber, and antioxidants, peaches are a wholesome addition to your summer recipes. Their natural juiciness makes them an ideal fruit for desserts, adding moisture and flavor without the need for excessive added sugars.
What sets this Peaches & Cream Bliss Bars recipe apart is its simplicity. As a no-bake treat, it eliminates the hassle of oven-watching and allows you to spend more time enjoying the company of family and friends. With just a few straightforward steps, you can create a dessert that impresses both in presentation and taste. Whether you’re hosting a summer gathering, a barbecue, or simply looking for a sweet way to cool off, these bliss bars are sure to be a hit.
Understanding the Ingredients
To create the perfect Peaches & Cream Bliss Bars, it’s essential to understand the role each ingredient plays in achieving a harmonious blend of flavors and textures. Let’s break down the components that make up this delightful dessert.
The Crust
The foundation of any great dessert lies in its crust, and for our bliss bars, we’ll craft a buttery base that provides the perfect contrast to the creamy filling and fresh peaches. Here are the key ingredients that work together to create this delectable crust:
– All-Purpose Flour: The main structure of the crust, flour provides stability and a pleasant texture. It binds together with the other ingredients to form a cohesive base.
– Sugar: A touch of granulated sugar enhances the flavor of the crust, infusing it with sweetness that complements the creaminess of the filling.
– Butter: Cold, unsalted butter is crucial for achieving that melt-in-your-mouth texture. It adds richness and flavor while helping to create a crumbly consistency. When using cold butter, it’s important to cut it into the flour mixture until it resembles coarse crumbs.
– Vanilla Extract: A splash of vanilla adds depth and warmth, enhancing the overall flavor profile of the crust.
– Salt: Just a pinch of salt balances the sweetness and elevates the flavors of the crust, making it more complex and satisfying.
The Cream Layer
Next comes the luscious cream layer that takes these bliss bars to the next level. This layer is all about achieving the right balance of creaminess and sweetness. Here’s what you’ll need:
– Cream Cheese: The star of the cream layer, softened cream cheese lends a rich and tangy flavor that complements the sweetness of the peaches perfectly. It also helps to create a thick and creamy texture.
– Heavy Cream: Whipping heavy cream adds lightness and a fluffy, airy quality to the cream layer. The key is to whip it until soft peaks form, creating a cloud-like consistency that feels indulgent.
– Powdered Sugar: To sweeten the cream layer without adding grittiness, powdered sugar is the ideal choice. It dissolves easily, ensuring that the cream remains smooth and creamy without any crunchy bits.
The Peach Topping
Finally, the pièce de résistance: the peach topping. Fresh peaches not only provide vibrant color but also a fresh and juicy flavor that brightens the entire dessert. Here’s how we’ll enhance their natural taste:
– Fresh Peaches: The star of the topping, ripe, juicy peaches are essential for this recipe. Choose peaches that are firm yet slightly soft to the touch, as they will be easier to slice and will contribute the best flavor.
– Lemon Juice: A splash of fresh lemon juice adds a zesty brightness that contrasts beautifully with the sweetness of the peaches. It also helps to prevent the peaches from browning.
– Sugar: A small amount of sugar can be added to the peaches to enhance their sweetness and draw out their natural juices. This step is optional, depending on your preference and the ripeness of the peaches.
Preparation Steps for Peaches & Cream Bliss Bars
Now that we understand the importance of each ingredient, let’s dive into the preparation process for our Peaches & Cream Bliss Bars. This step-by-step guide will help you navigate through the recipe with ease.
Preheating the Oven
Before we get started on the crust, it’s time to preheat your oven to 350°F (175°C). Preheating is a crucial step in baking, as it ensures that your crust bakes evenly and achieves the desired texture. This will take about 10-15 minutes, giving you enough time to gather your ingredients and prepare for the next steps.
Making the Crust
Once your oven is preheated, it’s time to make the crust. Here’s how to achieve the perfect texture:
1. Combine Dry Ingredients: In a mixing bowl, combine the all-purpose flour, granulated sugar, and salt. Whisk together to ensure even distribution.
2. Cut in the Cold Butter: Using a pastry cutter or your fingertips, cut the cold, unsalted butter into the flour mixture. This process should create a texture similar to coarse crumbs. Be careful not to overwork the dough; you want to see small pea-sized pieces of butter throughout.
3. Add Vanilla: Stir in the vanilla extract, ensuring that it’s evenly distributed throughout the mixture.
4. Press into Pan: Pour the crust mixture into a greased 9×9-inch baking pan. Using your hands or the back of a measuring cup, press the mixture down firmly and evenly across the bottom of the pan.
5. Bake the Crust: Place the pan in the preheated oven and bake for 15-20 minutes or until the crust is lightly golden brown. Keep an eye on it to prevent over-baking, as a well-baked crust will hold together without crumbling.
Preparing the Cream Layer
While the crust is cooling, let’s move on to the creamy filling:
1. Beat the Cream Cheese: In a large mixing bowl, beat the softened cream cheese with an electric mixer until smooth and creamy, scraping down the sides of the bowl as needed.
2. Add Powdered Sugar: Gradually add the powdered sugar while continuing to beat the mixture. This will help incorporate the sugar without creating a cloud of dust.
3. Whip the Heavy Cream: In a separate bowl, whip the heavy cream until soft peaks form. Be cautious not to over-whip, as this can lead to a grainy texture.
4. Fold Together: Gently fold the whipped cream into the cream cheese mixture. Use a spatula to incorporate the cream without deflating it too much. The goal is a smooth and airy filling.
Assembling the Bars
With the crust baked and the cream layer ready, it’s time to assemble the bliss bars:
1. Layer the Cream Mixture: Pour the cream mixture over the cooled crust, spreading it evenly with a spatula.
2. Chill to Set: Before adding the peach topping, cover the pan with plastic wrap or foil and let it chill in the refrigerator for at least 2 hours. This chilling period allows the cream layer to set, ensuring that your bars will hold their shape when cut.
Making the Peach Topping
While the cream layer sets, you can prepare the peach topping:
1. Slice the Peaches: After washing and drying your fresh peaches, slice them into thin wedges or bite-sized pieces.
2. Mix with Lemon Juice and Sugar: In a medium bowl, toss the sliced peaches with lemon juice and a sprinkle of sugar (if desired). This will enhance their natural sweetness and keep them vibrant.
3. Let Sit: Allow the peaches to sit for about 10-15 minutes. This step will help release some of their juices, creating a flavorful topping for your bars.
The Chilling Process
Once the layers are assembled, it’s crucial to chill the bars for several hours, preferably overnight. Chilling allows the flavors to meld and the cream layer to firm up, ensuring that your Peaches & Cream Bliss Bars slice neatly and maintain their shape. The result is a refreshing dessert that’s easy to serve and even easier to enjoy.
By following these steps, you are well on your way to creating a delicious and visually stunning dessert that captures the essence of summer. The combination of creamy filling, buttery crust, and fresh peaches makes these bars a go-to recipe for any warm-weather occasion. Stay tuned for the next part of the recipe, where we’ll delve into serving suggestions and tips for making these bliss bars even more delightful!
{{image_1}}
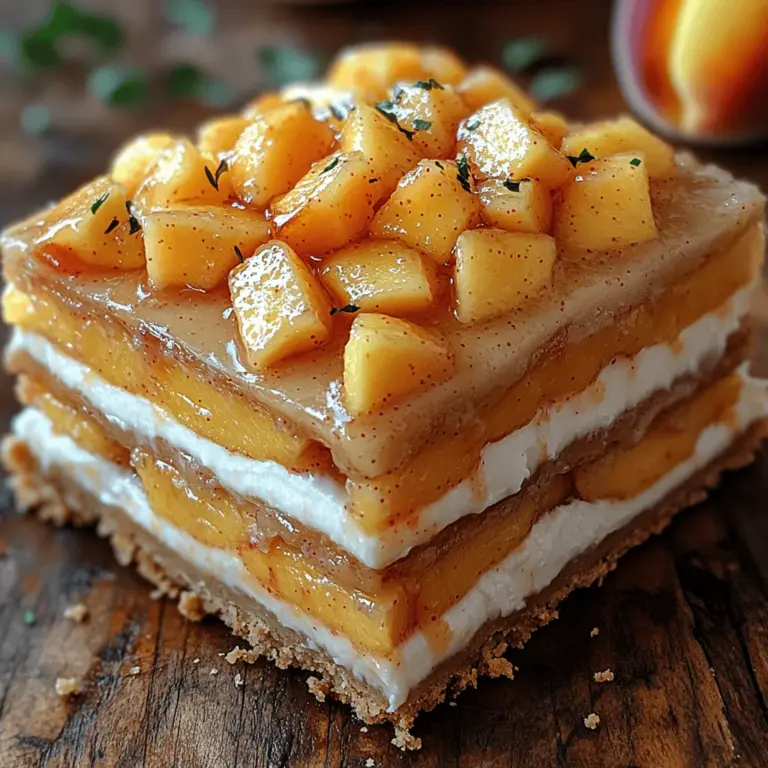
How the Flavors Develop During the Refrigeration Period
The magic of Peaches & Cream Bliss Bars lies not only in their preparation but also in the way the flavors meld together during the refrigeration period. After assembling the bars, it’s essential to allow them to chill for at least four hours, though overnight is preferred. This resting time is crucial for several reasons. First, it allows the cream layer to firm up, creating that perfect, sliceable texture. Secondly, the flavors have time to marry; the sweetness of the peaches infuses into the creamy base, enhancing the overall taste experience.
During refrigeration, the natural juices from the peaches seep into the cream layer, which makes each bite a harmonious blend of fruity freshness and rich creaminess. The crust, too, softens slightly, becoming a delightful contrast to the smooth layers above. For the best results, patience is key—this is not a dessert to rush, as the wait will reward you with a sublime taste that’s well worth it.
Recommended Chilling Times for Best Results
To achieve the best possible results for your Peaches & Cream Bliss Bars, adhere to these recommended chilling times:
– Minimum Chill: 4 hours
– Optimal Chill: 8 hours or overnight
Chilling the bars overnight is ideal because it allows the flavors to deepen and the texture to achieve the perfect balance between creamy and firm. If you’re in a hurry, however, ensure you allow a minimum of four hours to achieve at least some flavor development and texture.
Serving Suggestions
Peaches & Cream Bliss Bars are versatile and can elevate any occasion. Here are some ideal settings for serving this delightful dessert:
– Summer Picnics: These bars are perfect for outdoor gatherings, providing a refreshing treat that’s easy to transport and serve.
– Family Gatherings: Bring everyone together with a dessert that’s sure to please both kids and adults alike. The fruity and creamy layers are a hit with all ages.
– Dessert Parties: Impress guests at your next dinner party with these elegant bars. They can be sliced into small squares, making them an ideal finger food for socializing.
Pairing Suggestions
To complement the flavors of the Peaches & Cream Bliss Bars, consider these refreshing beverage pairings:
– Iced Tea: A glass of sweetened or unsweetened iced tea can provide a refreshing contrast to the rich creaminess of the bars.
– Lemonade: The tartness of lemonade pairs beautifully with the sweetness of peaches, enhancing the overall flavor experience.
– Sparkling Water: For a light and refreshing option, serve with sparkling water infused with fresh mint or a slice of lemon.
Nutritional Information
Understanding the nutritional content of your Peaches & Cream Bliss Bars can help you enjoy this treat mindfully. Here’s a breakdown of the nutritional content per serving, assuming the recipe yields 12 bars:
– Calories: 220
– Total Fat: 12g
– Saturated Fat: 7g
– Cholesterol: 30mg
– Sodium: 150mg
– Total Carbohydrates: 27g
– Dietary Fiber: 1g
– Sugars: 14g
– Protein: 3g
Health Benefits of Using Fresh Ingredients
Using fresh peaches in this recipe not only enhances flavor but also offers several health benefits. Peaches are low in calories and packed with vitamins A and C, which are essential for maintaining healthy skin and eyesight. They also contain dietary fiber, which aids digestion.
Substitutions can cater to various dietary restrictions. For a gluten-free option, consider using almond flour or a gluten-free graham cracker crust. This allows everyone to enjoy these blissful bars without compromising on taste or texture.
Troubleshooting Common Issues
Even the most experienced bakers can encounter problems when creating Peaches & Cream Bliss Bars. Here are common issues and their solutions to ensure a perfect outcome every time:
– Crust Texture: If your crust is too crumbly, it might not hold together well. Ensure you’re using enough melted butter to bind the ingredients. If it’s too wet, reduce the butter slightly and press the mixture firmly into the pan to create a solid base.
– Cream Layer Consistency: If the cream layer is too runny, it may not have chilled long enough. Ensure you allow ample refrigeration time. If you’re short on time, consider adding a bit more powdered sugar to thicken it up.
– Peach Topping Issues: If the peach topping is too watery, it can make the bars soggy. Pat the peaches dry with a paper towel before adding them on top of the cream layer. This will help maintain the integrity of the bars.
Storing and Freezing
Proper storage of your Peaches & Cream Bliss Bars is essential for maintaining their freshness. Here are the best practices for storing leftovers:
– Refrigeration: Store the bars covered in the refrigerator for up to 5 days. Use an airtight container to prevent any absorption of odors from other foods.
– Freezing: To freeze, wrap the bars tightly in plastic wrap, followed by aluminum foil, to prevent freezer burn. They can be stored in the freezer for up to 3 months. When you’re ready to enjoy them, transfer the bars to the refrigerator to thaw overnight or let them sit at room temperature for about 30 minutes before serving.
Conclusion
Making and enjoying Peaches & Cream Bliss Bars is a delightful experience that highlights the joy of cooking with seasonal ingredients. This recipe not only offers a delicious treat but also a way to savor the sweet taste of fresh peaches in a delightful dessert.
Embrace the opportunity to create homemade desserts that will impress your family and friends, and encourage them to try their hand at this simple yet sophisticated recipe. There’s a special joy that comes from sharing delicious treats with loved ones, and these bliss bars are the perfect way to spread happiness and create lasting memories. Whether it’s a casual picnic or a festive gathering, these bars are sure to be a hit every time.
