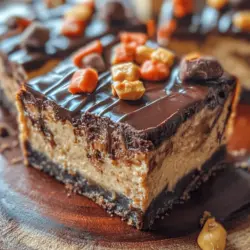
Delve into the decadent world of dessert with our Reese’s Butterfinger Cheesecake Bars. These delightful treats combine the rich, creamy flavors of cream cheese and peanut butter with the nostalgic crunch of Butterfinger bars and Reese’s Peanut Butter Cups. Whether you’re preparing for a special occasion or indulging in a personal craving, these cheesecake bars are sure to impress.
Cheesecake has long been a beloved dessert, celebrated for its velvety texture and a variety of flavors. The combination of cream cheese, sugar, and eggs creates a luxurious filling that can be enjoyed in countless ways—baked or unbaked, flavored with chocolate or fruit, and served in various forms from traditional slices to bars. What makes our Reese’s Butterfinger Cheesecake Bars particularly special is their unique blend of flavors and textures, making every bite a delightful experience.
In this article, we will explore the step-by-step process of crafting these delicious bars, discuss the ingredients involved, and provide insights into their distinctive flavors and textures. Let’s dive into the components that make these cheesecake bars a must-try dessert.
Understanding the Ingredients
The foundation of any great dessert lies in its ingredients. For our Reese’s Butterfinger Cheesecake Bars, we’ll be using a combination of straightforward yet essential components that work together to create a mouthwatering treat.
Breakdown of Graham Cracker Crumbs
Graham cracker crumbs form the perfect foundation for our crust, giving it a delightful crunch and subtle sweetness. They are a popular choice for cheesecake bases due to their ease of use and the distinctive flavor they contribute. When selecting graham crackers, opt for plain varieties to avoid overpowering the other ingredients. Crushing them into fine crumbs can be easily achieved using a food processor or placing them inside a zip-top bag and rolling over them with a rolling pin.
Importance of Unsalted Butter in Baking
Unsalted butter plays a crucial role in baking by contributing both flavor and moisture. Using unsalted butter allows you to control the level of salt in your recipe, ensuring a balanced flavor profile. It’s essential to use butter at room temperature, as this ensures a smooth blend with the graham cracker crumbs and sugar, leading to an even and cohesive crust.
Cream Cheese: The Heart of the Cheesecake Filling
Cream cheese is the star of the show in any cheesecake recipe. It provides the creamy texture that makes cheesecakes so indulgent. When preparing the filling, ensure that your cream cheese is softened to room temperature—this will help you achieve a smooth and lump-free consistency when blended. Opt for full-fat cream cheese for the best flavor and texture, and avoid low-fat alternatives, as they may not yield the same rich results.
The Role of Granulated and Brown Sugar
In our cheesecake bars, both granulated and brown sugar work together to create the ideal sweetness and texture. Granulated sugar provides a clean sweetness, while brown sugar adds a hint of molasses flavor, enhancing the overall depth of the cheesecake. The combination of the two sugars contributes to the creamy filling, helping to create a balance that won’t overwhelm your palate.
Peanut Butter: Adding Creaminess and Nutty Flavor
No cheesecake bars featuring Reese’s would be complete without the addition of peanut butter. This ingredient adds a wonderful creaminess to the filling, along with a rich, nutty flavor that complements the sweetness of the other components. Be sure to use a creamy peanut butter for optimal blending, and if you prefer a crunchier texture, feel free to experiment with chunky peanut butter.
Butterfinger Bars: Crunch and Sweetness
Butterfinger bars introduce a unique element to our cheesecake bars—crunchy bits of toffee-covered chocolate that provide both texture and sweetness. These candy bars are not only a nostalgic treat but also add a delightful contrast to the smooth cheesecake filling. When incorporating Butterfinger pieces, chop them into small chunks to ensure they distribute evenly throughout the filling.
Toppings: The Finishing Touches with Reese’s and Chocolate Ganache
To elevate our cheesecake bars, we’ll finish them with a topping of Reese’s Peanut Butter Cups and a drizzle of chocolate ganache. The Reese’s add a lovely presentation and an extra layer of peanut butter flavor, while the chocolate ganache provides a rich, glossy finish. Both toppings are simple to prepare and can be adjusted to suit your tastes—whether you prefer a light drizzle or a generous coating.
Preparing the Crust
Creating the perfect base for cheesecake bars is crucial to the overall success of the dessert. A sturdy crust not only supports the creamy filling but also adds a satisfying crunch that balances the soft texture of the cheesecake. Follow these steps to prepare the ideal crust for your Reese’s Butterfinger Cheesecake Bars.
Importance of a Sturdy Crust for Cheesecake Bars
A well-prepared crust is essential for ensuring your cheesecake bars hold their shape after baking and cooling. Unlike traditional round cheesecakes, bars require more structural integrity to withstand slicing and serving. This is achieved through the right blend of graham cracker crumbs and butter, as well as proper baking techniques.
Step-by-Step Guide to Mixing Graham Cracker Crumbs, Sugar, and Butter
1. Gather Your Ingredients: You will need about 1 ½ cups of graham cracker crumbs, ¼ cup of granulated sugar, and ½ cup of unsalted butter.
2. Combine the Ingredients: In a mixing bowl, combine the graham cracker crumbs and granulated sugar. Melt the unsalted butter in a microwave-safe bowl or on the stove, and then pour it over the crumb mixture.
3. Mix Until Combined: Using a fork or your hands, mix the ingredients until the crumbs are fully coated with butter and resemble wet sand. This moisture will help bind the crust together during baking.
Techniques for Achieving an Even Layer in the Baking Pan
1. Prepare Your Baking Pan: Line a 9×9-inch baking pan with parchment paper, allowing some overhang on the sides. This will make it easier to lift the finished bars out of the pan later.
2. Press the Mixture: Transfer the crumb mixture into the prepared pan, using the bottom of a measuring cup or your hands to press it down firmly and evenly across the bottom. Aim for a thickness of about ½ inch.
3. Create a Smooth Surface: Ensure that the crust is level and smooth, as this will contribute to the overall appearance of your cheesecake bars.
Baking Tips: Timing and Temperature for Optimal Crust Texture
1. Preheat Your Oven: Preheat your oven to 350°F (175°C) while you prepare the crust.
2. Bake the Crust: Place the pan in the preheated oven and bake for 8-10 minutes, or until the crust is golden brown and fragrant. Baking the crust helps to set it, ensuring it won’t crumble when you slice the bars.
3. Cool the Crust: Once baked, remove the pan from the oven and allow the crust to cool for about 10 minutes before adding the cheesecake filling. This cooling period is important to prevent the filling from melting into the crust.
Crafting the Cheesecake Filling
Now that the crust is prepared and cooled, it’s time to create the rich, creamy filling that will elevate our cheesecake bars. Follow these steps to mix the ideal cheesecake filling.
Preparing Cream Cheese: Ensuring the Right Texture
To start, ensure your cream cheese is at room temperature. This is crucial for achieving a smooth, creamy consistency when blending. If you forget to take it out in advance, you can microwave it for a few seconds, but be careful not to melt it.
The Process of Blending Sugars and Vanilla: Building Flavor
In a large mixing bowl, combine 1 cup of granulated sugar, ½ cup of brown sugar, and 1 teaspoon of vanilla extract. Using a hand mixer or stand mixer, blend the sugars until they are well combined and the mixture is slightly fluffy.
Incorporating Eggs: Achieving the Right Consistency
Next, add two large eggs, one at a time, mixing well after each addition. Be careful not to overmix, as excessive air can create cracks in your cheesecake during baking. The eggs provide structure and help the filling set, ensuring a smooth and creamy texture.
Gradually Adding Peanut Butter: Techniques for Smooth Integration
Once the eggs are incorporated, it’s time to add the star ingredient—peanut butter. Gradually add 1 cup of creamy peanut butter to the mixture. Using a spatula or mixer, blend until the peanut butter is fully integrated and the filling is smooth.
Folding in Butterfinger Pieces: Preserving Texture While Mixing
Finally, it’s time to fold in the chopped Butterfinger pieces. Use a spatula to gently mix the candy into the filling, ensuring that the pieces are evenly distributed without overmixing. This will preserve their crunchy texture, adding delightful bites throughout the cheesecake bars.
With the crust prepared and the cheesecake filling mixed to perfection, you’re well on your way to creating these indulgent Reese’s Butterfinger Cheesecake Bars. Stay tuned for the next steps, where we’ll guide you through baking and decorating these delicious treats for a truly show-stopping dessert.
{{image_1}}
Baking the Cheesecake Bars
Perfecting the Bake
Pouring the Filling: Techniques for Even Distribution
Once your crust has baked to a golden perfection, it’s time to pour in the cheesecake filling. To ensure an even distribution, start by gently spooning the filling into the center of the crust. From there, use a spatula to spread it towards the edges, making sure to fill the corners properly. This technique helps prevent bubbles and ensures that every bite of your cheesecake bars has a balanced creamy texture. Tap the pan lightly on the counter to release any trapped air bubbles and create a flat surface.
Baking Time and Temperature: Achieving That Perfect Set
For the Reese’s Butterfinger Cheesecake Bars, you will want to bake them at 325°F (160°C). This lower temperature allows the cheesecake to set slowly and evenly, preventing cracks. Bake for approximately 30-35 minutes. The edges should look set while the center may still have a slight jiggle. It’s important not to overbake, as the cheesecake will continue to firm up while cooling.
Knowing When It’s Done: Signs of a Properly Baked Cheesecake
Determining the doneness of your cheesecake bars can be tricky. Look for the following signs: the top should be lightly browned, the edges firm, and the center slightly wobbly but not liquid. A toothpick inserted into the center should come out mostly clean with a few crumbs clinging to it. Remember, cheesecake will continue to cook as it cools; therefore, it’s better to err on the side of caution and take it out a little early rather than risk overbaking.
Cooling the Bars: Importance of Room Temperature Before Refrigeration
Once baked, remove the cheesecake from the oven and let it cool in the pan on a wire rack. Allowing the bars to cool to room temperature is crucial as it helps prevent condensation from forming when placed in the refrigerator. This step is essential in maintaining the texture and preventing a soggy crust.
Chilling Time: Why Patience is Key for Flavor Development
After reaching room temperature, cover the pan loosely with plastic wrap and refrigerate for at least 4 hours, preferably overnight. This chilling time is critical as it allows the flavors to meld beautifully, resulting in a richer and creamier cheesecake. The longer you can wait, the better the flavor will develop, so practice patience for the best outcome.
Creating the Chocolate Ganache Topping
Finishing Touches for Enhanced Flavor
Understanding the Chocolate Ganache: Simple Yet Luxurious
Chocolate ganache is a decadent topping that adds a rich layer of flavor to your cheesecake bars. It consists of just two main ingredients: high-quality chocolate and heavy cream. The combination creates a smooth and glossy finish that elevates your dessert from simple to luxurious.
Step-by-Step Instructions for Melting Chocolate and Cream
1. Chop the Chocolate: Start by finely chopping your chocolate (about 8 ounces of semi-sweet or dark chocolate works well) and place it in a heatproof bowl.
2. Heat the Cream: In a small saucepan, heat 1 cup of heavy cream over medium heat until it just begins to simmer. Do not let it boil.
3. Combine: Pour the hot cream over the chopped chocolate. Let it sit for about 2-3 minutes to soften the chocolate.
4. Stir: Gently whisk the mixture until smooth and fully combined. If there are any lumps, you can place the bowl over a double boiler (a bowl set over a pot of simmering water) and stir until melted and silky.
Tips for Achieving a Smooth and Glossy Finish
For the best results with your ganache, use high-quality chocolate with a cocoa content you enjoy. Also, avoid introducing air into the mixture by stirring gently. If you desire an even more luxurious finish, you can add a tablespoon of butter to the ganache after it’s melted and stir until combined. This addition will enhance the shine and richness of the ganache.
Cooling the Ganache: Timing for Perfect Drizzling
Once your ganache is smooth, let it cool for about 10-15 minutes at room temperature. You want the ganache to thicken slightly but still be pourable. If it cools too much, it may become too thick to drizzle. If this happens, simply reheat it gently over a double boiler until it reaches the desired consistency.
Assembling the Bars
Bringing it All Together
Drizzling the Ganache: Techniques for an Artistic Presentation
To create an eye-catching presentation, use a spoon or a piping bag to drizzle the cooled ganache over the chilled cheesecake bars. Start from one side and move your way across, allowing the ganache to fall in a zigzag pattern. This method not only enhances the visual appeal but also ensures that every bite has a taste of that rich chocolate.
Adding Reese’s Peanut Butter Cups: Enhancing Texture and Flavor
After drizzling the ganache, it’s time to add the finishing touches with chopped Reese’s Peanut Butter Cups. Scatter them generously over the top of the ganache while it is still slightly warm, allowing them to adhere better. This addition not only adds an amazing flavor but also provides a delightful crunch that contrasts beautifully with the creamy cheesecake.
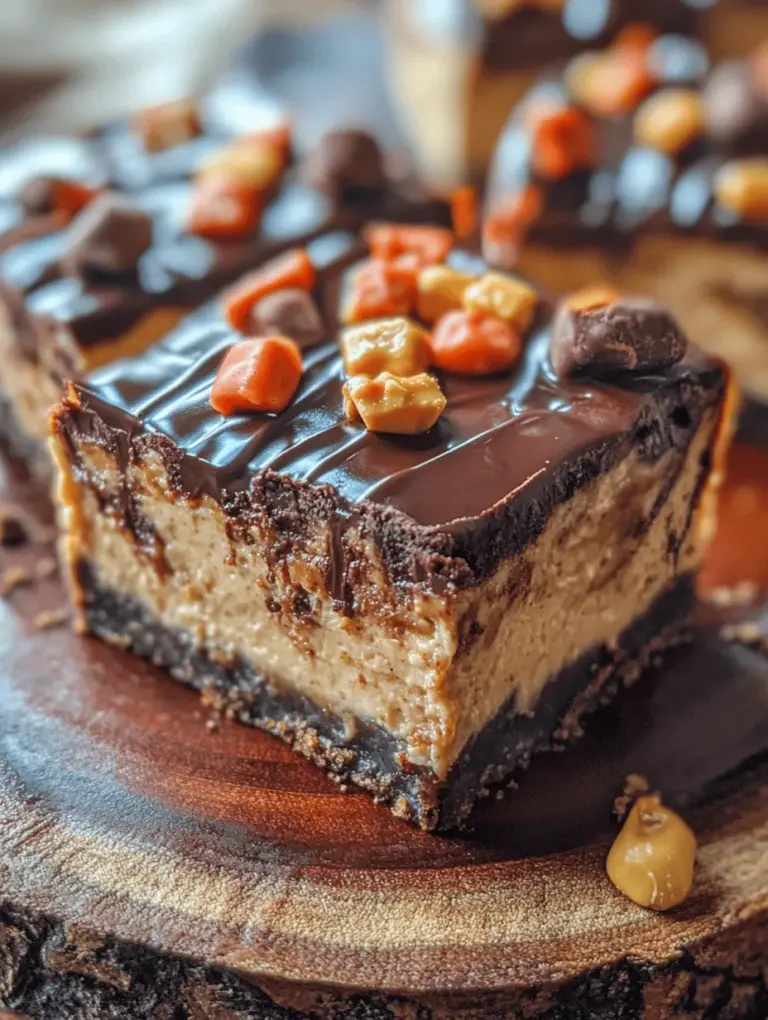
Cutting and Serving: Best Practices for Clean Slices
When it comes time to cut your cheesecake bars, use a sharp knife and dip it in hot water before slicing. Wipe the knife clean between each cut to maintain clean edges. This method ensures that each slice is perfect, showcasing the beautiful layers of crust, cheesecake, and ganache.
The Visual Appeal: Why Presentation Matters in Dessert Making
The visual appeal of your dessert is almost as important as the taste. A well-assembled dish can enhance the dining experience and make your dessert more enticing. Consider garnishing with additional crushed Butterfinger pieces or a sprinkle of sea salt for a touch of sophistication and extra flavor.
Serving Suggestions
Enjoying Your Cheesecake Bars
Ideal Occasions for Serving: Parties, Gatherings, or Casual Treats
These Reese’s Butterfinger Cheesecake Bars are perfect for a variety of occasions, whether it’s a birthday party, holiday gathering, or a simple family dessert night. Their delicious flavor profile and beautiful presentation make them a hit at potluck events or as a sweet ending to a dinner party.
Pairing Suggestions: Complementary Beverages or Sides
To complement the rich flavors of your cheesecake bars, consider pairing them with a scoop of vanilla ice cream or a dollop of whipped cream. For beverages, a glass of cold milk is a classic choice. Alternatively, a rich coffee or espresso can enhance the chocolate notes, making for a delightful pairing.
Storage Tips: How to Keep Your Bars Fresh and Delicious
To keep your cheesecake bars fresh, store them in an airtight container in the refrigerator. They can last for up to one week, although they are best enjoyed within the first few days. If you need to store them for an extended period, consider freezing them. Wrap each bar individually in plastic wrap and place them in a freezer-safe container. They can be frozen for up to three months. Thaw them in the refrigerator before serving.
Conclusion: The Joy of Homemade Reese’s Butterfinger Cheesecake Bars
In conclusion, Reese’s Butterfinger Cheesecake Bars offer a delightful blend of flavors and textures that make them a beloved dessert. With a crust that provides the perfect crunch, a creamy peanut butter filling, and the irresistible toppings of Reese’s and chocolate ganache, these bars are sure to become a favorite in any household. By following the detailed steps and understanding the ingredients, you can create a dessert that not only satisfies your sweet cravings but also impresses your friends and family. Indulge in the joy of baking and enjoy every bite of this creamy, crunchy, and utterly delicious treat.